


31
❏
5. From a leftover 1/8" x 3/8" stick, cut a piece
approximately 4-1/4" long to fit on the side of the fin, from
former F-6A to the TE of the fin. Cut the piece in half
diagonally to make two fairings.
❏
6. Sand the top surface of the fairings to a rounded shape.
❏
7. Test fit the fairings in place. The forward edge should be
flush with the top of former F-6A. When satisfied with the fit,
glue the fairings in place on both sides of the fin/stab joint.
❏
8. Apply balsa filler to any gaps around F-6A to blend the
fairings into the fin and stab.
❏
9. From leftover 1/8" balsa, make gussets to fit at the joint
between the outside dowel stringers and former F-3A.
❏
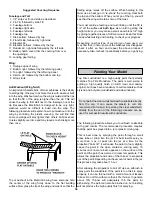
1. Turn the fuse upside-down and position the 1/8" wire
main landing gear on the 3/16" ply landing gear plate as
shown on the plan. Tack glue it in place with a drop of thin CA.
❏
2. Position the three nylon landing gear straps over the
main landing gear as shown on the plan. Mark the screw
hole locations on the landing gear plate.
❏
3. Drill a 1/16" diameter pilot hole at each location
you marked.
❏
4. Temporarily secure the main landing gear to the landing
gear plate with the landing gear straps and six #2 x 3/8" screws.
To reduce the weight of the plane, we recommend drilling
several 1/4" diameter holes through the landing gear
plate. Be careful to not drill through former F-2 or close to
the landing gear straps.
Mount the Landing Gear