


3
10
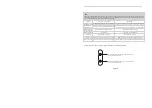
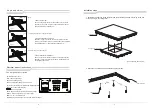
Front
View
640mm
640mm
Side
View
8
mm
安装孔
φ
10mm
310mm
680mm
6
8
0
m
m
6
2
0
m
m
Over
View
GPCD50 Series
:
Size
:
640x640xH
mm
Max
Load
:
15kg
Ceiling
Hole Opening Size
:
655x655
mm
Screw
Rod Installation Size
:
310x620
mm
Ceiling
door
Dimension
:
680x680
mm
Rated Voltage
:
220V
50Hz
Rated Power
:
120W
Suitable
for
projector
size
:
W440XD480XH240 mm
(
Including wiring and lens
)
The
noise
:≤
55dB
Control mode:
Weak current dry contact/Rs-485/Wireless RF
Required ceiling height
:
H
+
50mm
Specification
Detail
in
Parameter
List
Detail
in
Parameter
List
GPCD50
detail
specification
Modle
GPCD5004
GPCD5009
640x640x590
440x480x240
310x620
655x655
655x655
640x640x860
440x480x240
310x620
4
4
Overall size
Quantity
of
Telescopic
Arms
(
W
*
D
*
H
)
mm
Mounting Hole
(
W
*
D
)
mm
Ceiling opening
size
(
W
*
D
)
mm
Suggestion Projector
Size Range
(
W
*
D*H
)
mm
Front View
Rs485
Port
Setting:
Bit
Rate
:
2400
Data
bit
:
8
bit
Odd
check
:
N
/
A
Stopping
position
:
1
Hexadecimal control code:
UP
:
ff
,
ee
,
ee
,
ee
,
dd
STOP
:
ff
,
ee
,
ee
,
ee
,
cc
DOWN
:
ff
,
ee
,
ee
,
ee
,
ee
Some
center
console
need
setting
address
:
ff
,
ee
,
ee
,
ee
,
aa
USB Serial Port (COM3)
属性
常规
端口设置 驱动程序 详细信息
事件
2400
8
无
位 /秒
(
B
):
数据位(
D
):
奇偶校验(
P
):
A
高级
(
)
…
还原默认值(
R
)
1
无
停止位(
S
):
流控制(
F
):
取消
确定
常规 端口设置 驱动程序 详细信息 事件
Baud Rate:
2400
Data Bits:
8
Parity:
无
Stop Bits:
1
Flow Control:
Baud Rate:
位 /秒
(
B
) :
数据位(
D
) :
奇偶校验(
P
) :
停止位(
S
) :
A
高级(
)
…
还原默认值(
R
)
取消
确定
无
流控制(
F
) :
Remote
controller
Notice
:
1
.
When
connecting
via RS232
or
RS485
,
if
any
control
fails
,
please
switch
two
controlling
cable
.
2
.
Connecting
Loop Resistance Tester should
not
be
over
20
Ω
3
.
Prohibit
parallel
line
with
strong
interference
source
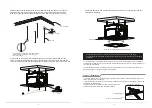
UP
STOP
DOWN
C
ontrol
button
instruction
1
.
Press
UP
to
lift
2
.
Press
STOP
to
stop
3
.
Press
DOWN
to
lower