Grandview GPCD50 Series Installation Manual Download Page 3

1

Do not take apart the lift by yourself, 
Please call a specialist to help you on 
this when Fix and regulating job in needed

1

.

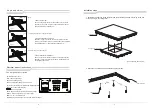
Please ensure the installation ceiling be secure enough to avoid falls, The loading capacity 

    must be 4 times of the projector lift and the projector.

2

.

Please tighten all the screws and check whether it become loose regularly, to ensure safety use.

3

.

Please do some regular maintenance.  

A

.

When dirty mark there, please gave the lift a polish with a soft duster.

B

.

When dust there, please remove with soft brush.

4

.

Kindly suggest a specialist to manage this device, then ensure security and smooth use.

5

.

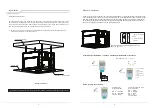
Please ensure the lift up and down via Remote control, no pulling with hands.

6

.

Always retract the lift to the ceiling after use.

7

.

Ensure the power outlet is connecting with grounding wire.

8

.

There is no need to add the lubricant to the motor. Do not regulate the motor by yourself, the motor 

    is already in the right position before delivery, Please call a specialist to help you on this when it is

    in needed.

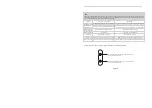
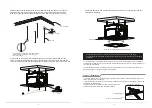
When the lift is fully lowered, the bottom 
of the lift should be no less than 1.8 meters 
away from the ground to avoid being touched 
by children。

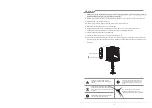
Please always retract the lift to the ceiling 
after use, prevent the dust entering.

Please install the lift in the place with 
stronger loading capacity, otherwise 
accident may happen and falling risk 
there.

Lower  limitation

Upper  limitation

Caution

Please do read the caution, incorrect 
operation will cause accident and product 
damage. 

Summary of Contents for GPCD50 Series

Page 1: ...ualong Panyu Guangzhou Guangdong P R C http www grandviewscreen com After salesservice Tel 020 84899499 Telescopic rod projector lift installation manual Model GPCD50 Series Thank you for purchasing t...

Page 2: ...t The design of this product can be used without failure for many years many problems are caused by simple things If something goes wrong check out our simple fix list If the problem continues please...

Page 3: ...down via Remote control no pulling with hands 6 Always retract the lift to the ceiling after use 7 Ensure the power outlet is connecting with grounding wire 8 There is no need to add the lubricant to...

Page 4: ...the projector lift slight move upwards and downwards 3 Test if the remote could control the product properly if not try to pair again GPAD58 Series projector lift remote control pairing notice This p...

Page 5: ...x620 4 4 Overall size Quantity of Telescopic Arms W D H mm Mounting Hole W D mm Ceiling opening size W D mm Suggestion Projector Size Range W D H mm Front View Rs485 Port Setting Bit Rate 2400 Data bi...

Page 6: ...e reaches the ceiling press the pause button to use the keyhole on the back of the remote controlWhen the needle is inserted into the blue light the hanger will enter the preset state and reach the po...

Page 7: ...ry position height HDMI 2 0 19 1 2 0 HD interface Digital display electric hanger current screw telescopic height Rotate left and right 3 1 Rotate left and right Use a hex wrench to loosen the two scr...

Page 8: ...convenience of installation the side plates of the cage can be removed first After the installation is completed the installer can stand in the cage and reinstall the side panels At this time the side...

Reviews: