background image

31

32

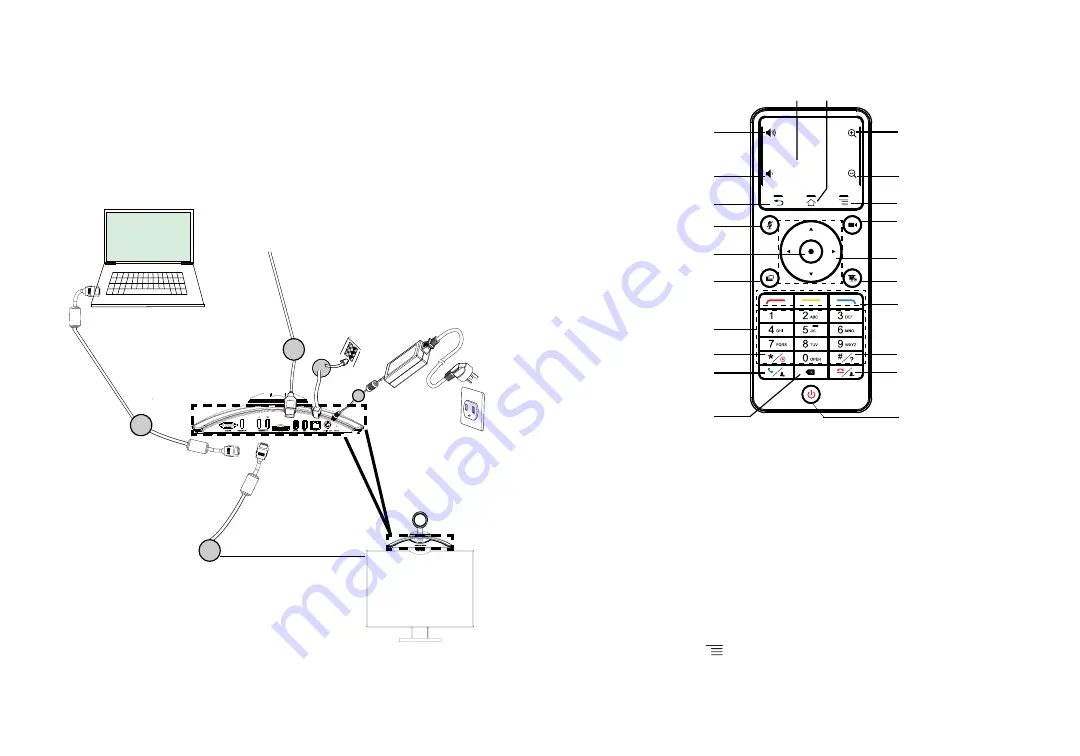
USANDO EL CONTROL REMOTO DEL GVC3202:

OK

Camara

Terminar llamada/
Remover grupo de la 
conferencia

SUBIR VOLUMEN

Enviar/Responder/
Agregar grupo a la 
conferencia

Teclas de acceso 
directo: 
Rojo/Amarillo/Azúl

Teclas de Navegación: 
Arriba/Abajo/
Izquierda/Derecha

Menú

Atrás

Inicio

Tecla de retroceso

PIP

Teclado Estándar

Presentación

Muto/DND

BAJAR VOLUMEN

Acercar

Alejar

Trackpad

# / Información

Encendido/Apagado

* / Grabar

1. Abrir la cobertura de la batería en la parte posterios del control remoto. Colocar 
    dos baterías AAA adecuadamente y poner la cobertura nuevamente.
2. Cuando use el GVC3202 por primera vez, el control remoto ya debería estar 
    emparejado y conectado via Bluetooth. Luego de que el GVC3202 arranque 
    totalmente, marque sobre el botón de OK en el control remoto para iniciar la 
    conexión. En ese momento el control remoto puede ser usado.

Ejemplo de conexión:

Conecte  el  cable  de  Ether-
net  desde  el  puerto  LAN  del 
GVC3202  a  un  puerto  Hub/
Switch/ Router (de lado LAN).

Conecte el cable HDMI 
del  puerto  de  entrada 
del GVC3202 al puerto 
HDMI  de  la  laptop. 
Esto es para presenta-
ciones.

Conecte  el  cable  HDMI  del 
puerto 1 de salida del GVC3202 
al puerto HDMI del Televisor.

Conecte  el  teléfono  altavoz  externo  al 
puerto  SPKR  del  GVC3202.  Use  el  cable 
de extensión USB dentro del paquete si es 
necesario.

6. Inserte su tarjeta SD dentro de la ranura para tarjetas SD. Los archivos
    grabados se guardarán en la tarjeta SD.
7. (Opcional) Conecte un dispositivo de presentación (Ejemplo, una laptop) Al 
    puerto de entrada HDMI o al puerto de entrada VGA para propósitos de
    presentación durante la llamada de conferencia.
8. (Opcional) Conecte un accesorio USB (Ejemplo, ratón, teclado, memoria USB, 
    entre otros) al puerto USB.

El  adaptador  de 
poder  de  12V 
DC  debe  estar 
conectado  a  un 
toma corriente.

Nota:

Para  mayor  información  acerca  de  cómo  instalar  y  conectar  el  GVC3202,  por 
favor visite la página web del producto GVC3202 desde 
http://www.grandstream.com/support

Si el control remoto ya no está emparejado con el GVC3202 (Ejemplo, se hace 
un reinicio de fábrica), siga los pasos a continuación para emparejar y conectar 
el control remoto: 
1. Conecte un ratón USB al puerto USB del GVC3202. O ingrese en la web GUI 
    del GVC3202 y clic sobre “Control Remoto” en la parte superior de la esquina 
    derechapara que aparezca el control remoto virtual.
2. Use el ratón USB o el control remoto virtual para navegar en la pantalla Menú 
    -> Opciones -> Red -> Bluetooth en el Tv.
3. Seleccione Menú        y clic sobre “Búsqueda de dispositivos”.
4. En el control remoto, presione el botón OK y el número 5 al mismo tiempo por 
    aproximadamente 4 segundos. Esto iniciará el proceso de emparejamiento en 
    el control remoto.

http://arttel.ru

http://arttel.ru/shop/videokonferentsii/grandstream-gvc3202

Summary of Contents for GVC3202

Page 1: ...http arttel ru http arttel ru shop videokonferentsii grandstream gvc3202...

Page 2: ...Content English 1 e8 12 Espa ol 23 Fran ais 34 Deutsch 45 Italiano 56 Jmkkdc 3RUWXJXrV 3ROVNL Version 1 11 2015 http arttel ru http arttel ru shop videokonferentsii grandstream gvc3202...

Page 3: ...LIABLE FOR ANY CLAIM DAMAGE OR LOSS YOU HEREBY WAIVE ANY AND ALL SUCH CLAIMS OR CAUSES OF ACTION ARISING FROM OR RELATING TO YOUR INABILITY TO USE THE GVC3202 TO CONTACT EMERGENCY SERVICES AND YOUR F...

Page 4: ...t B on Part A carefully to adjust the space until the TV can be clamped in properly INSTALLATION The GVC3202 can be installed in the following three ways Option 1 Place on desktop Option 2 Mount on TV...

Page 5: ...TO MOUNT THE GVC3202 ON WALL 6 Manage the wire harness with the Hook and loop fastener on wall mount bracket Part B 1 Locate the wall mount bracket in the package and identify Part A and Part B Detac...

Page 6: ...OME screen with IP address on the top status bar as well Lens OLED It shows IP address information after bootup For example IP 192 168 40 123 LED Indicator 11 Manage the wire harness with the Hook and...

Page 7: ...able in the package if necessary QVHUW RXU 6 FDUG LQWR WKH 6 FDUG VORW 7KH UHFRUGLQJ OHV ZLOO EH VDYHG LQ SD card 7 Optional Connect presentation device e g a laptop to the GVC3202 HDMI IN port or VGA...

Page 8: ...http arttel ru http arttel ru shop videokonferentsii grandstream gvc3202...

Page 9: ...j pxp b 2 C 4 B l j p Z b 7 d Y 55 5 4 1Z j p d j p 4LZQF 4LZQF GPS VTJOFTT PPHMF BOHPVUT b 7 2 a a 7b a L C P j p Z BV b 7 ZT ZT ZT P 8 O j AU ZT P 8 O 8 O sF YV w V s O O b iY h 1 H q6 V 7 b T 7 E...

Page 10: ...h O O 5 1 O sb 7 O b n mb O 1 7 d b b 7 V O b 7 8 O 8 OVAU b AU b l O O W AU a 5 O O Wb sY O d m Ub P O L 1 L b 1P 7 8 Ob h w O O s b w O O O O d http arttel ru http arttel ru shop videokonferentsii...

Page 11: ...L b O b V O d O b O O ph Ub O O Pm U d b P V dib b 7 O b O 1 7 d b b 7 V O b P O L 1 L b 7 L g g L 3 g b P L AU 7 g b T A U h g b i AU H h v g GQ b T g f E Tb P 64 L 2 7 41 3gb http arttel ru http ar...

Page 12: ...1 AU b h U 0 b 1 AU 0 4 5 7 4 5 b c q i 4 5 b V P L 7 L U 1 3 7 7 g 7 gb V 64 Sa o 64 i 7 64 gb U P 6 4 L 2 7 41 3gb 1 V P 7 64 L L 7 g g L 3 g 7 V P L 3 7 7 g U P L b j 7 g i h c 7 http www grandstr...

Page 13: ...http arttel ru http arttel ru shop videokonferentsii grandstream gvc3202...

Page 14: ...EMPLEADOS O AFILIADOS PUEDEN SER SUJETOS REPONSABLES POR NINGUN RECLAMO DA O O PERDIDA POR LO TANTO USTED RENUNCIA A SU DERECHO DE RECLAMO O DENUNCIA QUE PUEDA SURGIR DEBIDO A LAS LIMITACIONES EN EL...

Page 15: ...ice cuidadosamente la montura de pared de la Parte B sobre la Parte A para ajustar el espacio hasta que el TV se sujete correctamente INSTALACI N El GVC3202 puede ser instalado de las siguientes tres...

Page 16: ...LA PARED 6 Administre los cables con el sujetador de gancho en la montura de pared de la Parte B RFDOLFH OD PRQWXUD GH SDUHG HQ HO SDTXHWH H LGHQWL TXH OD 3DUWH OD 3DUWH al deslizar la Parte A hacia a...

Page 17: ...n IP en la barra superior de Estado Lente OLED Muestra la informaci n de la direcci n IP despu s de arrancar Por ejemplo IP 192 168 40 123 LED Indicator 11 Administre los cables con el sujetador de ga...

Page 18: ...USB dentro del paquete si es necesario 6 Inserte su tarjeta SD dentro de la ranura para tarjetas SD Los archivos grabados se guardar n en la tarjeta SD 7 Opcional Conecte un dispositivo de presentaci...

Page 19: ...http arttel ru http arttel ru shop videokonferentsii grandstream gvc3202...

Page 20: ...cium Broche de positionnement Vis int gr Partie A Partie B INSTALLATION Le GVC3202 peut tre install selon les trois dipostitions suivantes Option 1 Plac sur le bureau Option 2 Fixation sur TV Moniteur...

Page 21: ...de OD 79 OLVVHU OH VXSSRUW GH DWLRQ murale partie B sur la Partie A soigneusement pour ajuster l espace jusqu ce que la TV peut tre propremement serr INSTALLATION DU SUPPORT POUR FIXER LE GVC3202 SUR...

Page 22: ...t 2 Branchez la prise HDMI port 1 du GVC3202 au port HDMI de l cran principal par exemple TV en utilisant le c ble HDMI Connectez le port HDMI 2 si vous DYH G DXWUHV GLVSRVLWLIV G DI FKDJH VXSSOpPHQWD...

Page 23: ...u GVC3202 un hub switch routeur partie LAN Connecter un c ble HDMI depuis le port HDMI IN du GVC3202 au port HDMI d un ordinateur portable Ceci pour la pr sentation Connecter un c ble HDMI depuis le p...

Page 24: ...http arttel ru http arttel ru shop videokonferentsii grandstream gvc3202...

Page 25: ...ORDERUNGEN SCHADEN ODER VERLUSTE HAFTBAR GEMACHT WERDEN SIE VERZICHTEN HIERMIT AUF JEGLICHE UND ALLE SOLCHE FORDER UNGEN ODER RECHTLICHEN SCHRITTE DIE DURCH DIE UNM GLICHKEIT BER DAS GVC3202 NOTRUFE Z...

Page 26: ...TALLATION Das GVC3202 kann wie folgt installiert werden 1 Auf dem Schreibtisch 2 Direkt am Monitor Hierzu ist eine Halterung im Lieferumfang enthalten 3 Wandmontage hierzu ist eine Halterung im Liefer...

Page 27: ...utzen Sie den Kabelbinder und die Aussparung am Teil B 1 Nehmen Sie die Halterung aus dem Karton Zur Montage am Monitor m ssen die beiden Teile der Halterung getrennt werden Ziehen Sie Teil A ab Vier...

Page 28: ...en am OLED Display angezeigt werden Die eigene IP Adresse wird auch auf dem Hauptmonitor in der oberen Statuszeile angezeigt Objektiv OLED Hier wird nach dem Startvorgang die IP Adresse angezeigt z B...

Page 29: ...ereinheit mit dem SPKR Port am GVC3202 Falls not wendig benutzen Sie bitte das mitgelieferte USB Verl ngerungskabel 6 Steckt eine SD Karte im SD Karten Steckplatz kann auf dieser SD Karte eine Konfere...

Page 30: ...http arttel ru http arttel ru shop videokonferentsii grandstream gvc3202...

Page 31: ...ONE GVC3202 pu essere installato nei tre modi seguenti Opzione 1 Posizionato su una scrivania Opzione 2 Montato su TV Monitor Si richiede staffa per il montaggio a parete Opzione 3 Montaggio a parete...

Page 32: ...teriormente a quest ultima Far scorrere accuratamente la Parte B della staffa per montaggio a parete sulla Parte A per regolare lo spazio QR DO VVDJJLR DSSURSULDWR DOOD 79 INSTALLAZIONE DELLA STAFFA P...

Page 33: ...et 2 Collegare la porta HDMI 1 del GVC3202 alla porta HDMI del dispositivo di visualizzazione principale ad es TV usando il cavo HDMI Collegare la porta HDMI 2 se si hanno dispositivi di visualizzazio...

Page 34: ...llegamento Collegare il cavo Ethernet dalla porta LAN GVC3202 all hub switch router lato LAN Collegare il cavo HDMI dalla porta HDMI IN di GVC3202 alla porta HDMI del laptop Questo a scopo di presenta...

Page 35: ...http arttel ru http arttel ru shop videokonferentsii grandstream gvc3202...

Page 36: ...H BL EB KHLJM GBDB B NNBEBJH GGU EBP G G KML HL LKL GGHKLB KEMQ D DBO EB H IJ L GABC MS J EB H IHL JV B U L F K FUF HLD AU L KV HL D DBOEB H LJ H GBC BEB HKGH GBC EY BKD Y EYXSBOKY J AMEVL LHF BEB D...

Page 37: ..._jom gZ L kaZ b L b Zcl_ qZklv gZ qZklv h l_o ihj ihdZ L g_ m _l aZ Zl iehlgh 9 fh gh mklZgh blv lj_fy ke_ mxsbfb kihkh Zfb Kihkh MklZgh blv gZ klhe Kihkh Ijbdj_iblv d L Fhgblhjm Lj_ m_lky jZfdZ gZkl_...

Page 38: ...lb 9 AZdj_ibl_ ijh h Z aZklz dhc gZ qZklb jZfdb gZkl_ggh h dj_ie_gby GZc bl_ gZkl_ggh_ dj_ie_gb_ dhfie_dl_ b hij_ _ebl_kv dZdZy qZklv qZklv Z dZdZy qZklv Hl _ebl_ qZklv u bgm qZklv gZjm m u bg_l_ qZkl...

Page 39: ...jZ _gby gZij L ihdZ _l wdjZg 20 j_ bf_ h b Zgby Z lZd _ 3 Z j_k kljhd_ khklhygby k _jom H t_dlb HKB A _kv hlh jZ Z_lky bgnhjfZpby ihke_ aZ jmadb GZijbf_j IP 192 168 40 123 K _lh bh guc bg bdZlhj AZdj_...

Page 40: ...jbl_ev d ihjlm 63 5 gZ 9 Ijb g_h oh bfhklb bkihevamcl_ 86 dZ _ev ba dhfie_dlZ ihklZ db klZ vl_ 6 dZjlm kehl 6 dZjlu NZceu aZibk_c m ml khojZg_gu gZ 6 dZjlm HipbhgZevgh Ih dexqbl_ mkljhckl h ij_a_glZpb...

Page 41: ...http arttel ru http arttel ru shop videokonferentsii grandstream gvc3202...

Page 42: ...tido Parte A Parte B INSTALA O O GVC3202 pode ser instalado numa das seguintes formas Op o 1 Coloque em cima de uma mesa ou superf cie plana Op o 2 Instalar por cima da TV Monitor Suporte de montagem...

Page 43: ...e a Parte B do suporte de parede na Parte A cuidadosamente para ajustar o espa o DWp TXH D 79 SRVHU DGD FRUUHWDPHQWH INSTALA O DO SUPORTE PARA MONTAR O GVC3202 NA PAREDE 6 Ajuste a cablagem com o pren...

Page 44: ...C3202 tomada RJ 45 de um hub switch ou roteador Lado LAN atrav s do cabo Ethernet 2 Ligue a porta HDMI 1 do GVC3202 porta HDMI do visor prim rio P exemplo TV usando o cabo HDMI Ligue a porta HDMI 2 se...

Page 45: ...cabo Ethernet da porta LAN do GVC3202 no hub switch roteador lado LAN Conecte o cabo HDMI entre a porta HDMI IN do GVC3202 e a porta HDMI do laptop Isto para apresenta o Conecte o cabo HDMI a par tir...

Page 46: ...http arttel ru http arttel ru shop videokonferentsii grandstream gvc3202...

Page 47: ...K 50 5 1 675 0 1 3 1 02 2 32 1 6 8 0 5 781 2 0 32 5 1 7 0 85 1 9 50 5 1 STREAM JEJ KIEROWNICTWO PRACOWNICY ANI POD 0 27 672 5 6 21 1 02 32 1 7 2 2 32 12 7 78 8 2 526 6 8 675 7 8 7 2 1 1 1 6 0 5 6 6 7...

Page 48: ...SRUQLND GR PRQWD X FLHQQHJR Z FL Z FHOX Z UHJXORZDQLD RGVW SX WDN DE ZVSRUQLN SU OHJD RGSRZLHGQLR GR telewizora INSTALACJA 8U G HQLH 9 PR QD DLQVWDORZD QD WU QDVW SXM FH VSRVRE Opcja 1 Umieszczenie na...

Page 49: ...QLHP F WHUHFK RWZRUyZ Z FL L Z ZLHU MH 167 63251 2 0217 8 85 1 9 1 1 3RSURZDG ZL N NDEOL SR FL ZVSRUQLND GR PRQWD X FLHQQHJR SU X FLX SU OHSFRU HSyZ QDMG ZVSRUQLN GR PRQWD X FLHQQHJR Z RSDNRZDQLX L LG...

Page 50: ...HQQHJR 7U SLH XVWDODM F Z FL ZVSRUQLND GR PRQWD X FLHQQHJR SRZLQLHQ E dopasowany do otworu w dolnej F FL XU G HQLD 9 RNU ZEXGRZDQ UXE QD FL ZVSRUQLND GR PRQWD X FLHQQHJR DE DJZDUDQWRZD H XU G HQLH 9 j...

Page 51: ...OL WR NRQLHF QH X M SU HG X DF D 86 GRVWDUF zonego w opakowaniu y NDUW 6 GR JQLD GD QD NDUW 6 3OLNL QDJUD E G DSLV ZDQH QD NDUFLH SD 2SFMRQDOQLH 3RG F XU G HQLH GR Z ZLHWODQLD SUH HQWDFML QS NRPSXWHU...

Page 52: ...http arttel ru http arttel ru shop videokonferentsii grandstream gvc3202...

Reviews: