background image


19

10. Network Printer Wizard Software


The 

Network Printer Wizard

 software will allow you to use the shared printer without 

executing the USBServer. If the printer is being used by other user, you can also print 
document without waiting for the disconnection. 
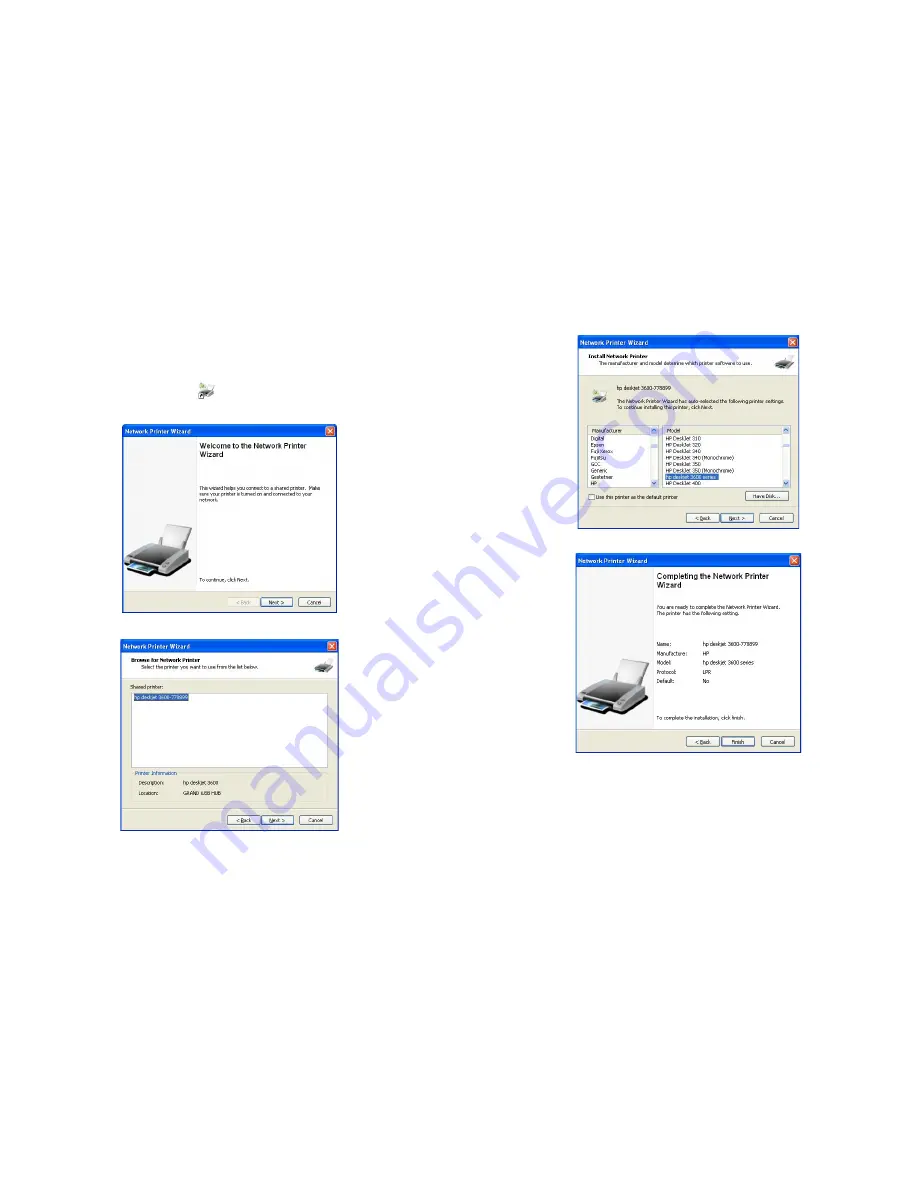
Step 1:

 Double click the shortcut icon 

  (Launch Network Printer Wizard) on the desktop 

to connect a shared printer. 


Step 2:

 Select the printer you want to share from the list of available devices.


20

Step 3:

 Select the 

Manufacturer

 and 

Model 

of the shared printer from a drop down list, or 

click “Have Disk” if your printer came with an installation disk.   


Step 4:

 Click 

Finish 

to complete the installation.


Step 5:

 You'll see the printer appear in the 

Printers and Faxes (

Start


Control Panel 

→ 

Printers and Faxes

)

, and you can use the printer to print document.


Summary of Contents for iUSB HUB PRO

Page 1: ...iew 2 5 Installation 3 6 Using the iUSB HUB Pro 4 6 1 Status of USB Servers Devices 5 6 2 Accessing a USB Device 7 7 Control Menu 8 7 1 File 8 7 2 Options 8 7 3 View 12 7 4 Help 13 7 5 Log File 13 7 6 Search 13 8 Server Configuration 14 8 1 Configuration with Web based UI 14 8 2 Configuration with Utility 17 9 Device Settings 18 10 Network Printer Wizard Software 19 11 FAQ 21 ...

Page 2: ... limits one person to connect Supports 1000Base T 100Base TX 10Baes T RJ45 Ethernet Compatible with Windows 7 Vista and XP 32 64 bit Bundled Management Software Centralized remote USB server management and status monitoring Centralized remote printer management and status monitoring Multi Languages English French German Italian Japanese Polish Portuguese Russian Spanish Simplified Chinese Traditio...

Page 3: ...ing the software the Launch USB Server and Launch Network Printer Wizard icons should appear on your desktop Or you could also find the shortcut by click on Start USB Server 2 4 6 Using the iUSB HUB Pro Double click the shortcut icon Launch USB Server on the desktop to run the program The main dialog box of USBServer is shown below It is consisted of a Control Menu File Options View and Help a tre...

Page 4: ...d and ready to be connected Occupied by Yourself Indicates the USB device is connected by yourself and you can use the USB device Occupied by Other User Indicates the device is occupied by another user and you cannot connect to the USB device at the moment You can make a device request to the user refer to section 7 2 Request Disconnect Device 6 Device on Different Segment This icon with question ...

Page 5: ...ton is changed to Disconnect Device Click on the button to release the selected USB device for other users Once you see the icon turns back the device has been disconnected and other users will then be able to connect to it 8 7 Control Menu 7 1 File Quit Click on the Quit item to quit the USBServer program 7 2 Options Language Select the OSD language English Traditional Chinese Simplified Chinese ...

Page 6: ...B device 10 Disconnect Device Disconnects the selected USB device Request Disconnect Device When you want to use a device occupied by other user you can make a device request to the user Or you could also Right click on the USB device and select Request Disconnect Device from the pop up menu The other user will receive a message as shown below The occupying user would either release the device or ...

Page 7: ...sconnected if it stays idle for 60 seconds Disconnect Printer When Idle The USB printer will be disconnected if it stays idle for 60 seconds 12 7 3 View The tree view in the main dialog has two display modes Servers and Devices mode and Devices Only mode You can toggle between these two display modes with the View option on the control menu Servers and Devices view Device Only View ...

Page 8: ...Configuration with Web based UI We allow the users to configure the settings of the USB Servers via the web based UI Select the target server on the tree view and then click on the Open Web Page button or double click on it to bring up the web based configuration UI 8 1 1 Status This is the main page of the configuration UI You can see the important information about the USB Server and the device ...

Page 9: ...ssword set Please just leave it blank 16 8 1 4 Factory Default Click on the Submit button to restore the factory default settings You do not need to provide a password for this operation if there is not password set Please just leave it blank 8 1 5 Firmware Update Please first click on the Browse button to browse to the firmware you would like to upload and then click on the Submit button to updat...

Page 10: ...button to update the firmware Change Password Simply enter the new password and enter it again for confirmation Click on Submit to change Restart Server To reboot the server Please note that this function will not work if the server you attempt to reset has a device connected to it and the device is occupied by a user 18 9 Device Settings When you right click on a device icon you see these options...

Page 11: ...nch Network Printer Wizard on the desktop to connect a shared printer Step 2 Select the printer you want to share from the list of available devices 20 Step 3 Select the Manufacturer and Model of the shared printer from a drop down list or click Have Disk if your printer came with an installation disk Step 4 Click Finish to complete the installation Step 5 You ll see the printer appear in the Prin...

Page 12: ...own the program and restart it again Q How come I don t see any servers on my USB Server GUI after installing it Ans One of the possibilities that might have caused this is that there is a Firewall software installed on your PC The Firewall will block any unauthorized attempt to access the network from your PC and since you have just installed USB Server on your PC its attempt to search the networ...

Reviews: