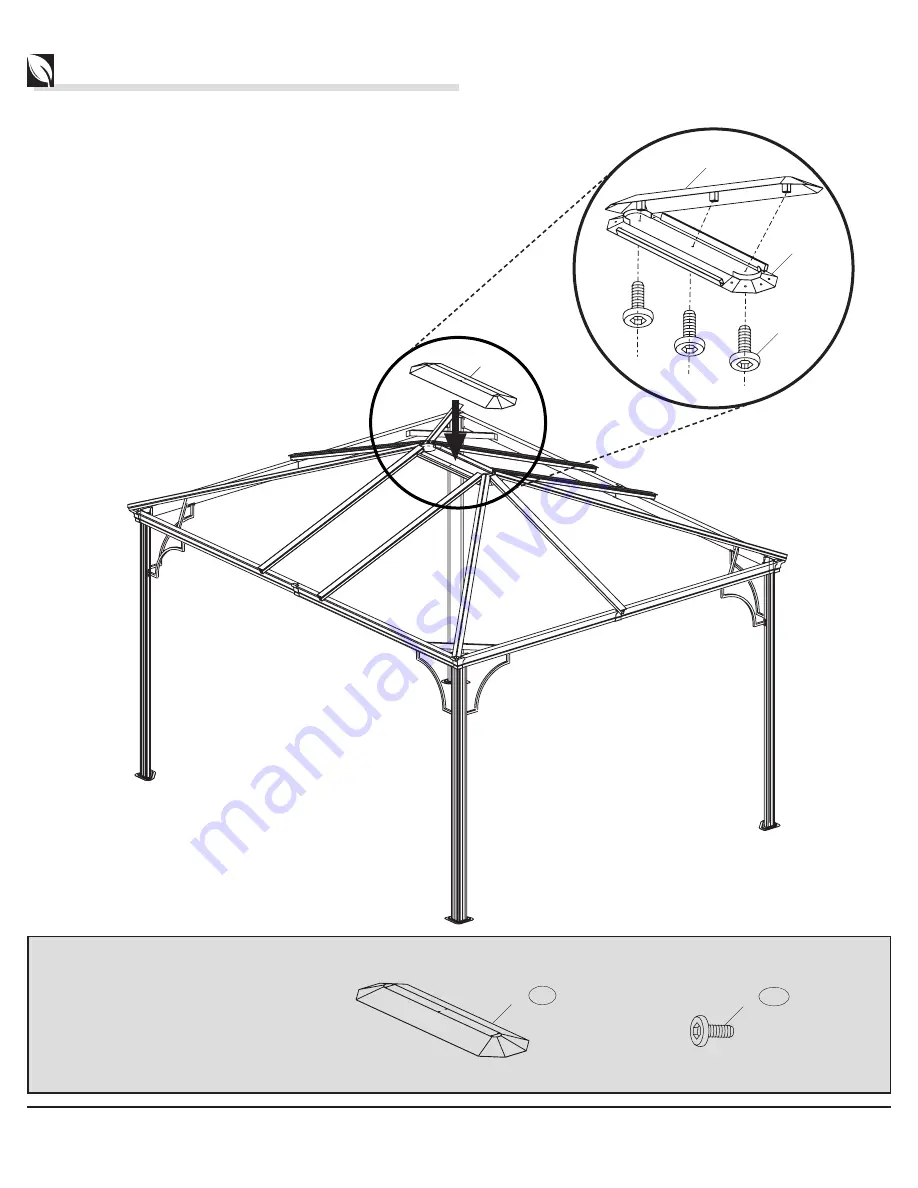
Parts required for this step:
installation
17
step 13
13.1 Install the Outside Roof Connector (S)
to the Inside Roof Connector (S1) using Screws (V).
V
X
3
S
1
S1
Page 1: ...Owner s Manual Venetia 10 x 12 Hardtop Gazebo Sojag Code 999 3136463 Product Code D71 M80921 UPC Code 772830136463 Date of purchase _____ _____ _____ ...
Page 2: ...ction including but not limited to a fence garage house overhanging branches laundry line or electrical wires 6 Always install your unit on a level platform The unit must be anchored to either wood or concrete using the appropriate screws for that flooring 7 Check all screws for tightness before and during usage 8 Your shelter has been created for all four seasons and will resist to snow accumulat...
Page 3: ...wever any accumulation of snow must be removed from the roof of the unit Mosquito netting must be removed for storage during the winter The unit must be anchored using the appropriate screws based on the flooring which it is be anchored to Roof panels must be installed with the UV protected side facing the sun Failure to follow any of the previously mentioned requirements will void the warranty Ma...
Page 4: ... assembled even if bolted to the ground At least 3 people are recommended for assembling the unit Follow all instructions to assure the strength of the shelter In order to avoid damage to the shelter and its components use appropriate tools Do not use the structure as a support a stepladder is recommended Keep instructions and parts list for further reference TOOLS REQUIRED Not included in the box...
Page 5: ... Description Qty T M6 x 20 Screws 8 U M6 x 35 Screws 16 V M6 x 16 Screws 137 W St5 x 15 Screws 72 W1 M5 x 15 Screws 12 Y Allen Key 1 NOTE Parts not shown to actual size and not to scale T U V W W1 X8 X16 X137 X72 X12 Y X1 ...
Page 6: ... Corner Cover 4 I1 Column Cap 4 J Left Roof Support Bar 4 J1 Right Roof Support Bar 4 J2 Middle Roof Support Bar 2 K Solidifying Bar 4 K1 Solidifying Bar 4 K2 Solidifying Bar 4 A X4 B X2 B1 X2 D X4 F1 X4 G X4 G1 X4 H X4 I X4 I1 X4 K X4 L X4 Ma X4 Mb X4 R X6 Q X4 Na X4 Nb X4 X X52 P X4 K1 X4 K2 X4 J X4 J1 X4 F X4 E X6 C X2 C1 X2 B2 X2 C2 X2 F2 X2 G2 X2 J2 X2 Z X2 S X1 S1 X1 Z1 X2 B3 X2 C3 X2 Part D...
Page 7: ...r this step installation 7 W1 H A A H A H W1 X4 X4 X12 IMPORTANT Always install the sun shelter on a level platform wood or concrete Step 1 1 1 Install Column A on Base H using Screws W1 Repeat for all four Column A X4 ...
Page 8: ...the Long Ogee C into the Long Ogee C1 2 3 Attach the Short Ogee B to the Short Ogee B1 using Srews V 2 4 Attach the Long Ogee C to the Long Ogee C1 using Srews V Repeat for all Ogees B X2 B1 X2 C X2 C1 X2 B1 B C1 C V V NOTE Only the two bottom screws are to be inserted for this step V B1 B C1 C X2 X2 X2 X2 V X8 ...
Page 9: ...k C3 Repeat this step twice Step 4 4 1 Install Long Track C2 into Long Ogee C using Screws V 4 2 Install Long Track C3 into Long Ogee C1 using Screws V 4 3 Install Short Track B2 into Short Ogee B using Screws V 4 4 Install Short Track B3 into Short Ogee B1 using Screws V Repeat this step twice X B2 X6 B3 C2 X7 C3 X7 X X6 X X C C1 V V C3 C2 B B1 B3 B2 V B2 X2 V X40 B3 X2 C2 X2 C3 X2 X X52 X2 X2 X2...
Page 10: ...ing Screws V from the inside of each column A as illustrated 5 2 Install the Ogees B B1 between 2 Columns A Use Screws T on the outside of the ogee and Screws U on the inside of the ogee Finish the installation of the short ogees B and B1 using Screws V from the inside of each column A as illustrated Repeat this step twice T X8 U X16 CAUTION 3 people are required for this step C1 C A A T T C C1 B1...
Page 11: ...ep 6 6 1 Install the Joint Cover Plates L using Screws W on the joint between the ogees B B1 and C C1 6 2 Install the Corner Cover I using Screws W on each corner of the structure Repeat this step 4 times I W X4 X32 L X4 L W W W I W B1 B C1 C X4 X4 ...
Page 12: ...ar K2 between ogees and fix in place using Screws V in order to form a triangle 7 2 Install Solidifying Bars K K1 inside each structure bar and join the other end to the column using Screws V Repeat this step for each four corner K1 K1 K K K2 V V K2 K2 K1 X4 X4 V X48 K X4 X4 X4 ...
Page 13: ...ation 13 Step 8 8 1 Fix the Roof Side Structure G G1 G2 on the Ogees C C1 using Screws W 8 2 Fix the Roof Side Structure G G1 on the Ogees B B1 using Screws W Repeat this step twice X2 G1 W G1 G G1 G B1 B G2 G C1 C G1 X4 G2 X2 G X4 W X40 ...
Page 14: ...n Cap I1 on top of Column A Repeat this step 4 times Step 10 10 1 Install Corner Roof Bars D to the Inside Roof Connector S1 using Screws V Repeat this step 4 times A I1 X4 D D D D V V D S1 S1 D I1 X4 S1 X1 D V X4 X8 X4 NOTE Do not screw the column cap I1 before step 11 ...
Page 15: ...Parts required for this step installation 15 Step 11 11 1 Place roof structure on top of ogees 11 2 Screw Corner Roof Bar to the column using Screw V Repeat this step 4 times V X4 V D X4 ...
Page 16: ...p installation 16 Step 12 12 1 Install Roof Bars E to the Inside Roof Connector S1 using Screws V 12 2 Screw Roof Bars E to the Ogees B B1 C C1 using Screws V Repeat this step 6 times V V E S1 E E E E E E E V S1 X6 X6 E V X12 X6 ...
Page 17: ...Parts required for this step installation 17 Step 13 13 1 Install the Outside Roof Connector S to the Inside Roof Connector S1 using Screws V V X3 S X1 V S S S1 ...
Page 18: ...t Middle Roof Panels Z not be completely pushed to the back of the tracks Repeat this step twice CAUTION One side of the roof panels is UV protected Make sure to put the UV protected side facing the sun It is a very important procedure if not followed as described your roof will not be covered by the warranty NOTE The roof panels are covered with a plastic film identifying which side has a UV prot...
Page 19: ...1 J2 according to picture Make sure they are completely inserted in the tracks 15 2 Align Middle Roof Support Bar J2 with Roof Support Bar J J1 J1 J2 J X4 X4 X2 J1 J J J2 J1 J J1 J2 D E E E D D E CAUTION Ensure that the roof panels are completly inserted into the roof support bars J J1 and J2 ...
Page 20: ... Mb Z1 THIS SIDE UP THIS SIDE UP CAUTION One side of the roof panels is UV protected Make sure to put the UV protected side facing the sun It is a very important procedure if not followed as described your roof will not be covered by the warranty NOTE The roof panels are covered with a plastic film identifying which side has a UV protector Once the plastic film is removed it is impossible to know ...
Page 21: ... the other Place Finishing End R over the aligned holes and secure with Screw V 17 3 Repeat this step with Finishing Roof Side Structure F1 by securing it to Middle Roof Side Structure F2 with Finishing End R and Screw V 17 4 In order to transition from the 12 foot side of the unit to the 10 foot side align the remaining pre drilled hole of Finishing Roof Side Structure F1 with that of a Finishing...
Page 22: ...to the last corner where the installation of the Finishing Roof Side Structures began 17 7 Undo screw V and align the pre drilled holes of the first and last side structure which were installed Secure both bars in the corner with a Corner Finishing End Q by inserting a Screw V R F1 F R V R V Q NOTE The 10 foot sides of the unit do not require having Finishing Roof Side Structure F2 installed on th...
Page 23: ...p border of the netting Repeat for all four mosquito panels NOTE The netting should be installed starting in the middle of the 12 foot side of the unit wrap around the inside of the post and finish the installation in the middle of the 10 foot side of the unit The zippers to close the netting will therefore meet in the center of the each side of the sun shelter P X4 P P X P X4 X4 ...
Page 24: ...mments about product Email piece sojag ca or Call toll free 1 866 901 1649 Made in CHINA Distributed by Sears Roebuck and Co Hoffman Estates IL 60179 See our extensive assortment of outdoor living products on line at www sears com and www kmart com Printed in China ...