background image

Accessories

French

185–956

Spanish

185–961

German

186–041

Greek

186–045

Korean

186–049

English

185–953

Apply other

language here

DANGER LABELS
The English language DANGER label shown on
page 1 is also on your sprayer. If you have paint-
ers who do not read English, order one of the fol-
lowing labels to apply to your sprayer. The draw-
ing below shows the best placement of these la-
bels for good visibility.

Order the labels directly from Graco, free of
charge.

Toll Free: 

1–800–367–4023

MOTOR BRUSH KIT

220–853

DISPLACEMENT PUMP PACKING KIT
220–877
See contents on page 24.

SUCTION TUBE KIT

208–920

5 gallon (19 liter) size
Includes:

Ref
No.

Part No.

Description

Qty

1

101–818

CLAMP, hose

2

2

160–327

UNION, 90

 swIvel; 3/4 npt(m x f)

1

3

170–705

ADAPTER, intake

1

4

170–706

HOSE, 1” ID x 48”; nylon

1

5

170–957

TUBE, suction

1

6

181–072

STRAINER

1

5

1

3

2

6

4

SUCTION TUBE KIT

208–259

55 gallon (200 liter) size
Includes:

Ref
No.

Part No.

Description

Qty

1

156–589

UNION, 90

;3/4 npt(f) x 3/4 npt(f) sw

1

2

214–961

HOSE, cpld 3/4 npt(mbe); 3/4” ID; nylon;
6 ft (1.8 m); spring guard one end

1

3

156–591

ELBOW, 90

; 3/4 npt x 1–1/2 – 24 ns

1

4

156–593

PACKING, o-ring, nitrile

1

5

100–220

THUMBSCREW, 5/16–18 X 1”

6

176–684

ADAPTER, bung

1

7

156–592

TUBE, riser

1

8

159–100

RETAINER, screen

1

9

161–377

SCREEN, filter

1

10

159–101

NUT, screen retainer

1

5

6

7

8

9

10

2

4

3

1

Summary of Contents for ULTRA PLUS+ 1500

Page 1: ...rmation READ AND KEEP FOR REFERENCE 120 VAC 18A ULTRA Plus 1500 Airless Paint Sprayer 3000 psi 21 0 MPa 210 bar Maximum Working Pressure Part No 223 773 Series A Basic Sprayer on upright cart CSA certified Patents Pending GRACO INC P O BOX 1441 MINNEAPOLIS MN 55440 1441 http www graco com COPYRIGHT 1994 GRACO INC Graco Inc is registered to I S EN ISO 9001 ...

Page 2: ...l use only Read all instruction manuals tags and labels before operating the equipment Use the equipment only for its intended purpose If you are not sure call Graco Technical Assis tance at 1 800 543 0339 Do not alter or modify this equipment Check equipment daily Repair or replace worn or damaged parts immediately Do not exceed the maximum working pressure of the lowest rated system component Re...

Page 3: ...ry Get immediate medical attention Do not point the gun at anyone or at any part of the body Do not put your hand or fingers over the spray tip Do not stop or deflect leaks with your hand body glove or rag Do not blow back fluid this is not an air spray system Always have the tip guard and the trigger guard on the gun when spraying Check the gun diffuser operation weekly Refer to the gun manual Be...

Page 4: ...ent from starting unexpectedly Liquids can be injected into the body by high pressure airless spray or leaks especially hose leaks Keep body clear of the nozzle Never stop leaks with any part of the body Drain all pressure before removing parts Avoid accidental trig gering of gun by always setting safety latch when not spraying Never spray without a tip guard In case of accidental skin injection s...

Page 5: ...se 1 4 in ID grounded nylon hose with spring guards on both ends K RAC IV Tip Guard Reverse A Clean RAC tip guard reduces the risk of fluid injection injury L Contractor Gun High pressure spray gun with gun safety latch M RAC IV Switch Tip RAC switch tip atomizes fluid and removes clogs from spray tip without removing tip from spray gun N 3 ft 0 9 m Hose 3 16 in ID grounded nylon hose used between...

Page 6: ...e gun movement install a 3 16 in ID 3 ft whip hose be tween the main hose and the gun 3 Fill the packing nut wet cup 216 1 3 full with Graco Throat Seal Liquid TSL supplied FIRE AND EXPLOSION HAZARD Proper electrical grounding is essential to reduce the risk of fire or explosion which can result in serious injury and property damage Also read FIRE OR EXPLOSION HAZARD on page 4 WARNING 4 Check the ...

Page 7: ... 0137 1 2 Gun safety latch shown disengaged CAUTION Do not run the sprayer dry for more than 30 sec onds to avoid damaging the pump packings 7 To prime the pump a Open the drain valve b Turn the ON OFF C switch to ON c Slowly increase the pressure setting until the sprayer starts d When fluid is flowing from the valve turn down the pressure and close the valve e Hold a metal part of the gun firmly...

Page 8: ...he gun into a waste container Engage the gun safety latch again Fig 5 1 2 Switch tip shown in spraying position Gun safety latch shown engaged 0137 1 2 3 Return the switch tip to the original position disen gage the gun safety latch and resume spraying 4 If the tip is still clogged engage the gun safety latch shut off and unplug the sprayer and open the pressure drain valve to relieve pressure Cle...

Page 9: ...nual 307 273 Install the bowl and support Clean the screen separately and install after flushing See Fig 7 3 Close the pressure drain valve 4 Pour one half gallon of compatible solvent into a grounded metal pail Put the suction tube in the pail 5 Remove the spray tip from the gun if it is installed 6 Turn the pressure adjusting knob all the way coun terclockwise to lower the pressure setting 7 Ope...

Page 10: ...uit Shutdown other electrical appliances on circuit Check position of 15 20 Lo High amp switch Put switch in 15 amp LO position Sprayer circuit breaker opens Check for locked motor rotor Unplug cord and try to turn fan blades with a screwdriver Repair gear train or pump if damaged Thaw the sprayer if frozen See NOTE 1 Replace the pressure control if damaged Check for shorted motor Use ohmmeter to ...

Page 11: ...uld clog the pump Check for leaking around throat packing nut which may indicated worn or damaged packings Replace packings See page 13 Also check piston valve seat for hardened paint or nicks and replace if necessary Tighten the packing nut wetcup Motor runs but pump does not stroke Check displacement pump connecting rod pin 20 See page 17 Replace pin if missing Be sure retainer spring 35 is full...

Page 12: ... G away leaving the motor lead in place Remove the brush C and spring B See Fig 10 4 Inspect the commutator for excessive pitting burn ing or gouging A black color on the commutator is normal Have the commutator resurfaced by a qualified motor repair shop if the brushes seem to wear too fast 5 Install the new brush C so its lead is in the long slot K of the holder H Slide the terminal E under the ...

Page 13: ...ump 220 872 2 1 4 adjustable open end wrench Plastic mallet Small screwdriver Throat Seal Liquid Thread Sealant NOTE Soak leather packings in oil before installing Cleaning and Inspecting Parts Clean and inspect the parts Pay particular attention to the ball seat in the intake valve which should have no nicks or wear and to the inside of the sleeve and the outside of the piston rod which should no...

Page 14: ...202 ball 204 and pin 221 See Fig 17 4 Tap the piston rod 224 out of the cylinder See Fig 18 5 Screw the sleeve removal tool s large nut A into the top of the cylinder Screw down the rod to push the sleeve out See Fig 19 Remove the tool Clean and inspect the parts 6 Clamp the piston rod 224 in a vise Loosen the retaining nut 211 Unscrew the piston valve 222 See Fig 20 7 Disassemble the piston and d...

Page 15: ...tite to the threads Place the ball 225 on the piston valve See Fig 25 4 While maintaining the alignment thread the piston valve assembly into the piston rod just until the piston valve nut contacts the rod See Fig 26 5 Place the flats of the rod in a vise Carefully tighten the piston valve nut 211 against the piston rod to 19 ft lb 27 N m Use two wrenches to maintain the alignment See Fig 27 6 Pla...

Page 16: ... assembly into the top of the sleeve See Fig 32 11 Slide the sleeve piston rod assembly into the bottom of the cylinder See Fig 33 12 Grease the intake valve o ring with non silicon grease Screw the pump cylinder into the intake valve Torque to 70 ft lb 95 N m See Fig 34 13 Tighten the packing nut 216 hand tight Screw the cylinder locknut A down to the bottom of the external cylinder threads See F...

Page 17: ...ING PARTS HAZARD If the pin works loose it or other parts could break off due to the force of the pumping action These parts could be projected through the air and result in serious bodi ly injury or property damage including damage to the pump connecting rod or bearing housing 4 Tighten the locknut 38 to 70 ft lb 97 N m See Fig 39 CAUTION If the locknut 38 loosens during operation the threads of ...

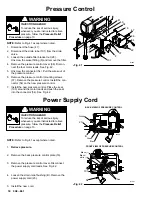
Page 18: ...tall the con nector 54 on the new pressure control 7 Install the new pressure control Place the seal 103 around the motor leads and push the seal into the connector 54 See Fig 42 Fig 41 8 22 16 84 28 13 40 41 37 54 47 28 101 36 01894 Power Supply Cord WARNING INJECTION HAZARD To reduce the risk of serious injury whenever you are instructed to relieve pressure follow the Pressure Relief Procedure o...

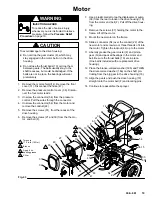
Page 19: ...0 from the the mo tor end bell F 7 Use a plastic mallet to tap the displacement pump 39 from the rear to loosen the drive housing 18 from the motor end bell F Pull off the drive hous ing 8 Remove the screws 37 holding the motor to the frame Lift off the motor 9 Mount the new motor on the frame 10 Slide a connector 54 over the conduit 22 of the new motor and screw two or three threads of it into th...

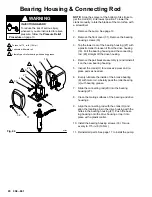
Page 20: ...mallet to loosen it from the drive housing 18 Pull the bearing housing and the connecting rod 29 straight off the drive housing 4 Remove the pail bracket assembly L and reinstall it on the new bearing housing 5 Inspect the crank H for excessive wear and re place parts as needed 6 Evenly lubricate the inside of the bronze bearing K with motor oil Liberally pack the roller bearing J with bearing gre...

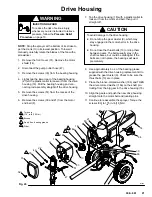
Page 21: ...o loosen it from the motor end bell then pull it straight off To avoid damage to the drive housing Do not drop the gear cluster 9 which may stay engaged in the motor bell or in the drive housing Do not lose the thrust balls 10 or drop them between gears The balls usually stay in the shaft recesses but could be dislodged If the balls are not in place the bearings will wear prematurely CAUTION 8 Use...

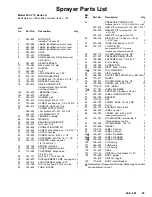
Page 22: ...2 35 20 19 26 28 13 28 46 12 34 85 84 16 92 43 87 15 37 37 57 8 48 50 46 Ref 101 6 14 82 64 91 81 64 54 22 30 63 40 41 41 40 63 51 69 27 32 4 31 33 49 29 18 10 18b 9 18a 10 1 63 21 37 97 64 98 3 2 99 95 88 71 77 Sprayer Parts Drawing 23 107 108 109 ...

Page 23: ...5 16 7 41 100 188 NUT heavy hex 5 16 18 unc 2a 7 42 183 423 TUBE INTAKE 1 Ref No Part No Description Qty 43 PRESSURE CONTROL KIT 1 includes items 13 16 23 2 of 28 34 4 of 84 223 803 NEW KIT for Models 231 351 231 352 1 223 804 REBUILT KIT for Models 231 351 231 352 1 224 018 NEW KIT for Sprayer 223 773 1 46 162 453 NIPPLE hex 1 4 npsm x 1 4 npt 1 3 16 long 2 47 220 849 HOSE 3 8 npsm f x 14 1 2 1 4...

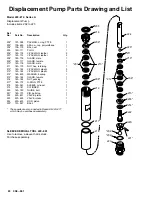
Page 24: ...3 182 V PACKING plastic 3 213 183 183 V PACKING plastic 3 214 183 653 WASHER backup 1 215 183 185 GLAND female 1 216 183 186 NUT packing 1 217 183 172 O RING PTFE 1 218 183 361 SLEEVE cylinder 1 219 183 181 CYLINDER 1 220 183 180 GUIDE ball 1 221 183 173 PIN ball stop 1 222 220 631 VALVE piston 1 223 220 629 VALVE intake 1 224 220 630 ROD piston 1 225 101 947 BALL 1 These parts are also included i...

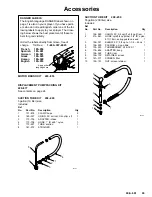
Page 25: ... page 24 SUCTION TUBE KIT 208 920 5 gallon 19 liter size Includes Ref No Part No Description Qty 1 101 818 CLAMP hose 2 2 160 327 UNION 90 swIvel 3 4 npt m x f 1 3 170 705 ADAPTER intake 1 4 170 706 HOSE 1 ID x 48 nylon 1 5 170 957 TUBE suction 1 6 181 072 STRAINER 1 5 1 3 2 6 4 SUCTION TUBE KIT 208 259 55 gallon 200 liter size Includes Ref No Part No Description Qty 1 156 589 UNION 90 3 4 npt f x...

Page 26: ... Notes ...

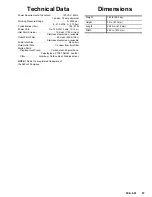
Page 27: ...steel screen reusable Outlet Paint Filter 60 mesh 250 micron Stainless steel screen reusable Pump Inlet Size 3 4 npt m Fluid Outlet Size 1 4 npsm from fluid filter Wetted Parts Displacement Pump Carbon steel Polyurethane Polyethylene PTFE Delrin Leather Filter Aluminum Carbon steel Stainless steel NOTE Delrin is a registered trademark of the DuPont Company Dimensions Weight 122 lb 55 5 kg Height 3...

Page 28: ...cluding but not limited to incidental or consequential damages for lost profits lost sales injury to person or property or any other incidental or consequential loss shall be available Any action for breach of warranty must be brought within two 2 years of the date of sale Graco makes no warranty and disclaims all implied warranties of merchantability and fitness for a particular purpose in connec...

Reviews: