


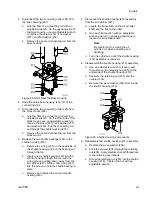


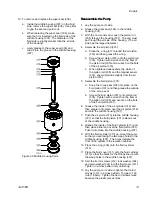


7.
Screw the piston cap (216) onto the housing
(201). Push forward to overcome the force of the
spring. Tighten until the piston cap (216) bottoms
out.
Note
Be careful not to cross threads while
assembling.
Service
Service
Service and
and
and Reassemble
Reassemble
Reassemble the
the
the Top
Top
Top Housing
Housing
Housing
of
of
of the
the
the Isolation
Isolation
Isolation Valve
Valve
Valve
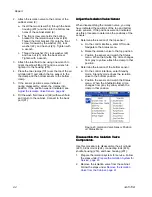
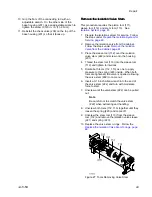
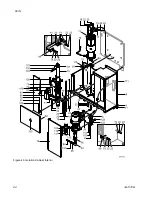
Use this procedure to replace the seals in the
top piston housing. This procedure also covers
reassembling the top piston housing.
1.
Disassemble the bottom housing of
the isolation valve as described in
Service the Bottom Piston Housing, page 67
.
Remove the piston and spring.
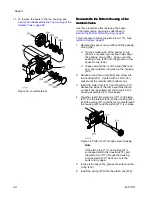
2.
Unscrew and remove the top housing of the
piston cap (210). The housing includes a U-cup
(203) and an o-ring (208).
3.
Replace the o-ring (208) and U-cup (203):
a.
Replace the o-ring (208) into the groove next
to the threading.
b.
Replace the U-cup (203) where it sinks into
place. The U-cup faces outwards in the cap.
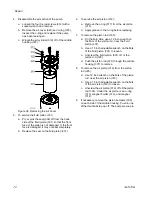
4.
Remove the spacer U-cup (206) and the packing
U-cup (204).
5.
Replace the spacer U-cup (206) and the packing
U-cup (204):
a.
On the smaller side of the spacer U-cup
(206) is a recessed groove that helps align
the packing U-cup (204). Snap or set the
packing U-cup (204) into the groove on the
spacer U-cup (206).
b.
Grease around the lip of the seal (204) and
pop it, seal side first, into the housing (201).
6.
In the cap (210), apply grease to the o-ring (208)
and U-cup (204).
7.
Screw the cap (210) into the housing and tighten
by hand.
8.
To complete reassembly, see
Bottom Housing of the Isolation Valve, page 68
.
3A7370B
69


