background image

WARNINGS

HIGH PRESSURE SPRAY CAN CAUSE SERIOUS INJURY.

FOR PROFESSIONAL USE ONLY. OBSERVE ALL WARNINGS.

Read and understand all instruction manuals before operating the equipment.

FLUID INJECTION HAZARD

General Safety

This equipment generates very high fluid pressure. Spray from

the gun, leaks or ruptured components can inject fluid through

your skin and into your body, and cause extremely serious bodily

injury, including the need for amputation. Also, fluid injected or

splashed into the eyes or on the skin can cause serious damage.
NEVER point the spray gun at any one or at any part of the body.

NEVER put your hand or fingers over the spray tip. NEVER try

to “blow back” paint; this is NOT an air spray system.
ALWAYS have the tip guard in place on the spray gun  when

spraying.
ALWAYS follow the 

PRESSURE RELIEF PROCEDURE,  below,

before cleaning or removing the spray tip or servicing any sys-

tem equipment.
NEVER try to stop or deflect leaks with your hand or body.
Be sure equipment safety devices are operating properly before

each use.

Medical Alert––Airless Spray Wounds

If any fluid appears to penetrate your skin, get 

EMERGENCY

MEDICAL CARE AT ONCE. DO NOT TREA T AS A SIMPLE

CUT. Tell the doctor exactly what fluid was injected.

Note to Physician

Injection in the skin is a traumatic injury. It

is important to treat the injury surgically as soon as possible.

Do not delay treatment to research toxicity . Toxicity is a

concern with some exotic coatings injected directly into the

blood stream. Consultation with a plastic surgeon or reconstru-

ctive hand surgeon may be advisable.

Spray Gun Safety Devices

Be sure all gun safety devices are operating properly before

each use. Do not remove or modify any part of the gun; this can

cause a malfunction and result in serious bodily injury.

Safety Latch

Whenever you stop spraying, even for a moment, always set the

gun safety latch in the closed or “safe” position, making the gun

inoperative. Failure to set the safety latch can result in accidental

triggering of the gun.

Diffuser

The gun diffuser breaks up spray and reduces the risk of fluid in-

jection when the tip is not installed. Check dif fuser operation

regularly. Follow the 

PRESSURE RELIEF PROCEDURE , be-

low, then remove the spray tip. Aim the gun into a metal pail, hold-

ing the gun firmly to the pail. Using the lowest possible pressure,

trigger the gun. If the fluid emitted 

is not diffused into an irregular

stream, replace the diffuser immediately.

Tip Guard

ALWAYS have the tip guard in place on the spray gun while

spraying. The tip guard alerts you  to the fluid injection hazard

and helps reduce, but does not prevent, the risk of accidentally

placing your fingers or any part of your body close to the spray

tip.

Trigger Guard

Always have the trigger guard in place on the gun when spraying

to reduce the risk of accidentally triggering the gun if it is dropped

or bumped.

Spray Tip Safety

Use extreme caution when cleaning or changing spray tips. If the

spray tip clogs while spraying, engage the gun safety latch im-

mediately. ALWAYS follow the

 PRESSURE RELIEF PROCE-

DURE, below, and then remove the spray tip to clean it.

NEVER wipe off build–up around the spray tip until the pressure

is fully relieved and the gun safety is engaged.

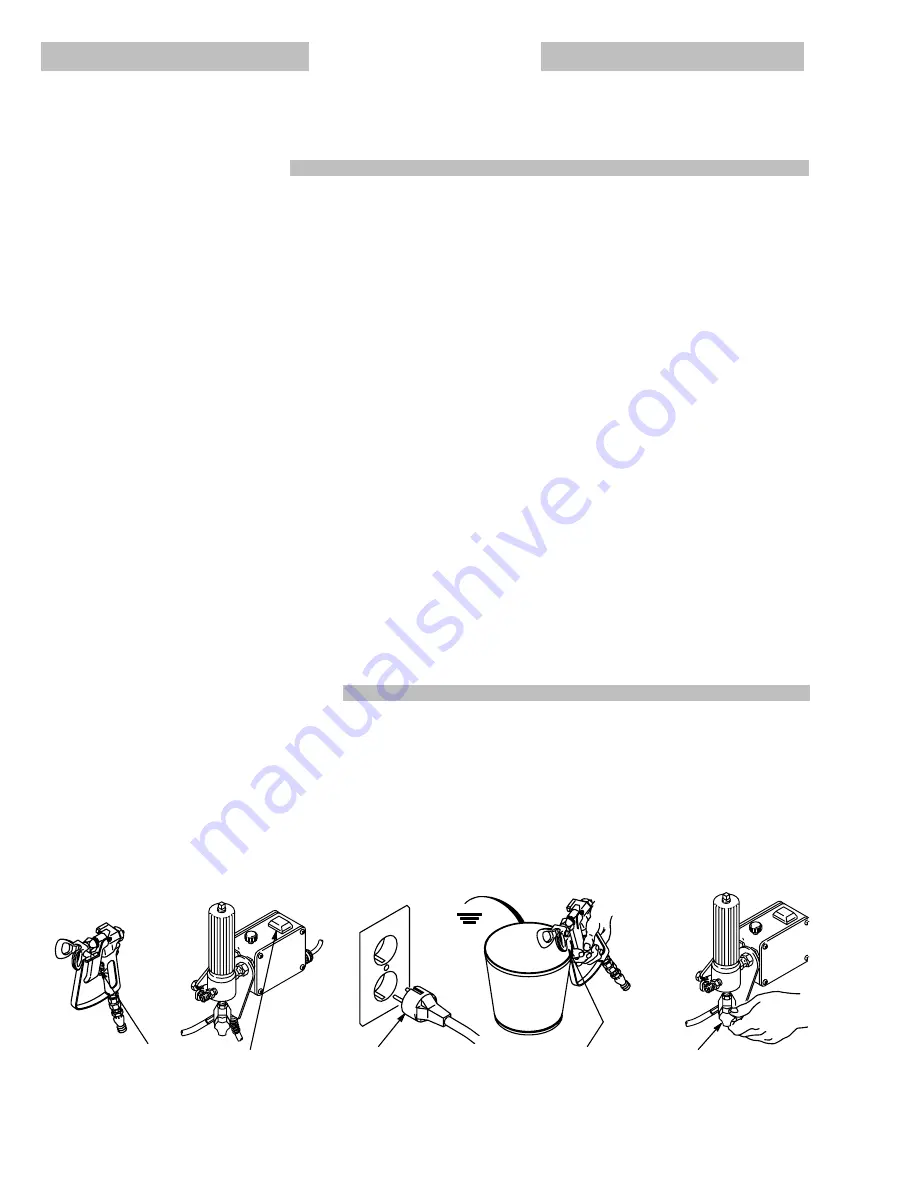
PRESSURE RELIEF PROCEDURE

To reduce the risk of serious bodily injury, including fluid injection,

splashing fluid or solvent in the eyes or on the skin, or injury from

moving parts or electric shock, always follow this procedure

whenever you shut off the sprayer, when checking or servicing

any part of the spray system, when installing, cleaning or chang-

ing spray tips, and whenever you stop spraying.
1. Engage the gun safety latch.
2. Turn the ON/OFF switch to OFF.
3. Unplug the power supply cord.
4. Disengage the gun safety latch. Hold a metal part of the gun

firmly to the side of a grounded metal pail, and trigger the gun

to relieve pressure.

5. Engage the gun safety latch.
6. Open the pressure drain valve, having a container ready to

catch the drainage, if a drain tube is not used. Leave the valve

open until you are ready to spray again.

If you suspect that the spray tip or hose is completely clogged,

or that pressure has not been  fully relieved after following the

steps above, wrap a rag around the tip guard retaining nut or

hose end coupling and VERY SLOWLY loosen the part to relieve

pressure gradually, then loosen completely. Now clear the tip or

hose.

1,5

2

3

4

6

0112

Summary of Contents for 220-834

Page 1: ...e removing parts Avoid accidental trig gering of gun by always setting safety latch when not spraying Never spray without a tip guard In case of accidental skin injection seek immediate Surgical Treat...

Page 2: ...e tip is not installed Check dif fuser operation regularly Follow the PRESSURE RELIEF PROCEDURE be low then remove the spray tip Aim the gun into a metal pail hold ing the gun firmly to the pail Using...

Page 3: ...rical resistance of your fluid hoses at least once a week If your hose does not have a tag on it which specifies the maximum electrical resistance con tact the hose supplier or manufacturer for the ma...

Page 4: ...install the spray tip yet If you are supplying your own hoses and spray gun be sure the hoses are electrically conductive that the gun has a tip guard and that each part is rated for at least 192 bar...

Page 5: ...ning section FIRE OR EXPLOSION HAZARD on page 3 of this manual and ground the sprayer as explained there WARNING 4 Plug in the sprayer Be sure the ON OFF switch is OFF See Fig 4 Plug the power supply...

Page 6: ...by turning the pressure adjusting knob all the way counterclockwise See Fig 6 5 Disengage the gun safety latch See Fig 7 6 To prime the pump hold a metal part of the gun firmly against and aimed into...

Page 7: ...t GUN SAFETY LATCH SHOWN IN SAFE OR EN GAGED POSITION Fig 7 7 TIP GUARD RETAINING NUT 0118 HANDLE SHOWN IN NORMAL SPRAYING POSITION ROTATE ARROW HANDLE 180 TO CLEAR Cleaning a Clogged Tip To reduce th...

Page 8: ...pump pres sure control or hoses Fluid which is allowed to freeze or set up in the sprayer or other accessories can cause loss of pressure stalling or serious equipment damage Always eliminate water o...

Page 9: ...rounded metal pail Put the suction tube in the pail 4 Remove the spray tip and tip guard if installed and clean separately 5 Turn the pressure adjusting knob all the way counter clockwise to the lowes...

Page 10: ...he pattern de pends on the fan pattern of the tip you choose Do not try to increase coverage by increasing the fluid pressure Use the lowest pressure needed for good re sults This prolongs the life of...

Page 11: ...ressure Pressure control frozen or damaged by overpressurization Try to thaw2 or replace pressure control Electric motor stops while spraying Power cord or extension cord unplugged or damaged or build...

Page 12: ...e Paint runs or sags Spray tip to big or worn Change the spray tip Spitting from gun Air in fluid pump or hose Check for loose connections at pump intake and tighten Then prime the pump Spray tip is p...

Page 13: ...aring and connecting rod link for wear or damage If either part needs replacing re place both When installing the rod and bearing coat the surfaces with SAE 10 non detergent motor oil 5 Clean and insp...

Page 14: ...f from the top rear of the motor housing B Pull the drive housing C off the motor housing B 3 Remove the screws 55c from the front of the motor housing B Pull the motor housing off the motor 4 Clean a...

Page 15: ...sconnect the green yellow motor lead from the grounding screw 302 the brown motor lead from the microswitch and the blue lead from the on off switch See Fig 18 5 Unscrew the connector 130 and 305 nuts...

Page 16: ...ch 3 Reassemble in the reverse order To verify the wiring refer to Fig 3 page 5 CAPACITOR To reduce the risk of serious bodily injury including fluid injection splashing in the eyes injury from moving...

Page 17: ...n the knurled part of the strain relief bushing 306 and unscrew it from the pressure control Slide the strain relief bushing up on the power cord to pro vide clearance and unscrew the conduit connecto...

Page 18: ...18 NOTES...

Page 19: ...om working loose due to vibration See Fig 22 If the pin works loose it or other parts could break off due to the force of the pumping action These parts could be projected through the air and result i...

Page 20: ...EALANT TO THESE THREADS 201 222 211 0082 3 Apply 1 drop only of sealant supplied with the repair kit to the piston valve threads Place the small ball 201 on the valve See Fig 24 Hand tighten the valve...

Page 21: ...4 N m 48 ft lb 219 Fig 27 212 POLY LIPS MUST FACE UP 213 POLY LIPS MUST FACE DOWN 210 224 206 LEATHER LIPS MUST FACE UP 203 LIPS OF U CUP SEAL MUST FACE DOWN 215 214 202 202 208 207 LEATHER LIPS MUST...

Page 22: ...6 18 x 2 2 55e 105 510 LOCKWASHER spring 1 4 4 55f 100 644 CAPSCREW soc hd 1 4 20 x 3 4 4 58 222 584 DISPLACEMENT PUMP see parts on page 26 1 84 155 665 UNION straight adapter 3 8 npt m x 3 8 npsm f s...

Page 23: ...ocated under this cover 102 200b 200a 14 94 34 33 130 1 55b 55c 23a 29 4 3 Ref 102 41 COVER 92 LABEL INSIDE COVER DANGER LABEL 129 0130 36 Model 220 834 Series D 18 53 54 55c 55b 55e 55f 37 27 23 123...

Page 24: ...1 309 100 840 ELBOW street 1 4 npt 1 311 178 034 TAG WARNING 1 312 218 372 CONDUCTOR with terminal 1 313 215 861 CONDUCTOR with terminals 1 315 162 453 NIPPLE 1 4 npsm x 1 4 npt 1 317 107 436 TERMINA...

Page 25: ...135 41 REF 40 306 305 308 309 315 REF 309 312 BLACK 318 319 320 325 TERMINAL STRIP MOUNTING HARDWARE GREEN YELLOW REF 17 23a 23c BROWN 313 REF 25 302 303 23a GREEN YELLOW 322 0087 0132 321 WHITE BROW...

Page 26: ...e 1 210 176 750 GLAND male 1 211 176 751 NUT hex retaining 1 212 176 882 V PACKING polyethylene 3 213 176 997 V PACKING polyethylene 3 214 180 161 WASHER backup 1 215 180 073 GLAND female 1 216 176 75...

Page 27: ...r sprayer The drawing below shows the best placement of these labels for good visibility Order the labels directly from your Graco distributor free of charge 0114 222 587 DISPLACEMENT PUMP REPAIR KIT...

Page 28: ...structures accessories equipment or materials not supplied by Graco This warranty is conditioned upon the prepaid return of the equipment claimed to be defective to an authorized Graco distributor for...

Reviews: