background image

29


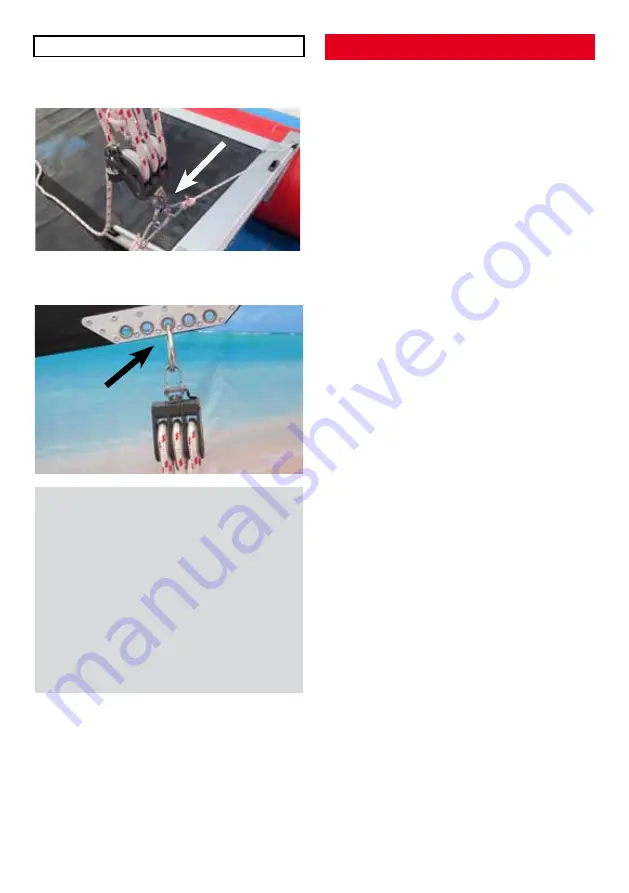
Attach the traveller rope to the ring of the 

mainsheet block. 

TRAvEllER, MAINSHEET

IMpORTANT NOTICE


The mast tilts aft by 5°.


When  the  mast  has  been  stepped,  the 

upper  shrouds  are  taut  and  the  lower 

shrouds are slack. Under pressure of the 

wind in the sail, the mast bends forward, 

whereby the lower shrouds tension. 


When sailing, the shrouds on the wind-

ward side become taut with the shrouds 

on the lee side becoming slack. 


Attach the mainsheet block to one of the 

clew plates eyes. 

DISMANTlING


Unshackle the tensioning stays from the 

rear frame element. 


Open the buckles on the trampoline cloth 

and  remove  the  forward  frame  element 

first,  thereafter  the  side-    and  rear  ele-

ments.   


Disassembly follows in reverse order.


Undo the luff tensioner and remove the 

mainsheet from the mainsail.


Lower the mainsail and completely remo-

ve the halyard. 


Pull both ends of the foresheet from cle-

ats and fairleads – leave the fore sheet 

attached to the clew of the foresail. 


Lower the foresail and completely remo-

ve the jib halyard.


Detach the foresail from the endless jib 

furler.


Place the foresail on the mainsail and roll 

up both.  - 

Attention: The sails must be 

dry.


Remove the endless furling jib.


Take the forestay off the the bowsprit – 

Notice: Ensure not to slacken the fo-

restay  to a point, which could cause 

the mast to fall over.


Lower the mast to the rear.    


Detach the shrouds from the frame.


Separate the four mast sections and re-

move  the  masthead  fly  from  the  upper 

mast section. 


Release  the  strap  connecting  bowsprit 

and crossbar.


Detach  bowsprit  from  the  trampoline 

frame and remove both tensioning stays. 


Unbolt rudder- and centerboard assem-

blies.


Disconnect  Rudder  and  Rudder  outrig-

ger.


Completely deflate the floats tubes.


Open the shakle from the reinforcing bow 

braces.


Disconnect the crossbar.

Summary of Contents for HAPPY CAT HURRICANE

Page 1: ...ane EIGNER HANDBUCH Teil 1 OWNER S MANUAL part 1 Besitzer Name Owner name PLZ Ort Post code town Stra e Nr Street nr Telefon Nr Telefon Modell Model Bootsnummer Boat number Kaufdatum Date of purchase...

Page 2: ...l 4 4 kw 6 PS Max Motorgewicht optional 30 kg WICHTIGER HINWEIS Segeln ist ein Sport der mit gewissem Risiko verbunden ist Das Segeln mit dem HAPPY CAT setzt Segelkenntnisse voraus besonders wenn man...

Page 3: ...die Nummern zusam men 1 1 2 2 3 3 4 4 Stecken Sie die Seitenteile auf den Hin terteil und ziehen Sie das Trampolintuch nach vorne TRAMPOLIN Stecken Sie den vorderen Rahmenteil von vorne auf die beide...

Page 4: ...der Schwim mer Heben Sie die hinteren Laschen an und h ngen sie die kurzen Teile ein Schieben Sie die Querstrebe nach hin ten bis sie ansteht Schwimmer Schwert HINWEIS Bei Verwendung vom Bug verdeck...

Page 5: ...an RICHTIG FALSCH bugspriet ACHTUNG Den Bolzen vom Sch kel um 180 verdrehen bis er einrastet Wenn der Sch kel beim Schlie en kei ne Spannung mehr hat muss er ausge tauscht werden Stecken Sie den Bugsp...

Page 6: ...e bei Steuerruder fest bugversteifungsstreben Stecken Sie die Streben auf die Kunst stoffzapfen am Rahmen Vorderteil Stecken Sie nun die Querstrebe mit den Kunststoffzapfen auf das andere Ende der Str...

Page 7: ...il mit der Ventil kappe Bajonettverschluss Siehe auch Ventil Aufpumpen in der Allge meinen Betriebsanleitung Teil 2 schwimmer aufpumpen Ziehen Sie den Sicherungsbolzen vom Mastfu Stecken Sie den Mast...

Page 8: ...re Ende vom Vorstag Halten Sie das Vorstag unter Spannung und h ngen Sie den Karabiner an der vorderen se vom Bugspriet ein Achtung Solange das Vorstag nicht eingeh ngt ist m ssen Sie daran ziehen dam...

Page 9: ...ei gleich lan ge Enden haben Knoten Sie die Fockschot bei der se zusammen F hren Sie die beiden Enden der Fock schot links und rechts durch die F h rungen und Klemmen vorne am Trampo linrahmen und sic...

Page 10: ...Rahmenteil Stecken Sie die beiden Schrauben von oben durch die Bohrungen und schrau ben sie mit den Fl gelmuttern fest steuerruder Befestigen Sie die Wanten Windf hn chen an den u eren Wanten rot Bac...

Page 11: ...ngen Sie das Vorsegel von der End los Rollfock aus Legen Sie das Vorsegel auf das Gro segel und rollen Sie beide zusammen Achtung Die Segel m ssen trocken sein Nehmen Sie die Endlos Rollfock ab H ngen...

Page 12: ...tarker Wind vorderste se schothornbrett Rahmenteil dann die beiden seitlichen Rahmenteile und den hinteren Rahmen teil ab Achtung Sp len Sie das Boot nach Salzwassergebrauch gr ndlich mit S wasser ab...

Page 13: ...beh r parallel zur Querstrebe verstaut werden Am Trampolintuch ist in der Mitte vorne eine Tasche angebracht in der bersch ssige Fall Leinen verstaut werden k nnen Das Gro segel ist mit 7 Segellatten...

Page 14: ...er Auf und Niederholerleine stufenlos ein gestellt werden ACHTUNG Durch das Ver ndern der Schwertposition kann der Trimm des Bootes ge ndert werden Die Klemme der Niederholerleine vom Schwert ist mit...

Page 15: ...ein Mal um Ihren K rper herum Lehnen Sie sich weit zur ck mithilfe der vorbereiteten Knoten k nnen Sie die Lei ne nachgreifen Der Katamaran wird sich durch Ihr K rpergewicht in die H he he ben Lehnen...

Page 16: ...immer Befestigen Sie die Sitzpolster mit den Gurten hinten am Trampolinrahmen und vorne an der se f r die Wanten sitzpolster Heck gep cksverdeck Befestigen Sie die hinteren Gurten an der Heckstange un...

Page 17: ...Auge der langen Wanten ein F hren Sie das Trapez entlang der lan gen Wanten und h ngen Sie das Gum mikabel an der se am Trampolinrah men ein Wiederholen Sie das einh ngen der 2 Trapez Talje auf der a...

Page 18: ...Schwimmern und Tauchern Fahren Sie nie ber der erlaubten Wind st rke Informieren Sie sich ber rtliche Vor schriften Pr fen Sie Wetterberichte rtliche Str mungen Gezeiten und Windverh ltnis se Informie...

Page 19: ...er untere Rand des Segels Vorliek Der vordere Rand des Segels Vorstag Abspannung vom Mast nach vorne Want Seitliche Abspannung von Mast zu Bootsrumpf Jetzt steht Ihren ersten Segelt rn nichts mehr im...

Page 20: ...rossbar 1 tie strap f crossbar bowsprit 2 reinforcing bow braces 1 rudder 1 rudder outrigger 1 detachable tiller 1 centerboard w retention bracket 1 mast 4 sections 4 shrouds 1 foresail 1 endless jib...

Page 21: ...4 Correctly assembled the frame numbers match 1 1 2 2 3 3 4 4 Slot the frame side elements onto the rear element and pull the trampoline cloth taut in forward direction TRAMPOLINe Push the insert stu...

Page 22: ...inward side USEFUL INFORMATION If inserting the frame lugs into the sleeve sockets proves difficult apply some silicone spray onto the lugs Insert the crossbars longer lugs forward into front positio...

Page 23: ...it locks into place Replace shackle if it appears to have lost tensi on Hang both tensioning ropes from the centreboard with the pelican hook on the top eyes of the trampoline frame and press them tog...

Page 24: ...shackle from the other end of the tensioning ropes through the lower large ring on the front part of the frame Connect the shackles and tensioning ro pes Close the pelican hooks When lifting the blad...

Page 25: ...ve cap ba yonet cap See Valve Inflation in the Operating Inst ructions Part 2 Inflate float tubes 1 Mast lower section with mast foot 2 Mast section with short shrouds 3 Mast section 4 Mast upper elem...

Page 26: ...y attached to the bowsprit you must pull and keep the forestay under tension to prevent the mast from falling backward Hook the endless jib furler to the free eye of the bowspeit Hang the carabiner fr...

Page 27: ...the foresheet though the clews sheet lead in a manner that that provi des two equal length ends Secure the sheets at the clew by means of a knot Feed both ends of the sheet through the foresheet cam c...

Page 28: ...ob and insert the til ler into rudder head tube until it locks rudder Clip the rudder to the rudder hinge ATTENTION When placing the sail pull it to the mast so that it goes directly into the groove D...

Page 29: ...e mainsail and completely remo ve the halyard Pull both ends of the foresheet from cle ats and fairleads leave the fore sheet attached to the clew of the foresail Lower the foresail and completely rem...

Page 30: ...late Attention Rinse the boat accurate after use in salt water and clean all connec tionparts to avoid damages by corrosi on see care and storage in operating instructions part 2 Pack sack stow rolled...

Page 31: ...sail incorporates 6 7 sail battens that slide into batten pockets and tie at the ends by means of straps The harder strapped into the pockets the greater the sails concavity sail battens If the traili...

Page 32: ...ace The trampoline cloth incorporates centre run ning a two space toe strap for hiking out The toe strap provides foot hold for the crew reaching far to windward when hi king out hiking out toe strap...

Page 33: ...your body Lean far back Using the prepared knots you can grab hold of the line The ca tamaran will be lifted up by your body weight Lean back until the catamaran falls back into the water with both hu...

Page 34: ...overlapping the gap to the float tubes Fasten seat cushions by means of the straps to the rear of the trampoline frame and to the eye at the shroud seat cushions The bow bag can be secured by means of...

Page 35: ...and lowering of the gennaker For the assembly please see the accom panying assembly instructions Attach the trapeze wire to the upper eyes of the longer shrouds Lead the trapeze along the long shroud...

Page 36: ...nside to avoid injury Ensure that your passengers will cope and be able to handle the boat in the event of an emergency Keep away from swimmers and divers Never be under way in conditions of winds of...

Page 37: ...forward end of a boat Clew the rear bottom corner of a sail Foot of a sail The lower edge of a sail Forestay the piece of standing rigging for ward of the mast which keeps it from falling backwards Ge...

Page 38: ...bowsprit Spannseil tensioning stay Schwert centerboard Fockschot jib sheet Fockschotklemme foresheet cam cleat Ausreitgurt hiking strap Trampolinrahmen trampoline frame Steuerruder rudder Traveller tr...

Page 39: ...g capacity Motor output Motor weight Sail area Draft draught 4 99 m 2 33 m 80 kg 4 600 kg 4 4 kW 6 PS 30 kg 11 5 m 0 18 m Konformit tsbewertungsmo dul Conformity evaluation class A Die Firma GRABNER G...

Page 40: ...und Druckfehler vorbehalten Subject to change technical changes errors and missprints 01 17 GRABNER GMBH Weistracherstra e 11 3350 HAAG sterreich Tel 43 0 7434 42251 Fax 43 0 7434 42251 66 Mail grabn...

Reviews: