background image

POSITIONING OF BASEMENT PLATE


-


Make a foundation pit in order that the foundation plate is 
78 mm far from the GATE (not from the slide). 

-


Put the plate in the foundation pit (protect the inferior part 
of the camping screws holes). 

-


In positioning the foundation pit, make sure that the plate 
hole for passage of cables is in opposite side of the gate 
(see photo). 


-


Make a foundation pit in order that the foundation plate is 
78 mm far from the GATE (not from the slide). 

-


Put the plate in the foundation pit (protect the inferior part 
of the camping screws holes). 

-


In positioning the foundation pit, make sure that the plate 
hole for passage of cables is in opposite side of the gate 
(see photo). 


POSITIONING OF THE MOTOR      


-


Put the motor on the plate. 

-


Put 4 little shims between the motor and the plate to keep 
provisionally the motor 1 mm higher. 

-


Unclamp the motor by using lever (B). (Turn the lever of 
1

00°). 


Leave the lever open until the end of installation. 


FIXING OF THE RACK


-Put the first piece of the rack on top of the spur wheel. And 
make it run until point 1 (see Fig. 1) 
-Weld or screw the first pin of the rack to the gate. 
-Add all the other pieces of the rack in order they are perfectly 
aligned to the first. 


FINAL OPERATION 


-


Take out from the bottom of the motor the 4 shims and 
fix the motor to the foundation plate using screws.  

-


Shift manually the gate and fix on the rack the end run 
cams (C). 

-


Clamp the lever. (A) 

-


Apply the electric connections. 

-


Fix the carter. 

-


Control the perfect working of the motor. 


ELECTRICAL CONNECTIONS


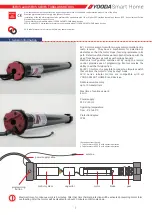
1 - tube d. 20 mm. – cable for rx photocell 2x0.5 mm. 
2 - tube d. 20 mm. – cable for rx photocell 2x0.5 mm. - 
Cable    for electromechanical sensing device 2x0,5 mm.  
3 - tube d. 0.25 mm – cable for tx photocell 4x0,5 -  
Cable for flashing light 3x0,5 – cable for Electromechanical   
sensing device 2x0,5 mm. - Cable for key switch 3x0,5 mm. - 
Cable for antenna Rg59                                                                    
4 - 2 tube d. 0.25 mm. For cables to the motor  
5 - tube d. 0.20 mm. – cable for tx photocell 4x0.5 mm. 
6 - tube d. 0.60 – alimentation cable 3x1.5 mm. 
7 - shaft 


Summary of Contents for GR6 Series

Page 1: ... by all the interested people In order to make the automation work efficiently the gate to automate must have the following characteristics it must be balanced it must oscillate fluently you have to carry out the manual closing and opening the gate without any effort remember that the motorization has been planned in order to help you use the gate This means that it does not resolve the problems c...

Page 2: ... the lever open until the end of installation FIXING OF THE RACK Put the first piece of the rack on top of the spur wheel And make it run until point 1 see Fig 1 Weld or screw the first pin of the rack to the gate Add all the other pieces of the rack in order they are perfectly aligned to the first FINAL OPERATION Take out from the bottom of the motor the 4 shims and fix the motor to the foundatio...

Page 3: ...r safety if necessary integrating those in the manual for installation of the door gate and give the user a copy Compile the proof book and give the user a copy see facsimile in Annex 1 Draft the EC declaration of conformity see facsimile in Annex 2 and give the user a copy Fill in the label or plate with CE marking and attach it to the motorised door gate N B The technical file must be held and m...

Page 4: ...ITH THE MACHINERY DIRECTIVE 98 37 EEC AND THE STANDARDS EN 13241 1 EN 12453 EN 12445 The risks listed below follow the sequence of the installation process These risks are those which are commonly present in motorised doors gates systems According to the various situations consideration therefore has to be made of any possible additional risks and exclude those which are not applicable The solutio...

Page 5: ...e considered The graph indicates the maximum values of the dynamic static and residual operating forces in relation to the various positions of the leaf N B With reference to the measurement points with L 50 300 and 500 mm the maximum dynamic force value permitted is 400 N F If the values of the forces are higher install a protective device in accordance with the standard EN 12978 for example a se...

Page 6: ...and the average value considered F If the values of the forces are higher install a protective device in accordance with the standard EN 12978 for example a sensitive edge and repeat the measurement 6 Shearing between the sliding leaf and fixed part during the movement of opening and closure Figure 1 risk C F The leaf of the sliding gate and the enclosure must be free from gaps or the gaps must be...

Page 7: ... in accordance with current regulations and as indicated in the installation manual of the drive unit N B If the electrical supply line is already set up via both a socket and a connector block declarations of conformity to Italian law no 46 90 are not necessary F Use CE marked components pursuant to the EMC Directive 89 336 EEC Carry out the installation as indicated in the manual for installatio...

Page 8: ...afety devices installed 1 7 1 1 7 2 1 7 3 1 7 4 1 6 1 1 1 2 Integration principles for safety and information 19 Signalling equipment 20 Warnings 21 Marking 22 Operating instructions 23 Maintenance 24 Unprotected residual risks F A flashing light should be installed in a visible position to indicate movement of the leaf F Traffic lights can be installed to control vehicle traffic F Reflectors can ...

Reviews: