Goscam 8217KP User Manual Download Page 4

05

06

Preparation before using camera

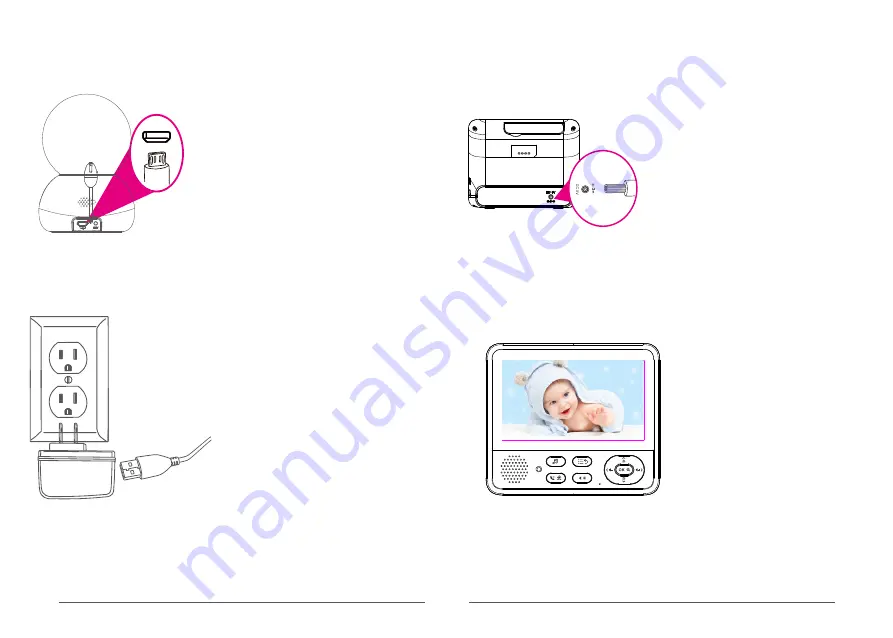
1. Powering the Camera Unit

Insert one end of the included charging 
cable into the USB jack on the back of the 
camera.

Insert the other end into the included power 
adapter. Then insert the adapter into the 
socket.

When energized, the camera will be automatically turned on. (The camera indicator 

flashes green

. At this point, the camera is turned on successfully).

Preparation before using receiver

1.Power on the receiver (The receiver is provided with a lithium battery, if the receiver has 
enough power, please go directly to the Step 2).

Insert one end of the charging cable into the 
DC charging jack on the side of the receiver.

2. Receiver starting up

Press and hold the 

ON/OFF

” 

button on the receiver to turn it on.

Note: This device has been paired before leaving the factory. If the receiver fails to display 
on the monitor screen as described above, please re-try the device pairing operation. For 
detailed steps, please refer to Page 8 “Camera Pairing”.

Insert the other end into the included power adapter. Then insert the adapter into 
the socket.

Summary of Contents for 8217KP

Page 1: ...Model No 8217KP ...

Page 2: ...e 1 Photo sensitive sensor 5 Power interface 2 Lens 3 Microphone 4 Indicator 6 Temperature sensor 5 6 7 2 1 3 7 SET button 01 02 4 10 Thank you for choosing our baby monitor Please read the instruction carefully in case of product damage due to improper operation Introduction Parts in the package Camera Manual Monitor Product structure 1 1 9 11 8 12 13 14 17 16 15 17 Menu button back 21 20 Turn ri...

Page 3: ...ation for status indicator LED The red light goes on when charging and off when charging not charging Using the Monitor Place the Camera Unit in a convenient location e g on a table or a shelf and point the camera lens toward the area you want to monitor NOTE Do not place the Monitor Unit within baby s reach If there is interference with the picture or sound try moving the units to different locat...

Page 4: ... on the receiver The receiver is provided with a lithium battery if the receiver has enough power please go directly to the Step 2 Insert one end of the charging cable into the DC charging jack on the side of the receiver 2 Receiver starting up Press and hold the ON OFF button on the receiver to turn it on Note This device has been paired before leaving the factory If the receiver fails to display...

Page 5: ...nction settings Functions of the Babysitter is user definable to best satisfy your demands Audio and temperature alarms may offer automatic notification to you This chapter will introduce the user definable settings item by item Access receiver menu In states of live view press MENU button on the monitor can enter into MENU list In states of non live view press MENU button on the monitor can retur...

Page 6: ...nd the indicator light will blink when the alarm is raised When the sound switch is turned off the sound icon will not appear on the page 2 Select the channel to be deleted and press OK to confirm Then select Delete Camera and press OK to confirm Note 1 Select Camera and press OK to enter the function VOX mode allows you to control the sound activation of your baby unit and can also saves the batt...

Page 7: ...itch lullabies press keys to adjust the volume Lullabies 1 Select Music Play and press OK to enter the function 2 Select the music you want to play press OK to confirm and the camera will play the lullaby of your choice Press OK again and the lullaby pauses Select All to play all the lullabies in a loop After settings are completed press MENU to return 1 2 3 4 5 ALL 3 You can also play music quick...

Page 8: ...Restore to default settings Restore to default settings Restore the receiver to default settings 1 Select Settings and press OK to enter the settings page 2 Select Restore to Default Settings and press OK to enter the settings page 3 The device will prompt Restore to default settings Select YES and press OK to confirm The device begins to execute a factory reset Tip After restoring to default sett...

Page 9: ...rom that to which the receiver is connected Consult the dealer or an experienced radio TV technician for help Changes or modifications not expressly approved by the party responsible for compliance could void the user s authority to operate the equipment This device complies with Part 15 of the FCC Rules Operation is subject to the following two conditions 1 this device may not cause harmful inter...

Reviews: