background image

19

06

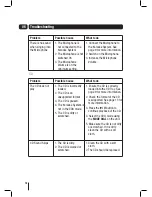
iPod

Problem

Possible Cause

What to do

The iPod is unstable 
in the Dock.

1. The iPod Model Switch 

is set to the incorrect 
setting.

1. Select the correct setting 

using the iPod Model Switch.

iPod does not 
respond to inputs 
from the Karaoke 
System.

1. The iPod is not docked 

correctly.

1. Ensure the iPod is correctly 

docked. See page 14 for 
more information.

Troubleshooting

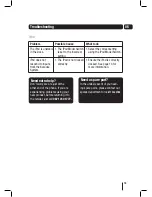
Need extra help?

Don’t worry we are just at the 
other end of the phone. If you are 
experiencing problems using your 
new product, before returning it to 
the retailer, just call 

 0871 230 1777.

Need a spare part?

In the unlikely event of you need-
ing spare parts, please contact our 
spares department on: 

 0871 230 0790

Summary of Contents for XB7CDGIP

Page 1: ...XB7CDGIP Karaoke System with Universal Dock for iPod User Guide IMPORTANT Please read all instructions carefully before use and keep for future reference ...

Page 2: ... This appliance is for household use only Key features Karaoke with CD G discs You and your friends can sing along to all your favourite songs using CD G discs The Karaoke System can be connected to a TV to display on screen lyrics Your voice and the backing tracks will be played through either the built in speaker or a connected Sound System TV iPod docking station Any of the iPods listed on page...

Page 3: ...PE AT Karaoke System Power Cable Video RCA Cable Remote Control Audio RCA Cable Quick Start Guide User Guide Microphone 01 02 03 04 Your Karaoke System 4 Getting Started 7 Daily Use 10 CD G Playback 12 Using Your iPod 14 Troubleshooting 17 Specification 20 Warnings 21 Electrical Information 23 Guarantee 24 06 07 08 09 Contents 05 10 ...

Page 4: ... PROG Button STANDBY Button PLAY PAUSE Button STOP Button NEXT Button PREV Button MASTER VOLUME Dial HEADPHONE Socket IPOD MODEL Switch SPEAKER iPod DOCK LED Display MODE Dial ECHO Dial AVC Dial MUSIC KARAOKE Dial MIC VOLUME Dial MIC 1 Socket MIC 2 Socket BATTERY Compartment ...

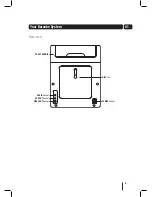
Page 5: ...5 01 AUX IN AUX OUT VIDEO OUT Your Karaoke System CARRY HANDLE AUX IN Socket AUX OUT Socket VIDEO OUT Socket DISC Tray POWER Socket Rear view ...

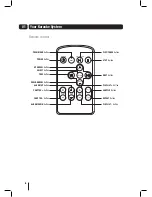
Page 6: ...APTER ALBUM PLAY LIST SHUFFLE REPEAT PROG MENU Button POWER Button UP ARROW Button SELECT Button PREV Button DOWN ARROW Button ALBUM UP Button CHAPTER Button CHAPTER Button ALBUM DOWN Button PLAY PAUSE Button STOP Button NEXT Button PLAYLIST Button SHUFFLE Button REPEAT Button PLAYLIST Button ...

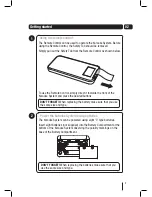
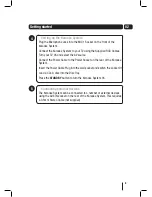
Page 7: ...of the Karaoke System and press the desired buttons DON T FORGET When replacing the battery make sure that you use the same size and type 1 Power the Karaoke System using batteries The Karaoke System can be powered using eight C type batteries Insert eight batteries not supplied into the Battery Compartment at the bottom of the Karaoke System observing the polarity markings on the base of the Batt...

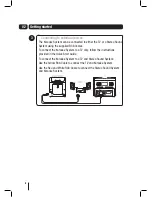
Page 8: ... the supplied RCA Cables To connect the Karaoke System to a TV only follow the instructions provided in the Quick Start Guide To connect the Karaoke System to a TV and Stereo Sound System Use the Yellow RCA Cable to connect the TV and Karaoke System Use the Red and White RCA Cable to connect the Stereo Sound System and Karaoke System 3 ...

Page 9: ...nnect the Power Cable to the Power Socket on the rear of the Karaoke System Insert the Power Cable Plug into the wall socket and switch the socket On Load a CD G disc into the Disc Tray Press the STANDBY button to turn the Karaoke System On Connecting external devices The Karaoke System can be connected to a number of external devices using the AUX IN socket on the rear of the Karaoke System This ...

Page 10: ...stem by inserting the Headphone Jack into the Headphone Socket on the front of the Karaoke System DON T FORGET If the RCA Cable is connected between the Karaoke System and a TV the backing track will play through the TV speakers Adjusting the master volume To increase the master volume rotate the MASTER VOLUME DIAL on the front of the Karaoke System clockwise To decrease the master volume rotate t...

Page 11: ...the Karaoke System clockwise To decrease the amount of AVC rotate the AVC DIAL on the front of the Karaoke System anticlockwise Cutting Backing Vocals while you Sing The Karaoke System can be set to turn off the vocals of the backing track while you sing To turn off the vocals of the backing track while you sing rotate the MUSIC KARAOKE DIAL to Karaoke Vocals Whenever you sing the vocals of the ba...

Page 12: ... button to stop playback Repeat play You can repeat a single track or all the tracks on the CD G disc Repeating a single track To repeat a single track press the REPEAT button once The Repeat indicator on the LED Display will begin to flash The track will be played continuously until the button is pressed To cancel the repeat function press the REPEAT button continuously until the Repeat Indicator...

Page 13: ... tracks press thePROG button followed by the II button To cancel the programmed sequence from the memory press the button during playback Audio CD playback Compatible disc types The Karaoke System supports playback of following types of CD CD G compact Disc 8cm 12cm Compact Disc Audio Discs 12cm Compact Disc Recordable Discs 12cm Compact Disc Re Writable Discs Playback Press the II button to begin...

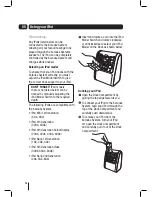
Page 14: ... following iPods are compatible with the Karaoke System iPod Mini 1st Generation 4 Gb 6Gb iPod 4th Generation 20Gb 40Gb iPod 4th GenerationColourDisplay 20Gb 30Gb 40Gb 60Gb iPod Nano 1st Generation 1Gb 2Gb 4Gb iPod 5th GenerationVideo 30Gb 60Gb 80Gb iPod Nano 2nd Generation 2Gb 4Gb 8Gb Insert and rotate a coin into the iPod Model Switch and rotate clockwise or anticlockwise to select your iPod Mod...

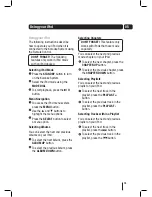
Page 15: ...on your iPod To select the next Album press the ALBUM UP button To select the previous Album press the ALBUM DOWN button Selecting Chapters DON T FORGET This feature only works with iPods that have movie capability You can select the next and previous movie chapter on your iPod To select the next chapter press the CHAPTER UP button To select the previous chapter press the CHAPTER DOWN button Selec...

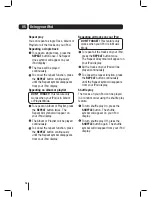
Page 16: ...uously To cancel the repeat function press the REPEAT button continuously until the Repeat symbol disappears from your iPod display Repeating all tracks on your iPod DON T FORGET This feature only works when your iPod is in Music Mode To repeat all the tracks on your iPod press the REPEAT button twice The Repeat All symbol will appear on your iPod display All the tracks on your iPod will be played...

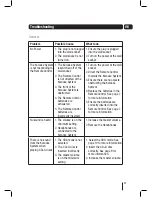
Page 17: ...all socket 2 Direct the Remote Control towards the Karaoke System 3 Ensure there are no objects obstructing the Karaoke System 4 Replace the batteries in the Remote Control See page 7 for more information 5 Ensure the batteries are correctly inserted into the Remote Control See page 7 for more information No sound is heard 1 The volume is on the minimum setting 2 Headphones are connected to the Ka...

Page 18: ...ncorrectly loaded 2 The CD is an unsupported format 3 The CD is paused 4 The Karaoke System is not in the CDG mode 5 The CD is dirty or scratched 1 Ensure the CD is correctly loaded into the CD Tray See page 9 for more information 2 Check the format of the CD is supported See page 13 for more information 3 Press the II button to continue playback of the CD 4 Select the CDG mode using the MODE DIAL...

Page 19: ...ke System 1 The iPod is not docked correctly 1 Ensure the iPod is correctly docked See page 14 for more information Troubleshooting Need extra help Don t worry we are just at the other end of the phone If you are experiencing problems using your new product before returning it to the retailer just call 0871 230 1777 Need a spare part In the unlikely event of you need ing spare parts please contact...

Page 20: ...d Alkaline is recommended for longer life Power Consumption Standby Operating Nominal Use 0 831W 28W 21W Frequency Response 100 10 000 Hz 3db Power Output 2W x 2 10 THD Speaker 3 4 ohms Microphone 60 dB 600 ohms impedance with 6 3mm dynamic microphone Unit Dimensions 165 D x 220 W x 290 H mm Unit Weight 2 65 kgs ...

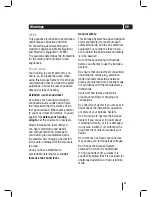
Page 21: ...have established a comfortable listening level do not increase the sound level General safety This Karaoke System has been designed and manufactured to meet European safety standards but like any electrical equipment care must be taken if you are to obtain the best results and safety is to be assured Do read these operating instructions before you attempt to use the Karaoke System Do ensure that a...

Page 22: ...m Don t obstruct the ventilation vents on the Karaoke System for example with curtains or soft furnishings Don t allow electrical equipment to be exposed to rain or moisture Store the Karaoke System in a clean dry environment Do not use any cleaning solutions on the Karaoke System Warnings ...

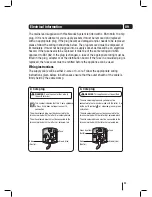
Page 23: ...me rating and ASTA approved to BS1362 If the plug is changed a fuse of the appropriate rating must be fitted in the plug adapter or at the distribution board If the fuse in a moulded plug is replaced the fuse cover must be refitted before the appliance can be used Wiring instructions The supply cable will be either 2 core or 3 core Follow the appropriate wiring instructions given below In both cas...

Page 24: ...daries of the country of purchase The product must be correctly installed and operated in accordance with the instructions contained in this User Guide The Karaoke System must be used solely for domestic purposes The guarantee will be rendered invalid if the Karaoke System is re sold or has been damaged by inexpert repair The manufacturer disclaims any liability for incidental or consequential dam...

Page 25: ......

Page 26: ......

Page 27: ......

Page 28: ...Technical Support 0871 230 1777 DCS May10 XB7CDGIP XB7CDGIP_UserGuide Rev5 indd 28 ...

Reviews: