background image

PAGE 13

TUNING IN TV STATIONS

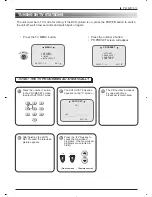
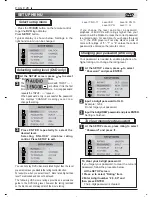
• Press the TV MENU button.

PR PRESET

1 AUTO SET
2 MANUAL SET
3 PR REMOVE
4 FINE TUNE

SELECT : 1~4                  EXIT

1

Press the number 1 button
in the PR PRESET screen
to select AUTO SET mode.

2

The AUTO SET indication
appears on the TV screen.

3

The PR number increases
by one each time a
broadcast is memorised.

4

5

Press the 

PR

key to

check the memorized

programs. (The memorized

programs are selected in

order)

(Front cabinet)

(Remote control)

AUTO SET 

PR 1

UHF

........................

EXIT:

After finishing the AUTO
SET Process, the television
picture appears.

TO SET THE TV PROGRAMS AUTOMATICALLY

MENU

1 PICTURE
2 PR PRESET
3 TIMER
4 INITIAL SETUP

SELECT : 1~4                  EXIT

• Press the number 2 button. 
• PR PRESET screen will appear.

The unit must be in TV mode for tuning. If the DVD picture is on, press the POWER button to switch
the unit off, wait a few seconds and switch back on again.

Summary of Contents for TD1540

Page 1: ...TD1540 TD1540 TD1540 TD1540 TD1540 TD1540 TD1540 TD1540 TD1540 TD1540 TD1540 TD1540 TD1540 TD1540 TD1540 TD1540 TD1540 TD1540 TD1540 TD1540 TD1540 TD1540 TD1540 TD1540 TD1540 TD1540 TD1540 TD1540 TD15...

Page 2: ...igital to Analog Converter DAC audio quality exceeding that of CDs is possible Convenient features GUI Graphic User Interface Menu Icons show the disc information or player information and provide acc...

Page 3: ...y from heat sources such as radiators heat registers stoves or other products including amplifiers that produce heat 6 Water and Moisture Do not use this product near water for example near a bath tub...

Page 4: ...s as an improper adjustment of other controls may result in damage and will often require extensive work by a qualified technician to restore the product to its normal operation e If the product has b...

Page 5: ...ss to start playback 9 PR Button Press to change to a higher numbered channel set into memory and to a lower numbered channel set into memory In the STANDBY mode press to turn on the unit 10 SKIP Butt...

Page 6: ...another TV or an analogue amplifier Input to this socket can be viewed on channel VIDEO 1 17 COAXIAL Digital Audio output for connecting a Dolby Digital or a DTS amplifier 18 ANTENNA Jack Connect the...

Page 7: ...sole Use a scart cable for VIDEO 1 input to the TV DVD combi VIDEO 2 Selects video and audio inputs on the front of the TV DVD combi Used for connection of camcorder or games console Use an AV cable w...

Page 8: ...REMOTE CONTROL You will find instructions for each of the remote control functions in the appropriate sections of this instruction manual Teletext functions are described in Teletext operation pages...

Page 9: ...two AAAM or R03 penlight size batteries 3 Replace the cover When direct sunlight an incandescent lamp fluorescent lamp or any other strong light shines on the Remote Sensor the remote operation may be...

Page 10: ...program you were watching PR 2 Adjust the volume level by pressing the VOLUME or Level will be indicated on the screen by green bars As the volume level increases so do the number of bars If the volum...

Page 11: ...ess this button to turn off the sound The TV DVD s sound will be silenced and MUTE will briefly appear on the screen The sound can be turned back on by pressing this button again or one of the VOLUME...

Page 12: ...PNESS 5 STANDARD CONTRAST 28 SEL 1 5 ADJ EXIT PICTURE 1 COLOR 2 BRIGHT 3 CONTRAST 4 TINT 5 SHARPNESS 6 STANDARD TINT SEL 1 6 ADJ EXIT PICTURE R15 G15 1 COLOR 2 BRIGHT 3 CONTRAST 4 SHARPNESS 5 STANDARD...

Page 13: ...Press the PR key to check the memorized programs The memorized programs are selected in order Front cabinet Remote control AUTO SET PR 1 UHF EXIT After finishing the AUTO SET Process the television p...

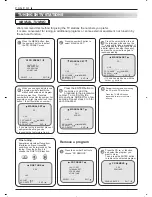
Page 14: ...SET PR 1 UHF PR CHANGE NUMBER SEARCH ADD ENTER EXIT 1 Press the number 3 button to choose PR REMOVE Remove a program Fine tuning Sometimes signals suffering from interference or poor reception conditi...

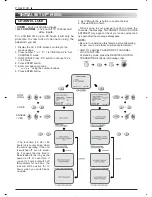
Page 15: ...LOCK mode TIMER 1 CLOCK AM 2 ON AM 3 OFF AM SELECT 1 3 SEL ADJ EXIT 3 2 Press the buttons to set AM PM Press the button to make the dashes flash on and off at the hour position Press the TV MENU butto...

Page 16: ...XIT TIMER 1 CLOCK AM 10 30 2 ON EVERY AM 7 30 3 OFF AM SELECT 1 3 SEL ADJ EXIT 1 Press the 3 button to select the OFF time TIMER 1 CLOCK AM 10 30 2 ON EVERY AM 7 30 3 OFF AM SELECT 1 3 SEL ADJ EXIT 3...

Page 17: ...here is no broadcast signal being received by the TV set Eliminates the snowy screen This menu is for 1 Switching no signal blue background on or off 2 Channel lock A password is required to operate t...

Page 18: ...your password code to unlock the channels the message INCORRECT UNLOCK CODE ENTERED may appear Check your code number and try again after the message disappears NOTE Be sure to understand this featur...

Page 19: ...white Now the same number list will appear whenever you watch teletext on this programme number FAST TEXT shows coloured page headings decided by the teletext service provider Index button List mode...

Page 20: ...mplete four figure number such as 0003 As soon as you enter the fourth digit of the sub page the three figure page number will come back and the number in the centre of the top row will start changing...

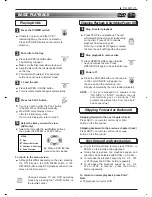
Page 21: ...op restart playback Press STOP to end playback The unit will remember the stop point depending on the disc Press PLAY to resume playback from the stop point Note If you press STOP again or unload the...

Page 22: ...tton Press PAUSE STEP during still playback The picture advances one frame each time you press the PAUSE STEP button To return to normal playback press PLAY button Notes There is no sound when viewing...

Page 23: ...s and press ENTER or press the numeric button s to select desired item The selected item is now executed 2 General Information about GUI menu icons This unit features GUI menu icons showing disc infor...

Page 24: ...ent chapter No and to jump to the desired chapter No To show the elapsed time and directly select scenes by the desired time See example in note below AUDIO ENTER To show the current audio sound track...

Page 25: ...ss SUBTITLE during playback When no subtitles are recorded OFF will be displayed instead of the language number Press repeatedly SUBTITLE until the desired language is selected Number of the subtitle...

Page 26: ...nges as shown below and the disc will repeat a chapter or title DVD or a track CD DVD CD To return to normal play Press REPEAT several times until OFF is displayed Repeat of chapter being played Repea...

Page 27: ...ee Repeat play on page 26 Press the RANDOM button in STOP mode Random appears on screen Press PLAY All the tracks will be played in random numeric order then the player will stop To return normal play...

Page 28: ...R Press ENTER repeatedly to select the desired level Selecting UNLOCK disables rating control Press SETUP to exit At the SETUP screen press rating to select Password and press To clear your 4 digit pa...

Page 29: ...put is supplied to equipment with a DTS or Dolby Digital decoder PCM Select PCM if the digital audio output is connected to equipment which requires only linear PCM typically a MD recorder or DAT deck...

Page 30: ...n the right hand column and press ENTER Or press 0 You can press the corresponding number key to change folder or play the file directly 1 2 song 1 song 2 song 3 song 4 song 5 song 6 song 1 song 2 son...

Page 31: ...Combi to other equipment be sure to turn off the power and unplug all of the equipment from the wall outlet before making any connections The output sound of the TV DVD Combi has a wide dynamic range...

Page 32: ...t offer Dolby Digital decoding If your amplifier has a Dolby Pro Logic decoder refer to the following connecting diagram Connect one or two rear speakers The output sound from the rear speakers will b...

Page 33: ...rroundTM the finest technology ever invented to transform a simple home cinema sound system into six discrete channels of exceptionally clear better than compact disc digital surround sound Notes Refe...

Page 34: ...t the camcorder to the TV DVD as shown opposite To use the TV screen as a monitor press the TV VIDEO button to select VIDEO 2 VIDEO GAME Connections The TV DVD can also be used as a display device for...

Page 35: ...on the DVD disc does not correspond to the Region number of this DVD CD player this DVD CD player cannot play that disc Region Management Information Notes on Unauthorized Discs You may not be able pl...

Page 36: ...ossible local interference Check for source of reception disturbance Try fine tuning Check VHF UHF antenna reposition or rotate antenna Poor or no colour TV station experiencing problems Possible loca...

Page 37: ...r cord for several minutes then reconnect and try again Check the RATING LEVEL setup see page 28 Some discs have no subtitles Subtitles are cleared Press SUBTITLE button to select one The function is...

Page 38: ...er wavelength 650 780nm S N Ratio 70dB Harmonic distortion 0 03 Dynamic range 90dB GENERAL Power Source AC 100 250V 50 60Hz Power Consumption 72 watts Dimensions W X D X H 382 X 382 X 400 Operating te...

Reviews: