background image

8

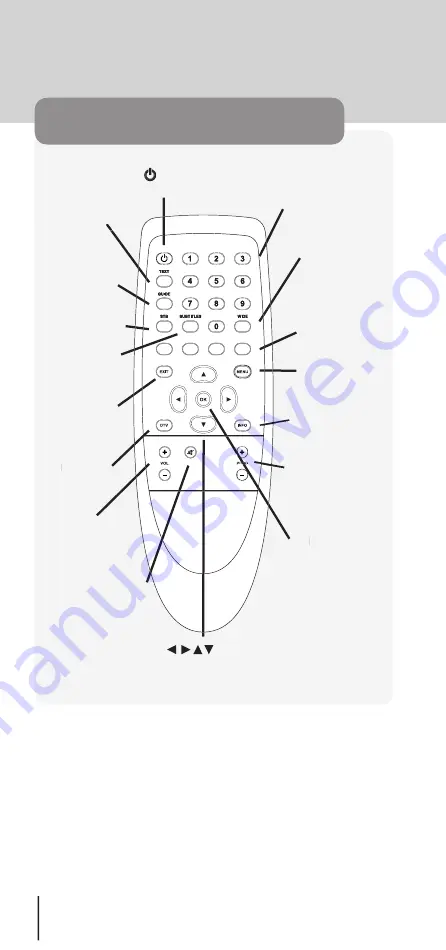
remote control

 toggles between power 

on and standby modes

0-9

 Quick access to 

channels

WIDE

 toggles 

between letterbox 
and fullscreen TV

SUBTITLES

toggles subtitles
on and off (where 
available)

TEXT

 toggles digital 

teletext on and off 
(where available)

GUIDE 

displays

on-screen TV guide

STB

 toggles 

between digital 
and analogue TV

Coloured buttons

perform special 
menu functions as 
shown on screen

EXIT

 returns 

you to the 
previous screen 
in the menu

MENU

 displays 

the main menu

 navigate 

up down, left and 
right in menus 

OK

 confirms 

OK

OK

selected action in 
menus

INFO

 displays 

information 
on selected 
programme

VOL +/- 

Increases/ 
decreases 
volume

PROG +/-

 Changes 

channels up/down

MUTE

 toggles 

mute on or off

DTV

 exits any 

DTV

DTV

menu and returns 
to digital TV

(where available)

on-screen TV guide

Summary of Contents for GDB5

Page 1: ...Goodmans Helpline Phone Number 0870 873 0080 ...

Page 2: ......

Page 3: ...3 contents Introduction 4 Connecting up 5 Overview diagrams 6 Getting started 8 Using the main menu 10 Troubleshooting 15 Technical Specifications 16 ...

Page 4: ...ables you to receive digital televison and DAB digital radio through your TV aerial and existing TV without the need for subscription based cable or satellite access GDB 5 Digital TV DAB Receiver main unit Remote control Batteries for remote control Power adapter SCART to SCART lead in the box introduction ...

Page 5: ...B5 AERIAL OUT socket and the other end of the cable to your TV aerial input socket 4 Connect the DC power adaptor cable to the 13 VOLT DC socket on the back of your GDB5 and insert the power adaptor into a 230V AC power supply connecting up SCART cable RF cable Aerial cable TV Power cable ADAPTER 1 Disconnect all the aerial and scart leads attached to your TV and VCR SCART cable RF cable Aerial ca...

Page 6: ...the supplied RF loop through cable to the GDB5 AERIAL OUT socket and the other end to your VCR aerial input socket 5 Connect an existing supplied with your VCR RF cable to the aerial out socket of your VCR and the other end to the aerial input socket of your TV 6 Connect the existing supplied with your VCR scart lead to the Scart socket of your VCR and the other end to the VCR AUX Scart socket on ...

Page 7: ...ignal from the remote control 13 VOLT DC for connection for connection to the power adapter SCART TV for connection to your TV AERIAL IN for connection to your aerial AERIAL OUT for connection to your TV video SCART VCR AUX for connection to your video main unit LINE LEVEL AUDIO OUT audio out for connection to your hifi ...

Page 8: ...een digital and analogue TV Coloured buttons perform special menu functions as shown on screen EXIT returns you to the previous screen in the menu MENU displays the main menu navigate up down left and right in menus OK confirms OK confirms OK selected action in menus INFO displays information on selected programme VOL Increases decreases volume PROG Changes channels up down MUTE toggles mute on or...

Page 9: ...ss the green button OK when the search is finished You see the first channel displayed on screen 3 View digital TV channels Once a search for channels has been completed you can watch any of the stored digital channels as follows 1 Press the DTV button at any time or if viewing the menu on screen press Exit repeatedly until you see a channel on the screen 2 Change to another channel by using one o...

Page 10: ...lect a channel press INFO again or press no buttons for 5 seconds to close the info bar and return to the TV 5 Listen to digital radio stations To listen to digital radio through your television 1 Press the MENU button You see the Main Menu 2 Use the left and right arrows and OK to select the Digital Radio icon If this is the first time you have selected Digital Radio a search will be performed to...

Page 11: ...mber of the station you want press the up or down arrows to highlight a station on the list and OK to change to that station Viewing extra information Press the yellow button Info on off to view extra information including DAB channel and frequency multiplex name and data rate Please read the instructions in the rest of this manual for further guidance on using your GDB 5 ...

Page 12: ...ogrammes are on and enables you to view favourite channels or further information about an individual programme You access the TV Guide from the main menu by selecting the TV guide icon or directly from the remote control by pressing the GUIDE button The channel list shows the channel number and name the current programme on each channel and time it started It also shows additional information abo...

Page 13: ...buttons If you have set up favourite channels you can toggle the list between showing only those channels you have selected as favourites and all channels by pressing the yellow Fav On Fav Off button See page 18 for more details about favourites Selecting a channel You can select a channel to view in one of two ways Enter the channel number listed alongside the channel in the list and press OK Nav...

Page 14: ... list of stations You can also jump up and down the list using the red Page up and green Page down buttons If you have set up favourite channels you can toggle the list between showing only those stations you have selected as favourites and all stations by pressing the yellow Fav On Fav Off button See page 18 for more details about favourites Selecting a station You can select a station to listen ...

Page 15: ...m AV or AUX for recording from an external source Check your VCR manual for details Note Your GDB 5 will automatically tune to the channel you selected at the time you set You cannot watch other digital channels whilst a record timer is active however you can switch to analogue TV and watch analogue channels by pressing the STB button You add or delete recordings from this list as described below ...

Page 16: ...nd return to the recording list 5 To set another record timer repeat steps 1 to 4 above Deleting a timer event 1 Press the up and down arrows to scroll up and down the recording list and highlight the recording you want to delete 2 Press the Red Remove key to remove the highlighted event from the list ...

Page 17: ...annels available in your area The number of channels available will vary depending on coverage at your location and the orientation and type of your aerial See Troubleshooting for further information on coverage and aerial issues 1 Select the TV Channel Search option using the up and down arrow keys and pressing OK The search will start and a bar will indicate the progress and the number of channe...

Page 18: ...ourite channels 1 Use the up and down arrows to highlight a channel then press OK The channel is marked with a tick in the favourites list 2 Repeat step one as required to select other channels or press the Green Select All button to select all channels or Red Clear All button to clear all selections Reordering your channel list 1 Use the up and down arrows to highlight a channel you want to move ...

Page 19: ...e left and right arrows to change the subtitle language This option is dependant on the broadcaster providing alternative subtitle languages The default is English Display Format Use the up and down arrows to highlight the Display Format option Use the left and right arrows to change the format between 4 3 standard TV or 16 9 Widescreen TV Signal Strength The signal strength option enables you to ...

Page 20: ...uitable for receiving Digital TV Repeat the channel search available on the Setup menu I cannot see my old analogue channels Check that you have connected a suitable RF cable between your GDB 5 and your TV Press the DTV button on the remote to toggle between Digital and Analogue channels Software updates Your GDB 5 contains software which may occasionally be updated to provide an enhanced service ...

Page 21: ... only Connections UHF Aerial input UHF Aerial output 2 SCART Audio L R phono output SCART pin connections TV SCART 1 Audio right output 12 n c 2 n c 13 Ground 3 Audio left output1 14 n c 4 Ground 15 Red Output 5 Ground 16 Fast blanking output 6 n c 17 Ground 7 Blue output 18 Ground 8 Function switching output 19 CVBS output 9 Ground 20 n c 10 n c 21 Ground 11 Green output VCR SCART no RGB 1 Audio ...

Page 22: ...22 ...

Page 23: ...23 ...

Page 24: ......

Reviews: