Goodmans 363306 User Manual Download Page 12

1. When the alarm sounds, press the OK button to delay the 

alarm for another 9 mins. The radio will go to Standby mode.

2. You can press POWER/MODE button to stop the Snooze 

function and go to the operation mode before the alarms rings.

Snooze Function

4.20

Note: You can press the INFO/MENU button to get back last one 
step when in the process of setting the alarm.

Note: The alarm will keep ringing for one hour if you do not turn it 
off when it is sounding.

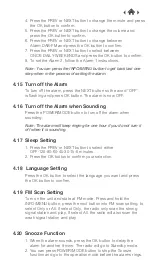
4. Press the PREV or NEXT button to change the minute and press 

the OK button to confirm.

5. Press the PREV or NEXT button to change the volume and 

press the OK button to confirm.

6. Press the PREV or NEXT button to change between 

Alarm-DAB-FM and press the OK button to confirm.

7. Press the PREV or NEXT button to select between 

ONCE-DAILY-WEEKENDS and press the OK button to confirm.

8. To set the Alarm 2, follow the Alarm 1 instructions.

1. Press the PREV or NEXT button to select either 

OFF-120-90-60-45-30-15-5 minutes.

2. Press the OK button to confirm your selection.

Sleep Setting

4.17

To turn off the alarm, press the NEXT button so the word “OFF” 
is flashing and press OK button. The alarm is now OFF.

Turn off the Alarm

4.15

Press the OK button to select the language you want and press 
the OK button to confirm.

Language Setting

4.18

4.19

Press the POWER/MODE button to turn off the alarm when 
sounding.

Turn off the Alarm when Sounding

4.16

Turn on the unit and state at FM mode, Press and hold the 
INFO/MENU button, press the next button into FM scan setting, to 
select Only or All. If select Only, the radio only scan the strong 
signal station and play. If select All, the radio will also scan the 
weak signal station and play.

FM Scan Setting

Summary of Contents for 363306

Page 1: ...DAB FM RADIO USER MANUAL MODEL 363306...

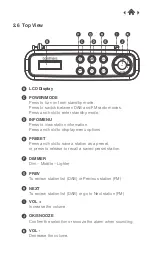
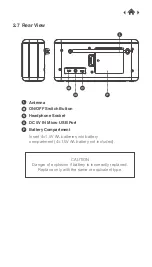
Page 2: ...Top View Rear View Front View 4 1 4 3 4 2 4 4 Full Scan Recalling Stored Stations Stations Information on DAB Mode Storing Stations 4 5 Removing Stations 3 1 3 2 Connecting the Power DAB Operation 4...

Page 3: ...ng the Radio Alarm Setting System Version 4 15 Turn off the Alarm 4 17 4 16 4 18 Sleep Setting Language Setting Turn off the Alarm when Sounding 4 19 FM Scan Setting 4 20 Snooze Function System Settin...

Page 4: ...r products have been carefully designed to be great at what they do and this one is no exception We hope you enjoy your new Goodmans DAB FM Radio Carefully remove your DAB FM Radio from the box Inside...

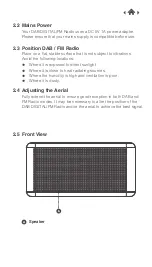
Page 5: ...at your mains supply is compatible before use Mains Power 2 2 Fully extend the aerial to ensure good reception in both DAB and FM Radio modes It may be necessary to alter the position of the DAB DIGIT...

Page 6: ...ation Press and hold to display menu options INFO MENU Press and hold to save a station as a preset or press to release to recall a saved preset station PRESET Dim Middle Lighter DIMMER To review stat...

Page 7: ...hone Socket DC 5V IN Micro USB Port Battery Compartment Insert 4 1 5V AA batteries into battery compartment 4 1 5V AA battery not included CAUTION Danger of explosion if battery is incorrectly replace...

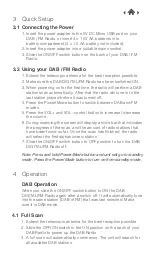
Page 8: ...ly tune into the same station DAB of FM that was last selected Make sure it is DAB mode Operation 4 DAB Operation 1 Extend the telescopic antenna for the best reception possible 2 Slide the OFF ON swi...

Page 9: ...DAB DIGITAL FM Radio has performed a Scan in several locations you may find there are stored stations that you can no longer receive This function automatically removes them from the stored station l...

Page 10: ...e OK button to recall a preset station number Recalling Stored Stations 4 9 1 To search for an FM station press and hold the NEXT button This will start scanning up the frequency band 2 To scan down t...

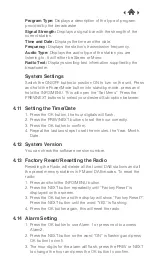
Page 11: ...3 Press the OK button and the display will show Factory Reset Press the NEXT button until the word YES is flashing 4 Press the OK button again this will reset the radio Factory Reset Resetting the Rad...

Page 12: ...or NEXT button to select between ONCE DAILY WEEKENDS and press the OK button to confirm 8 To set the Alarm 2 follow the Alarm 1 instructions 1 Press the PREV or NEXT button to select either OFF 120 9...

Page 13: ...ns Problem What to do Sound is distorted The volume is too high Adjust the volume control Desired station not found short Weak signal Use the manual tune function Display shows No Service There is no...

Page 14: ...95mm L x 61 6mm W x 96mm H EC Declaration 7 This product is intended for use within the UK This appliance complies with the below listed EU directives 2014 30 EU Electromagnetic Compatibility Directiv...

Page 15: ...atment recovery and recycling of the materials used For proper treatment recovery and recycling please take all WEEE marked waste to your Local Authority Civic waste site where it will be accepted fre...

Reviews: