background image

15

4. Use a knockout tool to create a 3" diameter hole
5. Install combustion air flange and secure with screws

removed in step one.

N

ON

-D

IRECT

 V

ENT

 (S

INGLE

 P

IPE

) P

IPING

Non-direct


vent 

installations require only a vent/flue pipe.  The

vent pipe can be run horizontally with an exit through the side of
the building or run vertically with an exit through the roof of the
building.  The vent can also be run through an existing 

unused

chimney; however, it must extend a minimum of 12 inches above
the top of the chimney.  The space between the vent pipe and the
chimney must be closed with a weather-tight, corrosion-resistant
flashing.

Although 

non-direct


vent

 installations do not require a combustion

air intake

 pipe

, a minimum of one 90° elbow should be attached to

the furnace’s combustion air intake 

if

: an upright installation uses

the standard intake location, or a horizontal installation uses the
alternate air intake location.  This elbow will guard against inad-
vertent blockage of the air intake.

V

ENT

/F

LUE

 P

IPE

 L

ENGTHS


AND

 D

IAMETERS

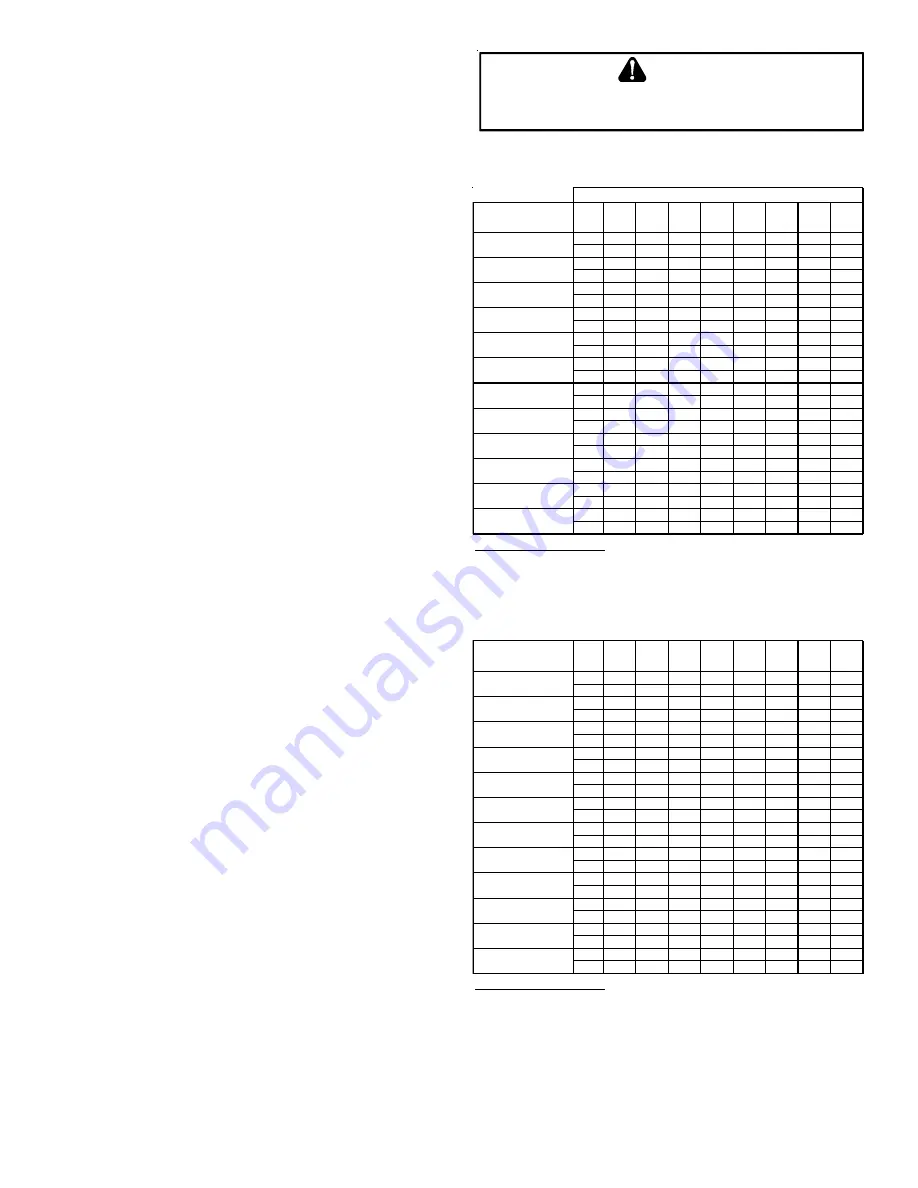
(For Installations At or Above 7,000 Feet using 3” Venting)

NOTE: 

If either a 90 degree or 45 degree elbow is used for

termination, it must be pointed downward.

Refer to the Direct and Non-Direct Vent Table for applicable length,
elbows, and pipe diameter for construction of the vent/flue pipe
system of a non-direct vent installation.  In addition to the vent/
flue pipe, a single 90° elbow should be secured to the combustion
air intake to prevent inadvertent blockage.  The tee used in the
vent/flue termination must be included when determining the num-
ber of elbows in the piping system.

V

ENT

/F

LUE

 P

IPE

 T

ERMINATIONS

NOTE: 

If either a 90 degree or 45 degree elbow is used for

termination, it must be pointed downward.

The vent/flue pipe may terminate vertically, as through a roof, or
horizontally, as through an outside wall.

Vertical vent/flue pipe terminations should be as shown in the fol-
lowing figure.  Refer to 

Vent/Flue Pipe and Combustion Air Pipe -

Termination Locations

 for details concerning location restrictions.

The penetration of the vent through the roof must be sealed tight
with proper flashing such as is used with a plastic plumbing vent.

Horizontal vent/flue pipe terminations should be as shown in the
following figure. Refer to 

Vent/Flue Pipe and Combustion Air Pipe.

To secure the pipe passing through the wall and prohibit damage to
piping connections, a coupling should be installed on either side of
the wall and solvent cemented to a length of pipe connecting the
two couplings.  The length of pipe should be the wall thickness plus
the depth of the socket fittings to be installed on the inside and
outside of the wall.  The wall penetration should be sealed with silicone caulking material.

NOTE: Terminate both pipes in the same pressure zone (same side of roof, no major obstacles between pipes, etc.).

B

E


SURE


NOT


TO


DAMAGE


INTERNAL


WIRING


OR


OTHER


COMPONENTS


WHEN


REINSTALLING


COUPLING


AND


SCREWS

.

CAUTION

MODEL

PIPE

SIZE

1

2

3

4

5

6

7

8

2

^

145

140

135

130

125

120

115

110

3

168

161

154

147

140

133

126

119

2

55

50

45

40

35

30

25

20

3

127

120

113

106

99

92

85

78

2

^

30

25

20

15

10

5

N/A

N/A

3

^

72

65

58

51

44

37

30

23

2

^

30

25

20

15

10

5

N/A

N/A

3

^

72

65

58

51

44

37

30

23

2

^

40

35

30

25

20

15

10

5

3

72

65

58

51

44

37

30

23

2

60

55

50

45

40

35

30

25

3

168

161

154

147

140

133

126

119

2

30

25

20

15

10

5

N/A

N/A

3

113

106

99

92

85

78

71

64

2

N/A

N/A

N/A

N/A

N/A

N/A

N/A

N/A

3

65

58

51

44

37

30

23

16

2

100

95

90

85

80

75

70

65

3

137

130

123

116

109

102

95

88

2

60

55

50

45

40

35

30

25

3

127

120

113

106

99

92

85

78

2

35

30

25

20

15

10

5

N/A

3

160

153

146

139

132

125

118

111

2

N/A

N/A

N/A

N/A

N/A

N/A

N/A

N/A

3

127

120

113

106

99

92

85

78

7,000 f t altitude or above use 3" pipe

^

 *MSS920402BN - add 20' of 2" pipe for upflow position 

*MSS920803BN - add 10' of  2" pipe for upf low  position, add 66' of  3" pipe f or upflow  position

^

 *MSS920804CN - add 25' of 2" pipe for upf low  position, add 58' of  3" pipe f or upf low  position

^ *MSS920805CN - add 15' of 2" pipe for upflow  position, add 58' of  3" pipe f or upf low  position

MODEL

PIPE

SIZE

1

2

3

4

5

6

7

8

2

^

100

95

90

85

80

75

70

65

3

168

161

154

147

140

133

126

119

2

45

40

35

30

25

20

15

10

3

168

161

154

147

140

133

126

119

2

^

35

30

25

20

15

10

5

N/A

3

168

161

154

147

140

133

126

119

2

60

55

50

45

40

35

30

25

3

113

106

99

92

85

78

71

64

2

45

40

35

30

25

20

15

10

3

120

113

106

99

92

85

78

71

2

40

35

30

25

20

15

10

5

3

151

144

137

130

123

116

109

102

2

N/A

N/A

N/A

N/A

N/A

N/A

N/A

N/A

3

158

151

144

137

130

123

116

109

2

100

95

90

85

80

75

70

65

3

137

130

123

116

109

102

95

88

2

45

40

35

30

25

20

15

10

3

168

161

154

147

140

133

126

119

2

40

35

30

25

20

15

10

5

3

120

113

106

99

92

85

78

71

2

N/A

N/A

N/A

N/A

N/A

N/A

N/A

N/A

3

113

106

99

92

85

78

71

64

2

N/A

N/A

N/A

N/A

N/A

N/A

N/A

N/A

3

110

103

96

89

82

75

68

61

7,000 f t altitude or above use 3" pipe

^ *MSS960402BN - add 25' of 2" pipe for upflow  position 

^

 *MSS960803BN - add 20' of 2" pipe for upf low  position

Number of Elbows

*MSS920402BN

*MSS920603BN

*MSS921004CN

*MSS960603BN

*MSS920803BN

*MSS920804CN

*MSS920805CN

*CSS920804CN

*CSS921005CN

*MSS960402BN

*MSS921005CN

*MSS921205DN

*CSS920402BN

*CSS920603BN

*MSS960804CN

*MSS960805CN

*MSS961005CN

*CSS961005CN

*MSS960803BN

*CSS961205DN

*MSS961205DN

*CSS960402BN

*CSS960603BN

*CSS960804CN

*MSS9* / *CSS9 Direct Vent (2-Pipe) & Non-Direct Vent (1-Pipe)

Maximum Allowable Length of Vent/FLue Pipe

Summary of Contents for *CSS920402BN

Page 1: ...ETY PRECAUTION is a registered trademark of Maytag Corporation or its related companies and is used under license All rights reserved TABLE OF CONTENTS SAFETY CONSIDERATIONS 3 SHIPPING INSPECTION 4 EL...

Page 2: ...RAP PRIMING 33 FURNACE OPERATION 33 GAS SUPPLY PRESSURE MEASUREMENT 34 GAS MANIFOLD PRESSURE MEASUREMENT AND ADJUSTMENT 34 GAS INPUT RATE MEASUREMENT NATURAL GAS ONLY 35 TEMPERATURE RISE 36 CIRCULATOR...

Page 3: ...ns when install ing adjusting altering servicing or operating the furnace To ensure proper installation and operation thoroughly read this manual for specifics pertaining to the installation and appli...

Page 4: ...ome loose in transit In the event of damage the consignee should 1 Make a notation on delivery receipt of any visible damage to shipment or container 2 Notify carrier promptly and request an inspectio...

Page 5: ...for use with natural or propane gas NOTE If using propane a propane conversion kit is required Dual certification means that the combustion air inlet pipe is optional and the furnace can be vented as...

Page 6: ...ing combustion products outdoors through a proper venting system Special consideration should begiventovent fluepiperoutingandcombustionairintakepipewhenapplicable Referto Vent FluePipeandCombustion A...

Page 7: ...snecessary useanaccessory subbase seeSpecificationSheetapplicableforyourmodelfordetails Aspecialaccessorysubbasemustbeusedforupright counterflow unit installations over any combustible material includ...

Page 8: ...any unused openings in the venting system 2 Inspect the venting system for proper size and horizontal pitch as required by the National Fuel Gas Code ANSI Z223 1 or the Natural Gas and Propane Install...

Page 9: ...back drafting or improper combustion of gas fired appliances thereby exposing building occupants to gas combustion products that could include carbon monoxide If this furnace is to be installed in th...

Page 10: ...tothefurnacesidepanel suspendingitbelowthefurnace Aminimum clearance of 5 5 below the furnace must be provided for the drain trap Additionally the appropriate downward piping slope must be maintained...

Page 11: ...all vent flue piping and connectorsarecompatiblewithfurnaceflueproducts Additionally itistheresponsibilityoftheinstallertoensurethatallpipingand connections possess adequate structural integrity and s...

Page 12: ...n from a 2 to 3 pipe in a horizontal section of pipe as this may create a water trap PREFERRED TRANSITION NO LESS THAN 45 DEGREES TO HORIZONTAL PLANE TO AVOID CREATING A WATER TRAP IN VENT PIPING ACCE...

Page 13: ...orted Vent FluePipe The vent pipe outlet is sized to accept 2 pipe Secure vent flue pipe directly into the furnace fitting with the appropriate glue Alternately a small section of 2 pipe may be glued...

Page 14: ...r outlet 5 Install cut end of the flanged section and connect to inducer with rubber coupling supplied with furnace 6 Install screws removed in step 1 securing flange to cabinet THE RUBBER ELBOW IS NO...

Page 15: ...ness plus the depth of the socket fittings to be installed on the inside and outside of the wall The wall penetration should be sealed with silicone caulking material NOTE Terminate both pipes in the...

Page 16: ...Condensate trapped to prevent flue gas from escaping and routed to field supplied condensate disposal Combustion Air Pipe Vent Pipe All piping and fittings must be joined per material manufacturer s s...

Page 17: ...termining the number of elbows in the piping systems If the combustion air intake pipe is to be installed above a finished ceiling or other area where dripping of condensate will be objectionable insu...

Page 18: ...Refer to the directions furnished with the Side Wall Vent Kit p n 0170K00000S or 0170K00001S for installation specifica tions CONDENSATE DRAIN LINES DRAIN TRAP A condensing gas furnace achieves its hi...

Page 19: ...ed horizontally require the trap to be relocated Many drain hoses have a built in grommet which will provide a cabinet seal when installed See instructions below for your model and installation positi...

Page 20: ...Remove the trap and two hoses from the blower deck 4 Remove the two plugs from the right side of the cabinet and install them in the blower deck 5a Draining the Vent Elbow Locate hose 2 factory instal...

Page 21: ...e the trap to the cabinet using two screws removed in step 2 by inserting the two screws through the large set of holes in the top mounting tabs of the trap into the two predrilled holes in the side o...

Page 22: ...clamps 7 Fasten the drain trap to the cabinet with two screws removed in step 2 8 Refer to Field Supplied Drain section for instructions on field supplied installed drain on outlet of furnace trap COU...

Page 23: ...e observed when making field connections Line voltage connections can be made through either the right or left side panel The furnace is shipped configured for a left side right side for counterflows...

Page 24: ...ig ured for a left side electri cal connection To make electrical connections through the opposite side of the furnace the junction box must be relocated to the left side prior to making electrical co...

Page 25: ...The combination of the lower air density and a lower manifold pressure will prohibit the burner orifice from drawing the proper amount of air into the burner This may cause incomplete combustion flash...

Page 26: ...valve and line and fittings to connect to gas valve In some cases the installer may also need to supply a transition piece from 1 2 pipe to a larger pipe size Thefollowingstipulationsapplywhenconnect...

Page 27: ...rd Gas Line Hole Ground Joint Pipe Union Ground Joint Pipe Union NOTE Union may be inside furnace cabinet where allowed by local codes COUNTERFLOW Figure 32 Drip Leg Plug in Main Gas Line Hole Alterna...

Page 28: ...sulting in heat exchanger failure Disconnect this unit and shutoff valve from the gas supply piping system before pressure testing the supply piping system with pressures in excess of 1 2 psig 3 48 kP...

Page 29: ...g plate for the maximum ESP ex ternal duct static rating Total external static refers to everything external to the fur nace cabinet Cooling coils filters ducts grilles registers must all be considere...

Page 30: ...s retaining the sheet metal over the duct opening Using tin snips cut the metal strips and remove the sheet metal covering the duct opening In the corners of the open ing cut the sheet metal along the...

Page 31: ...BN 2 10 X 20 or 1 16 X 25 Top Return CSS9 0804CN 2 10 X 20 or 1 16 X 25 Top Return CSS9 1005CN 2 14 X 20 or 1 20 X 25 Top Return CSS961205DN 2 14 X 20 or 1 20 X 25 Top Return Other size filters of equ...

Page 32: ...11 5 2 X 1600 CFM 2 16 in X 25 in x 5 AM11 3225 5 AM11 3225 AM11 5PP AM11 5 AM11 5RA AM11 5PP Family Family Family Upright Installations Depending on the installation and or customer preference differ...

Page 33: ...uipped with an ignition device which automatically lights the burner Do not try to light the burner by hand 5 Move the furnace gas valve manual control to the OFF position 6 Wait five minutes then sme...

Page 34: ...2 gas valve then use the 36G J Valve Pressure Check Kit Part No 0151K00000S 3 TurnONthegassupplyandoperatethefurnaceandallothergasconsuming appliances on the same gas supply line 4 Measure furnace gas...

Page 35: ...s to gas conversion consult your dealer for appropriate conversion GAS INPUT RATE MEASUREMENT NATURAL GAS ONLY The actual gas input rate to the furnace must never be greater than that specified on the...

Page 36: ...stalled with the furnace If the cooling capacity is in BTU hr divide it by 12 000 to convert capacity to tons Example Cooling Capacity of 30 000 BTU hr 30 000 12 000 2 5 Tons 2 Determine the proper ai...

Page 37: ...rol module monitors flame presence Gas valve will remain open only if flame is detected Circulator blower is energized on heat speed following a thirty 30 second blower on delay 96 models 115 VAC EAC...

Page 38: ...rmally closed electrically automatic reset temperature activated sensor The limit guards against overheating as a result of insufficient conditioned air passing over the heat exchanger AUXILIARY LIMIT...

Page 39: ...e control is in standby mode no call for heat or cool press the FAULT RECALL switch for five to ten seconds or until the diagnostic LED begins to rapid flash When the switch is released the LED will t...

Page 40: ...e To remove 1 Turn OFF electrical power to furnace 2 Remove filter s from the central return register or ductwork 3 Replace filter s by reversing the procedure for removal 4 TurnONelectricalpowertofur...

Page 41: ...should be as indicated in the Specifications Sheet FLUE PASSAGES QUALIFIED SERVICER ONLY The heat exchanger flue passageways should be inspected at the beginning of each heating season BEFORE LEAVING...

Page 42: ...Loose or improperly connected wiring Pressure switch circuit not closed Induced draft blower is operat ing Induced draft blower runs continuously with no further furnace operation Integrated control m...

Page 43: ...5 5 FLASHES Short to ground in flame sense circuit Furnace fails to operate Integrated control module diagnostic LED is flashing SIX 6 flashes No furnace operation Rollout limit open Integrated contro...

Page 44: ...5 1084 1005 HIGH 5 0 2284 30 2231 31 2170 31 2103 32 2037 33 1945 1836 1750 MED 4 0 1865 37 1869 36 1775 38 1732 39 1684 40 1619 1548 1480 MED LO 3 5 1594 43 1571 43 1530 45 1492 46 1454 47 1414 1355...

Page 45: ...N A 610 N A 604 571 519 HIGH 5 0 2233 32 2159 33 2086 34 2024 35 1941 37 1850 1753 1651 MED 4 0 1820 39 1778 40 1742 41 1695 42 1638 43 1551 1485 1384 MED LO 3 5 1571 45 1535 46 1497 48 1446 49 1402...

Page 46: ...TIONS N E C CLASS 2 WIRE GR GND 115 VAC 24 VAC BLOWER COMPARTMENT DOOR SWITCH OPEN WHEN DOOR OPEN DOOR SWITCH WARNING DISCONNECTPOWER BEFORE SERVICING WIRING TO UNITMUSTBE PROPERLY POLARIZED AND GROUN...

Page 47: ...GND 115 VAC 24 VAC BLOWER COMPARTMENT DOOR SWITCH OPEN WHEN DOOR OPEN DOOR SWITCH WARNING DISCONNECTPOWER BEFORE SERVICING WIRING TO UNITMUST BE PROPERLY POLARIZEDAND GROUNDED BK GND DISCONNECT L N PO...

Page 48: ...tly mounted to the exterior of the building at a minimum height of eight 8 feet above grade directly in line with the exhaust vent terminal for the horizontally vented gas fueled heating appliance or...

Reviews: