background image


6


Bottom Panel 

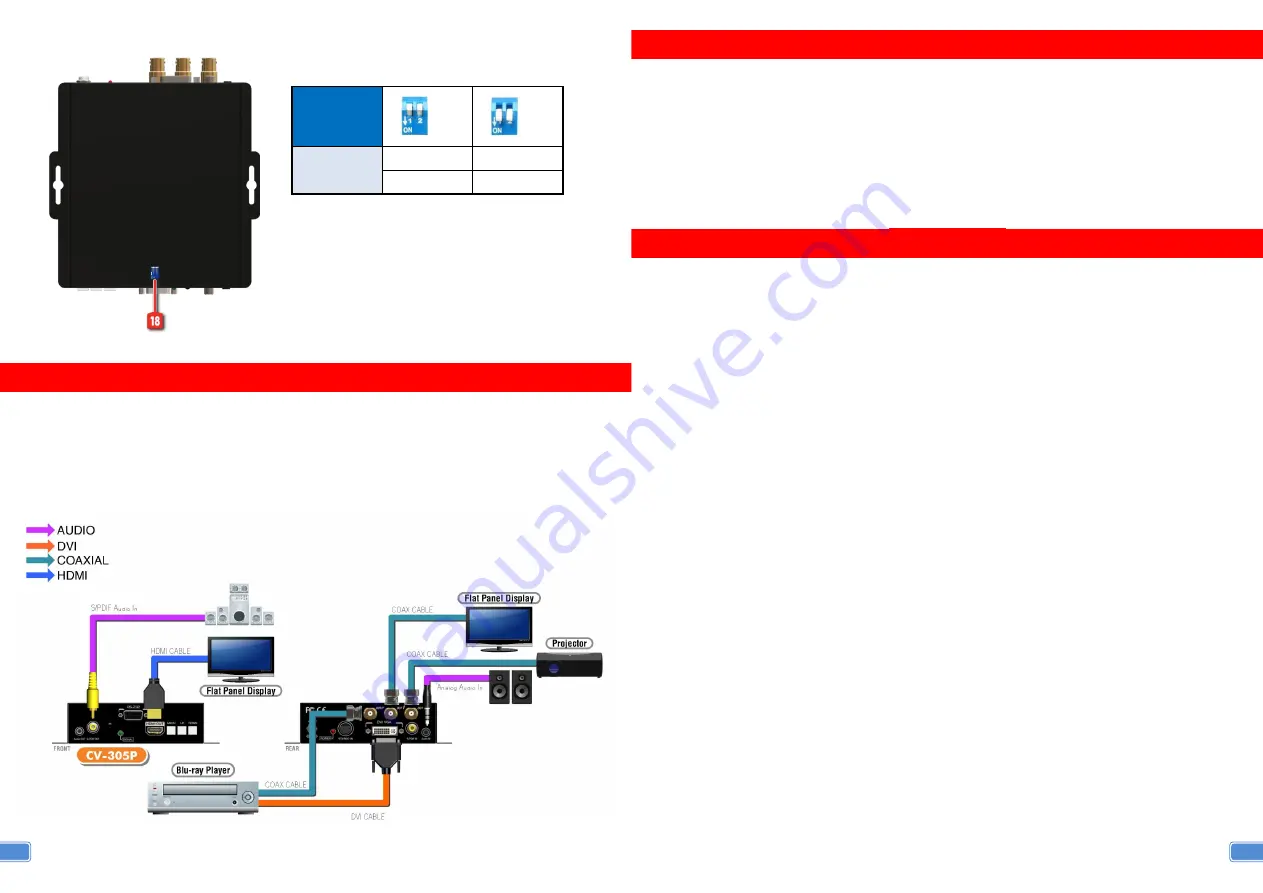
– 2-pin DIP Switch 


CONNECTION DIAGRAM 

1.  Connect your video sources to the input connectors. 

2. 

Connect your HDMI enabled monitors into the device’s HDMI output port. 

3.  Power up the CV-305P. 

4.  Use IR or push buttons to select the input, setup the output resolution, and adjust your video format. 


18.Switch   

  Position


-


-


Input 1 

Normal 

Reset 

Input 2 

Normal 

Reset 


7


DEFAULT SETTING 

1.

  Power up the CV-305P. 

2.

  To reset CV-305P back to the factory default values, pull up-and-down the DIP switch 1&2 from OFF 

to ON to complete the process. You NEED to pull back the DIP switch back to OFF in order to get 

CV-305P work normally. 


NOTICE 

1.  As the video formats evolves and expands, CV-305P is firmware upgradable for this fashion. 

2.  PIP and PAP only support digital and analog display or dual display for single input. 

3.  Analog stereo audio can merely support 2-channel audio. This version does NOT support 8-channel 

analog audio applications. 

4.  S/PDIF audio input can support 2 out of 8-channel audio input. 

5.  S/PDIF supports only 48KHz audio sample rate. Other than this rate, the input digital audio should be 

adjusted to 48KHz in order to get audio signal correctly sent. 

6.  Through OSD menu, users can decide which audio groups of SDI can be output! 


Summary of Contents for CV-305P

Page 1: ...nit Do not attempt to service this unit yourself except where explained in this manual Provide proper ventilation and air circulation and do not use near water Keep objects that might damage the devic...

Page 2: ...management fleshtone control dynamic contrast control closed caption support for CVBS 3D de interlacing 3 2 2 2 pull down detection and recovery Selectable analog stereo and S PDIF audio support for...

Page 3: ...CD 1x DC 5V 4A in line with C7 power cord 1x VGA to component breakout cable 1x Composite S video breakout cable 1x IR Remote control 1x User Manual 5 PANEL DESCRIPTIONS Input Panel 1 Audio OUT Analog...

Page 4: ...lete the process You NEED to pull back the DIP switch back to OFF in order to get CV 305P work normally NOTICE 1 As the video formats evolves and expands CV 305P is firmware upgradable for this fashio...

Page 5: ...this model F2 Display input timing F3 Auto color balance The buttons not listed above are not in use for this model 9 IR FRONT PANEL BUTTON Men u Video Processing Audio Settings Image Settings Setting...

Page 6: ...ue MPEG NR Temporal NR Fleshtone 11 Settings IR Factory Reset On Off Exit Execute Factory Reset Information Show the Input Information Mode Overlap 480p 640x480 Exit Freeze Freeze Unfreeze Main Screen...

Page 7: ...Vertical position 0 100 Blend OSD Blend Level 0 15 OSDTime OSD Existing Time 7 60 sec Exit Back to OSD sec ZoomInV 13 Video Wll Divide H by Divide Horizontal by 1 10 Divide V by Divide Vertical by 1 1...

Page 8: ...lect ComPort of PC connected to the device Push auto scan to start the automatic scan on each ComPort BaudRate is default as 115200 15 Window Messages The connection is not correct Please check Power...

Page 9: ...A 800x600 60Hz VESA 800x600 72Hz VESA 800x600 75Hz VESA 800x600 85Hz Supported Mode Resolution MAC 832x624 75Hz VESA 1024x768 60Hz MAC 1024x768 60Hz VESA 1024x768 70Hz IBM 1024x768 72Hz VESA 1024x768...

Reviews: