background image

9

SETTINGS MENU

Continued overleaf

ART 7 /G2+ MONITOR

H

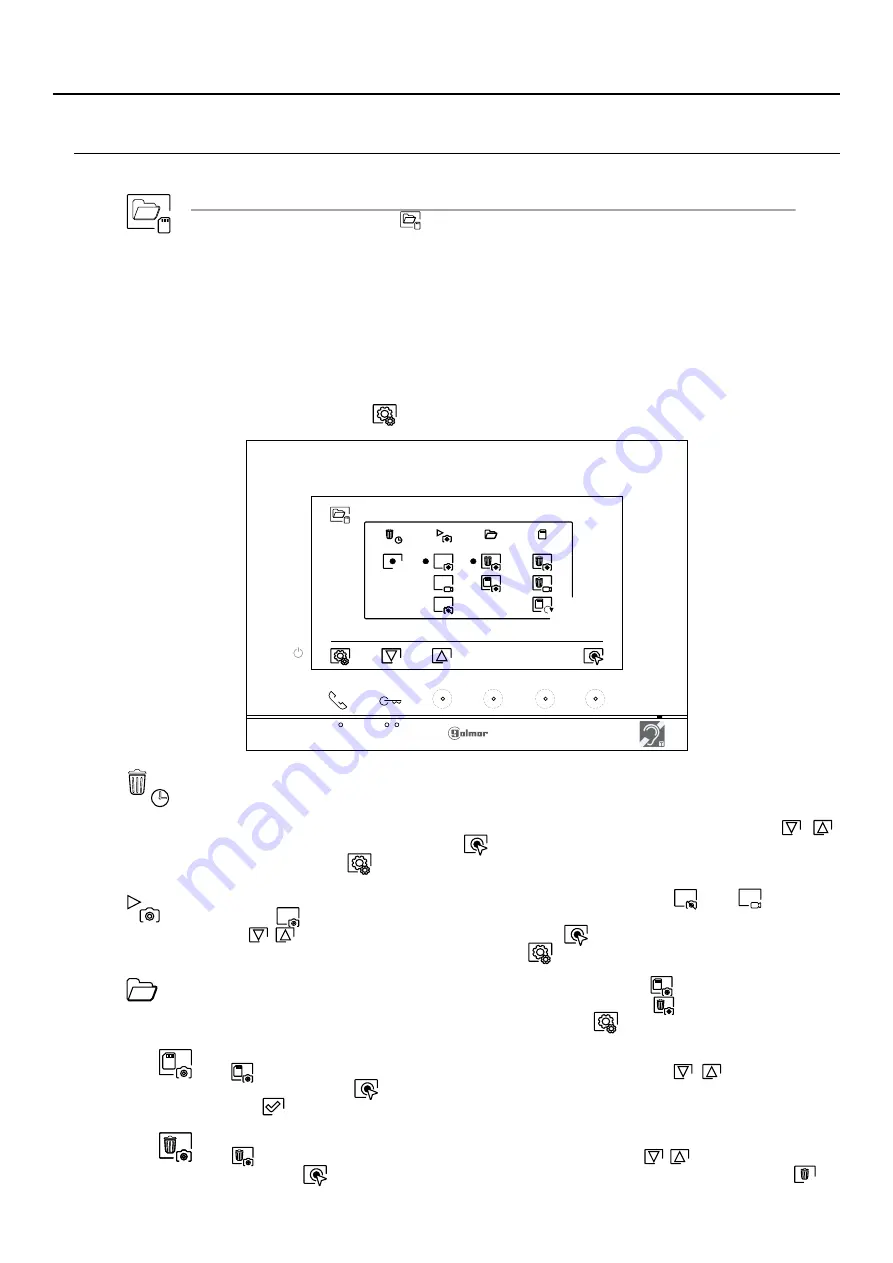
Automatically deleting images/videos, image recording mode, internal memory and Micro SD card: Press

the hidden button below icon

to access the settings screen. In some countries, the law does not

permit the storage of images or videos for more than 30 days after recording. The automatic deletion
function performs this task for you. You can disable this function if your country's legislation does not
require it, or under your responsibility.

If you have not inserted a Micro SD card into your monitor, only still images can be recorded in the

internal memory of the monitor (up to 100). If you have inserted one, the images and videos will
always be recorded on the card, and the images in the internal memory cannot be displayed until
you copy them to the card.

From this menu, you can select the image recording mode, delete contents, copy from the internal

memory to the Micro SD card and format the card. Any of these actions (copy/delete) will require
confirmation.

Press the button below icon

to return to the settings menu.

In some countries, the law does not permit the storage of images or videos for more than 30 days after

recording. The automatic deletion function performs this task for you. You can disable this function if
your country's legislation does not require it, or under your responsibility. To disable this function, go to
the option to be modified by pressing the

hidden buttons below corresponding icons

/

,

button/

then press the hidden button below icon

to enable/disable the automatic deletion function. Press

the button below icon

to return to the settings menu.

If you have inserted a Micro SD card into the monitor, you can copy

previously recorded still

images on the monitor to the new Micro SD card and then delete

the still images from the

internal memory of the monitor. Press the button below icon

to return to the settings menu.

To copy the still images recorded on the monitor to the Micro SD card, go to the option with icon

button/

by pressing the

hidden button below corresponding icons

/

. Press the hidden

button below icon

to access the card format menu, then press the hidden button below

icon

to perform this function.

To delete the still images recorded in the internal memory of the monitor, go to the option with icon

button/

by pressing the

hidden button below corresponding icons

/

. Press the hidden button

below icon

to access the card format menu, then press the hidden button below icon

to

perform this function

.

To select the image recording mode during the reception of a call: still image

video

and without

recording

, go to the desired option by pressing the

hidden button below corresponding

button/

icons

/

, then press the hidden button below icon

to select the recording mode. To return

to the settings menu, press the button below icon

.

Summary of Contents for Art 7 H /G2+

Page 1: ...Code 50122464 TART 7 G2 EN H REV 0320 Hands free USER MANUAL Art 7 G2 monitor H TECHNOLOGY 2 wire installation 09 27 23 9 20 0 20...

Page 2: ...ance 26 before installing or marking modifications to the devices Always disconnect the power supply The fitting and handling of these devices must be carried out by authorised personnel The wiring mu...

Page 3: ...apartment is called by mistake press the button for the correct apartment and the first call will be cancelled Upon receiving the call the image will appear on the screen of the master monitor and sl...

Page 4: ...are the buttons that access the main menu In call Above this raised dot is the Start end communication button Above this raised dot is the Door opening button E 7 TFTcolour screen F Microphone G Comm...

Page 5: ...me apartment through the BUS CONFIGURATION SWITCHES J Switch 8 This activates the end of line resistance in the ON position Activate it in monitors where the bus cable ends Deactivate it only in inter...

Page 6: ...ges videos will be recorded on the MicroSD card see pp 2 18 0 Press the hidden button below icon to make changes to the system settings see pp 1 7 1 Indicates that the inserted Micro SD card must be f...

Page 7: ...nu Setting the monitor s date and time as well as the presentation format Press the button below icon to access the settings screen Go to the option to be modified by pressing the button hidden button...

Page 8: ...icons then press the hidden buttons below corresponding icons to select the melodies and desired call volume Press the button below icon to validate the changes made and return to the settings menu S...

Page 9: ...oes not require it or under your responsibility To disable this function go to the option to be modified by pressing the hidden buttons below corresponding icons button then press the hidden button be...

Page 10: ...utton below icon to perform this function To delete the videos recorded on the Micro SD card go to the option with icon by pressing the button hidden button below corresponding icons Press the hidden...

Page 11: ...responding icons and select the automatic door opening function activation option by pressing the hidden button below icon Then if you wish to set a period of time for opening the door select the fiel...

Page 12: ...ible to make the change during display call and communication 21 24 processes A few seconds after receiving a call it automatically takes a photograph In the top left of the screen icon is displayed a...

Page 13: ...ally starts recording a few seconds after In the top left of the screen icon is displayed and indicator will receiving the call illuminate see p to configure video recording mode Then a short 1 second...

Page 14: ...nu will then appear brightness contrast colour and monitor in communication volume Go to the option to be modified by pressing the hidden button below icons and change to the desired level by button p...

Page 15: ...l to another monitor s in the same apartment go to the option with icon by pressing the hidden button below corresponding icons and press the hidden button button below icon to access the monitor sele...

Page 16: ...apartment with which you wish to communicate Intercom calls to other apartments are disabled by default see p 1 6 For external intercom r the monito of the apartment that makes the call and the monit...

Page 17: ...aking the call will play a confirmation melody and indicate with a blink the code of the apartment called To cancel the call press the hidden button below icon Press the button below icon to return to...

Page 18: ...the screen containing the list of images press the hidden button under icon to display the selected image The image is then displayed in full screen the number of recordings is indicated in the top l...

Page 19: ...the recording source is shown on the right door panel 1 door panel camera 1 camera Press the hidden button below to 4 to 4 button icons to show the next or previous recording respectively To view the...

Page 20: ...the button below icon Main menu 0 0 2 9 7 019 0 0 2 9 7 019 0 0 2 9 7 019 0 0 2 9 7 019 0 0 2 9 7 019 0 0 2 8 7 019 0 0 2 8 7 019 0 0 2 8 7 019 0 0 2 7 7 019 0 0 2 7 7 019 1 10 8 21 1 17 0 5 0 1 1 1 0...

Page 21: ...on located above the raised dot for the visually impaired 1 The special codes screen will then be displayed Press the hidden button below icons to select the field button to be modified and press the...

Page 22: ...0471 0470 0471 activated Do not show the image on the monitor when receiving a call from the door panel when the monitor is in Do not disturb mode Show Do not show Factory setting 0481 0480 0480 show...

Page 23: ...guration of the remote activation button Door panel Configure only on the master monitor Relay1 3 Factory setting Delay From to 2400 0 5s 2419 10s 2403 2s Configuration of the remote activation button...

Page 24: ...isible Not visible Factory setting General door panel 1 1111 1110 1111 General door panel 2 1121 1120 1120 General door panel 3 1131 1130 1130 General door panel 4 1151 1150 1150 General camera 1 1141...

Page 25: ...ts that contain acids vinegar or abrasive components Use a soft damp cloth not wet that sheds no bres Always wipe the monitor in the same direction from top to bottom After cleaning the monitor remove...

Page 26: ...a la Compatibilidad Electromagn tica 20 4 CEE 1 30 This product meets the essentials requirements of applicable European Directives regarding Electromagnetic Compatibility 20 4 ECC 1 30 NOTA El funcio...

Reviews: