background image


13 

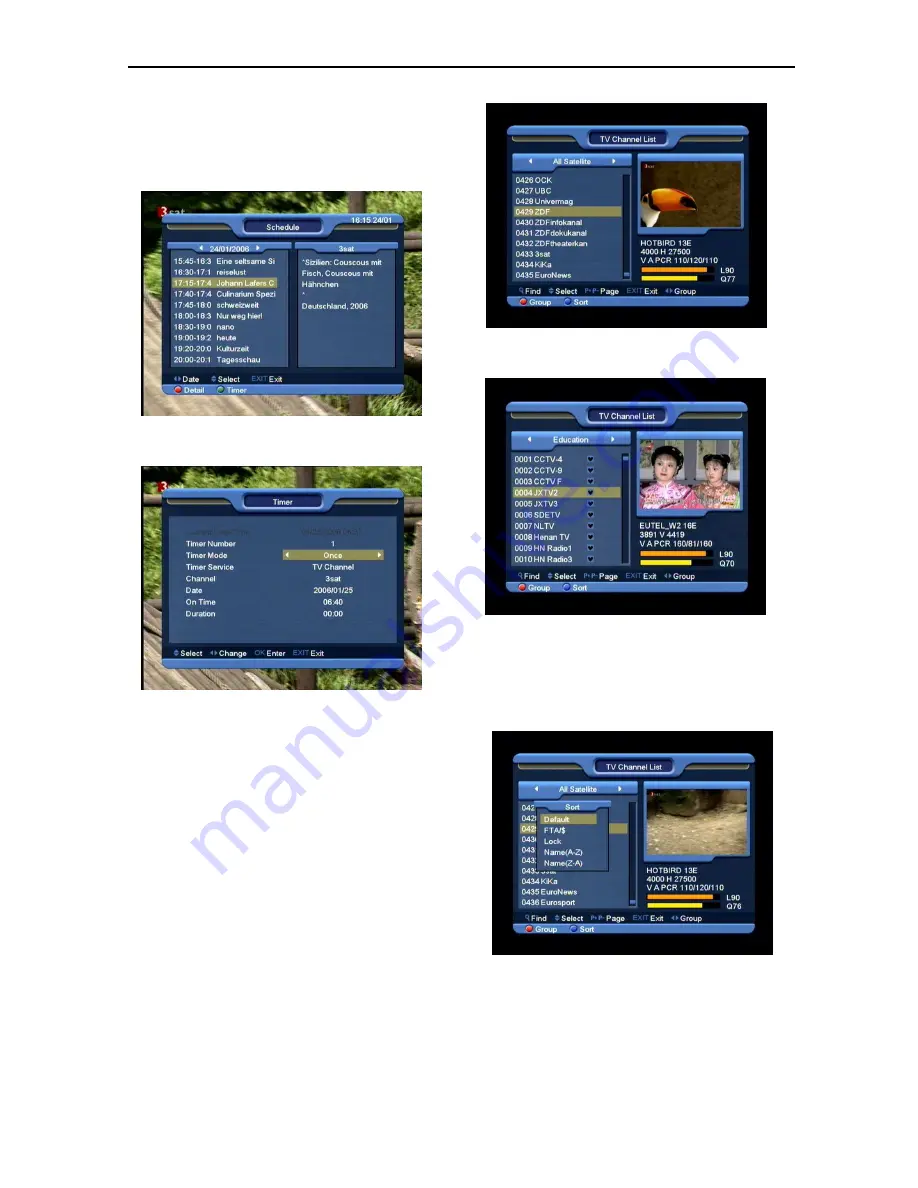
4  Press [Red] key in EPG menu can display” 

Schedule" Menu. In "Schedule” menu, you can 

press [Up/Down] to select “Event”. Press [left / 

right] key to day change. 


5  Press [Green] key in schedule menu can open 

timer menu. User can save a timer as he want. 


6  In EPG menu, press [Exit] to close EPG screen. 


8.13  TV/RADIO 

In TV mode, pressing [TV/RADIO] key can switch to 

Radio mode. In Radio mode, press [TV/RADIO] key to 

switch to TV mode. 


8.14  Channel List 

1  In full screen, press [OK] key can enter “Channel 

List”. 


2  Press [Left/Right] or [red] key to change satellite 

or favorite. which you can watch like below.   


3  Press    [Blue] key can open the “Sort” window like 

below. There are four kinds of sorting ways. You 

can press [Channel Up/Channel Down] key to 

move highlight and press [OK] key to confirm you 

selection. 


4    The five kinds of sorting way are: 


Default: Sorting by scanning result.


FTA/$: Sort channel through free and 

scramble sequence. Free channel will in the 

front of channel list and scramble channel will 

at the rear of channel list   

Summary of Contents for HD Receiver

Page 1: ...G 12 8 13 TV RADIO 13 8 14 CHANNEL LIST 13 8 15 SLEEP 14 8 16 PAGE UP PAGE DOWN 14 8 17 TEXT 14 8 18 SUBTITLE 14 8 19 FIND 14 8 20 ZOOM 14 8 21 TV STB 14 8 22 MENU 15 8 23 VIDEO FORMAT 15 8 24 EXIT 15 9 CHANNEL 15 9 1 TV CHANNEL LIST 15 9 1 1 Group 16 9 1 2 Skip 16 9 1 3 Edit 16 9 1 4 Sort 17 9 1 5 Favorite 18 9 1 6 Find 18 9 2 RADIO CHANNEL LIST 18 10 INSTALLATION 19 10 1 SATELLITE INSTALLATION 1...

Page 2: ... DEFAULT SETTING 29 12 3 1 Default Setting 29 12 3 2 Delete All Channel 30 12 3 3 VFD Power In 30 12 3 4 Scart Loop 30 12 4 SOFTWARE UPGRADE 30 12 5 UPGRADE BY USB 31 12 6 BACKUP TO USB 31 12 7 NETWORK LOCAL SETTING OPTIONAL 31 12 8 UPGRADE BY NETWORK OPTIONAL 31 13 GAME 32 13 1 TETRIS 32 13 2 SNAKE 32 13 3 OTHELLO 32 14 USB 33 14 1 RECORD MANAGER 33 14 2 HDD INFORMATION 33 14 3 HDD FORMAT 33 14 4...

Page 3: ...TS Do not use any attachments that are not recommended as these may cause hazard or damage the HD Receiver CONNECTION TO THE SATELLITE DISH LNB Disconnect the HD Receiver from the mains before connecting or disconnecting the cable from the satellite dish FAILURE TO DO SO CAN DAMAGE THE LNB CONNECTION TO THE TV Disconnect the HD Receiver from the mains before connecting or disconnecting the cable f...

Page 4: ...roduct correctly you will help ensure that the waste undergoes the necessary treatment recovery and recycling and thus prevent potential negative effects on the environment and human health which could otherwise arise due to inappropriate waste handling Information on Disposal for Business Users In the European Union If you wish to discard of this product please contact your local authorities and ...

Page 5: ... Subtitle supported Teletext supported by VBI insertion and software emulation Parental lock facility by channel and program event Program and Channel information transfer from receiver to receiver Exciting games embedded S PDIF for digital audio or Dolby digital bitstream output DiSEqC 1 0 1 1 1 2 and USALS HDMI HD Video Audio Output Software update via LAN port optional USB 2 0 Host VFD Display ...

Page 6: ... EXIT Cancel the user selection and return to the viewing mode from a menu OK To select menu option or to updated on entry KEY To adjust volume level or to move cursor left or right in the menu v KEY To change channels or to move cursor up or down in the menu P P To move up the cursor to the next or previous page in the menu or channel list PIP RED KEY To start the PIP function Teletext GREEN KEY ...

Page 7: ...t info bar Play To play the MP3 JPEG or Record files Stop To stop the Time Shift recording or MP3 JPEG player PAUSE Used to select the freeze function Press once to freeze the screen picture Record To start recording FB To start Fast Backward function FF To start Fast Forward function SB To start Slow Backward function SF To start Slow Forward function ...

Page 8: ...r DVB S DVB T DVB C 3 Indicate the recording from which Tuner optional 4 Indicate which operation status such as PLAY PAUSE 5 Will high light when MUTE the receiver 6 Indicate the play mode Loop or not 7 Will high light when decode the Dolby Digital audio 8 Will high light when the Smart card insert to the card reader 9 Will high light when the Module insert to the CI slot 10 Will high light when ...

Page 9: ...USB port for additional power only for some of USB hard disk drives WARNING Do not connect standalone USB devices to this port USB Data USB 2 0 Host connect to USB hard disk or flash disk RS 232C SERIAL PORT This is used to connect your receiver to a computer through a serial cable Ethernet optional Network port you can get a new software updates from this port YPbPr Component video output socket ...

Page 10: ...ver connector on the DiSEqC 1 2 motor Connect the coaxial cable from the LNB to the LNB connector on the DiSEqC 1 2 motor All our receivers are designed to be DiSEqC 1 0 and DiSEqC 1 2 compatible This allows multiple antennas to be connected to the receiver at the same time If you have two or more fixed antennas or LNBs then we recommend you use a DiSEqC 1 0 switch Connect the coaxial cable from t...

Page 11: ... 8 2 Power 1 Press Power Key can enter the Standby state 2 In Standby state press Power Key again can call back the unit and go on play the previous channel 3 User can also disconnect the device s main power to end the Standby state 8 3 Channel Up Channel Down In full screen press CH CH to change channel 8 4 Volume Up Volume Down In full screen press VOL VOL to adjust volume 8 5 Number In full scr...

Page 12: ... Volume Down key 3 Mode Left Right Stereo Mono 8 11 Information In full screen press INFO key can open information screen in the window shows the parameters of current channel 8 12 EPG 1 The STB has an Electronic Program Guide EPG to help you navigate channels through all the possible viewing options The EPG supplies information such as channel listings and starting and ending times for all availa...

Page 13: ...ch to TV mode 8 14 Channel List 1 In full screen press OK key can enter Channel List 2 Press Left Right or red key to change satellite or favorite which you can watch like below 3 Press Blue key can open the Sort window like below There are four kinds of sorting ways You can press Channel Up Channel Down key to move highlight and press OK key to confirm you selection 4 The five kinds of sorting wa...

Page 14: ... If the channel has no teletext information it will show No Teletext Data on the screen 8 18 Subtitle 1 Press Yellow key in full screen you can switch subtitle on or off 8 19 Find 1 Press Find key in full screen can open the Find window like above You can press Channel Up Channel Down Volume Up Volume Down key to move highlight and press OK key to input the selected symbol or letter into the dialo...

Page 15: ...System Tools Game and USB 2 Press OK or Right key to enter the Edit Channel If Menu Lock is On it will display an dialogue for user to key in password The default Password is 0000 3 Press Up Down key to select menu items among TV Channel and Radio Channel 4 Press Left key or Menu key to go back to main menu 9 1 TV Channel List When you enter to Channel List menu there will display the screen like ...

Page 16: ...e password is correct it will open the window like below The default password is 0000 9 1 3 1 Delete 1 In this menu press Red key can make a delete mark in the right side of the highlighted channel 2 Press Red key again can cancel the deleted mark on the current channel 3 When exit the menu it will ask you whether to save the change Select Yes to save the change 9 1 3 2 Create If you press Green k...

Page 17: ... mode Otherwise move highlight to Exit item and press OK key can exit Edit mode and won t save any modification 9 1 3 4 Lock Press Blue key can make a lock mark in the right side of the highlighted channel After save and exit the menu STB will request you to input the password while you want to watch the locked channel 9 1 3 5 Move 1 In this menu press White key can make a moving mark in the right...

Page 18: ...annel List there will show a favorite mark beside the marked channel 9 1 6 Find 4 Press Find key can open the Find window like above You can press Channel Up Channel Down Volume Up Volume Down key to move highlight and press OK key to input the selected symbol or letter into the dialogue 5 After input each character the program list on the left will search the channel according your input and list...

Page 19: ... to page up or page down 10 1 2 LNB Type In this item press Volume Up Volume Down key can switch among Standard User and Universal mode 10 1 3 DiSEqC DiSEqC You can use Volume Up Volume Down key to switch options There are several options for your selection Disable without DiSEqC 1 2 2 2 two ports DiSEqC 1 4 2 4 3 4 4 4 4 ports DiSEqC 1 8 2 8 8 8 8 ports DiSEqC 1 16 2 16 16 16 16 ports DiSEqC 10 1...

Page 20: ...requency and Symbol Rate for this new transponder The parameters of TP Frequency and Symbol Rate can set by number keys The available range are 3000 13450 MHz and 1000 45000Ks s When you press Yellow key there will show up a warning message for reminding whether you will delete the current transponder or not If you select Yes the current transponder will be deleted and the total account of transpo...

Page 21: ... OK key to start scanning 10 2 Terrestrial Installation Press OK key to enter the selected item 1 You can select the Bandwidth according different country 2 You can set the Tuner Power ON OFF 3 Press OK key on Terrestrial Installation item to enter the following menu Scan Mode 1 There are two modes You can scan channel by channel or by frequency 2 When scan band is UHF and region is France the ran...

Page 22: ...cy by use the numeric button of the RCU if you set the Scan Mode to Blind Scan 4 You can input the Symbol Rate by use the numeric button of the RCU 5 You can select the QAM value among 16QAM 32QAM 64QAM 128QAM and 256QAM 6 You can turn ON or OFF the NIT Search if you set the Scan Mode to Manual Scan 7 When you complete your modification press OK button on Search item to enter Scan menu and then pr...

Page 23: ...tors it is possible to watch many scrambled channels coded in this system This menu shows detailed information about cord inserted into cord reader module It allows inserted according to help messages visible on the bottom of the screen Note All information showed in this menu and submenu are coming from inserted card In case if anything is wrong it could be card problem After inserting the card c...

Page 24: ...anguage Press Left Right key can select subtitle language 6 Teletext You can set teletext language If the streams have this language you can see the teletext in language you set 7 Press Exit key to draw back from Language menu 11 2 TV System When you enter to TV System menu you will see the screen like below 1 Display Mode is for switching the system outputting video resolution Move highlight on i...

Page 25: ...will see the screen like below GMT Usage This item is use for open the usage of GMT You can press Volume Up Volume Down keys to switch On Off The GMT Offset item is valid only when the setting of GMT Usage is Yes You can press Volume Up Volume Down keys to switch GMT Offset value and the range is 12 00 12 00 increase each half hour progressively You can press Left Right to control Summer time on o...

Page 26: ...utomatically switch to standby mode If you want not work this function set the duration is 00 00 When you select Message reminding message option in Timer Service the screen will display like below Wakeup Message press Volume Up Volume Down key to select reminding message as Birthday Anniversary and General Date you can use number key to input your wakeup date On Time use number keys to input your...

Page 27: ...will be showed up while this function is On If this function is Off there won t show up subtitle information even if the current channel has subtitle information 2 OSD Timeout When you switch channels in full screen there will show up some information about current channel on the lower of the screen And regarding to the duration of these information show up on the screen you can press Volume Up Vo...

Page 28: ...ord or not If the setting is Yes play the channels with lock mark will show up a dialogue on the screen and ask for the password If the setting of Channel Lock is No the Lock function will invalid 4 New Password is used for revising password you can input the new password in this item by using number keys directly After you filled in 4 digital numbers the highlight will auto skip to Confirm Passwo...

Page 29: ...u can use Left Right key to select east or west in Local Longitude and Satellite Longitude select north and south in Local Latitude 3 Moving highlight to Start item and press OK key The lower column on the screen will calculate the corresponding value automatically 4 Orientation means the angle between south and satellite 5 Press Exit key to draw back to Tools menu 12 3 Default Setting 12 3 1 Defa...

Page 30: ...Loop This Scart Loop item have two options ON and OFF if setting is ON will enable SCART LOOP and TUNER LOOP function when receiver is in standby if setting is OFF will disable SCART LOOP and TUNER LOOP function when receiver is in standby 12 4 Software Upgrade Upgrade by RS232 1 We offer the functions for user to connecting receiver Master to the other receiver Slave via serial interface 2 Connec...

Page 31: ... the software to the USB equipment 1 In Backup file you can press OK key to edit the file name 2 In Backup to USB you can press OK to start dumping software 12 7 Network Local Setting Optional In this menu you may assign a dynamic IP address to the digital receiver To do so select the DHCP Enable If you have a static IP address unselect the DHCP Enable then the IP Address Subnet Mask Gateway DNS P...

Page 32: ...d press Volume Up Volume Down key to select the game level speed Moving highlight to Start and press OK key to start the game Moving highlight to Cancel keys and press OK key to draw back from the game Start on the game Volume Up Volume Down Channel UP Channel Down use these arrow keys to guide the snake OK Pause Play game Exit Quit game and draw back to Game menu 13 3 Othello Moving highlight to ...

Page 33: ...s Red Button To play the file with small window please press Button To play the file with full screen please press OK Button 14 2 HDD Information Press OK button to enter the HDD Information menu like the below picture in this menu you can see the details information about the HDD 14 3 HDD format If you want to format the HDD press OK button on HDD Format Item then select the File System between t...

Page 34: ...the program it just start when you press button not include the Timeshift files 14 5 File List In this menu you can check the files and folders of the USB storage and you can view JPEG files In this menu you can manage the play list Press OK button on the selected files to play the single file You can preview the picture at the top right corner if the scroll bar is on the picture files JPG BMP and...

Page 35: ...t music and MP3 play list menu is activated please see the below picture Red Key Play the 1st music file by press Red Key Play the file selected by scroll bar when press OK key Green key Change play mode by Green Key and play mode include Sequential Random Single repeat all repeat Yellow Key Delete the file selected by scroll bar by Yellow key Blue Key Delete all the file by blue Key but there is ...

Page 36: ...ind you Are you sure before practical operation if you select Yes all file will be deleted and Play list window will be closed Green key Press Green Key will show Setup Menu please see the below setup menu Size Screen select Real show the real size if the image size less than full screen size but only partial image the image is shown from Left Top corner don t show for over part Full Full screen d...

Page 37: ...um graphic on TV Screen 15 2 Time Shift If you connect the USB HDD and enable the Time Shift function in the menu Main Menu Record PVR Setting Time Shift It will start the Time Shift function automatically after you switch the program and when you press the Tms button the Time Shift info bar will displayed as the following picture You can press button to pause the video and can save the picture to...

Page 38: ...ing Press button again to setting the record time You can press button to pause the video and can save the picture to flash by press P button when the video is paused You can press or button to Fast Backward or Fast Forward You can press or button to Slow Backward or Slow Forward Press left or right button to jump to different position then press OK button to confirm Press button to stop the recor...

Page 39: ...ncorrectly Connected short circuit or open circuit The position of dish is aligned incorrectly Receiver is on but no picture or sound except the following messages NO TV program Channel is not available Channel is scramble Receiver not responding to remote control unit RCU batteries are dead or inserted incorrectly The RCU is pointing toward wrong direction Poor picture Quality The level of Signal...

Page 40: ...0mA max Demodulation COFDM 2K 8K Number of carriers 1705 6817 Constellation QPSK 16QAM 64QAM Guard Inter Val 1 4 1 8 1 16 1 32 FEC Decoder 1 4 2 3 3 4 5 6 7 8 k 7 Tuner Type DVB S S2 optional Input Connector F type Connector Female Loop Through F type Connector Female Signal Level 65 to 25 dBm Vertical 13V 14V Horizontal 18V 19V Current Max 500mA LNB Power Polarization Overload Protection 22KHz To...

Page 41: ...ideo CVBS RGB output TV SCART Audio L R output Video CVBS output Audio L R output Video CVBS input VCR SCART Audio L R input Video CVBS output 1x YPbPr output RCA A V Audio L R output S PDIF Optical Coaxial Digital Audio or Dolby Digital Bit Stream Output Transfer rate 115 2Kbps RS 232C 9 pin D sub Type USB One USB 2 0 slot Compatible for VER1 2 HDMI Type A PHYSICAL SPECIFICATION Size W H D 300mm ...

Reviews: