HEATER POWER SWITCH
•
Check that the heat control switch at the back of the heater is set to Off position
before plugging the heater in and turning on the mains supply.
•
Turn the Power Switch at the back of the heater to the
“I”
position.
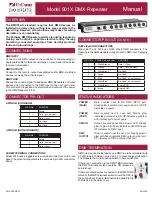
CONTROL PANEL
HEAT CONTROLS
•
Press the Power button to switch the appliance ON.
•
The LED will display the current room temperature.
•
The
“
▲
”
and
“
▼
”
buttons can be used to select High Heat (2400W) or Low Heat
(1200W). This is indicated by the segments to the right of the flame symbol.
THERMOSTATIC CONTROL
•
Press the TEMPERATURE button, then use the
“
▲
”
and
“
▼
”
buttons to set the
target temperature.
•
The thermometer symbol will illuminate, and the digital display will flash, showing
the target temperature.
•
After 5 seconds the display will stop flashing and return to displaying the room
temperature.
NOTE: the temperature is read from a thermostat in the heater, for a more accurate
reading, position a separate thermometer in another part of the room.
To find your preferred comfort level, Set the thermostat to the maximum setting.
When the room reaches a comfortable temperature for you, look at the temperature
reading on the heater and then set the heater to this temperature. The heater will
now cycle on and off to maintain the set temperature.
TEMPERATURE
TIMER
POWER INDICATOR
HIGH HEAT (2400W)
LOW HEAT (1200W)
POWER BUTTON
DECREASE AMOUNT (DOWN)
INCREASE AMOUNT (UP)
TIMER INDICATOR
TEMPERATURE INDICATOR
DIGITAL DISPLAY
Operating Your Heater