background image

®

PRO-VideoWall


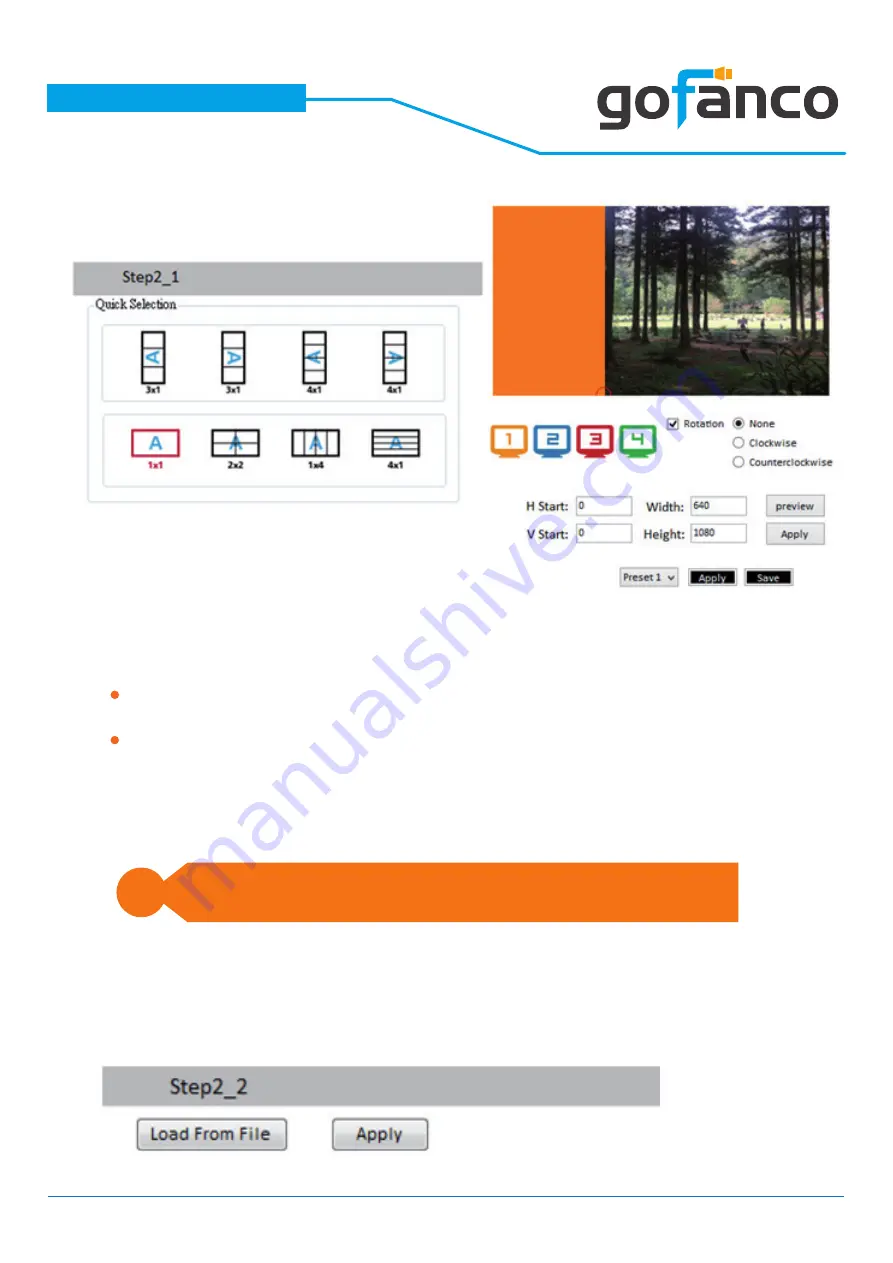
If you choose the Quick Selection mode in step 2, this window will automa-

tically pop up. In this mode, you can select default screen split and rotate 

screen (rotate screen only at 1080p resolution).  


When you select the 3x1 or 4x1 mode, the picture in the right part of control 

interface will show a red circle. You can slide this white circle to resize the 

output screen. In addition, you also can input the number to adjust the coordi-

nate. 


4. 

Step 2-2: configuration from file


You can load and read configuration from the existing file on your PC/laptop.

13

3.  Step 2-1: quick selection 


3x1: This mode will divide the screen into 3 parts and rotate the figure. 

The remaining part shows the full screen.

4x1: The mode will divide the screen into 4 parts and rotate the figure.


i

4k2k60 (YUV 4:4:4) only can be displayed as an 2x2 layout 

(1080p60 for each output)

Summary of Contents for prophecy PRO-VideoWall

Page 1: ...PRO VideoWall 4K 1x4 Video Wall Processor Made in Taiwan User s Guide ...

Page 2: ...needs wherever you go Have fun with our products Please read this manual carefully before first use If you need more information about our products please visit www gofanco com For technical support please email us at support gofanco com For drivers manuals download please go to http www gofanco com download ...

Page 3: ...it Do not attempt to service this unit yourself except where explained in this manual Provide proper ventilation and air circulation and do not use near water Keep objects that might damage the device and assure that the placement of this unit is on a stable surface Use only the power adapter and power cords and connection cables designed for this unit Do not use liquid or aerosol cleaners to clea...

Page 4: ...nto four 1080p60 TV 2x2 layout only Supports individual propagation delay on each display to have the best visual perception 3 Features The PRO VideoWall 4K 1x4 Video Wall Processor is a powerful cost effective and fully real time data video processor for multiple flat panel displays or pro jectors Virtually any setups for the display layout can be possible by the control software The PRO VideoWal...

Page 5: ...l Cloud Control Input TMDS signal 1 2 Volts peak to peak HDMI connector Type A 19 pin female Mini USB connector Type A RJ 45 connector WE SS 8P8C Mechanical Housing Metal enclosure Dimensions L x D x H Model 290 x 180 x 44mm 11 4 x 7 x 1 7 Package 376 x 240 x 112mm 1 2 x 9 4 x 4 4 Carton 590 x 510 x 405mm 1 9 x 1 7 x 1 3 Weight Model 1448g 3 2lbs Package 2091g 4 6lbs Fixedness 1RU rack mount with ...

Page 6: ...ns Button 1 Source Source setting HDMI or DisplayPort Button 2 LOCK Press button for 3 seconds will enable disable device locked Button 3 2x2 Fast switch to 1x1 and 2x2 Button 4 90 Fast switch to 3x1 90 and 4x1 90 Button 5 90 Fast switch to 3x1 90 and 4x1 90 Button 6 Preset 1 Button 7 Preset 2 6 2 3 1 6 4 7 5 8 9 10 11 12 13 4 Power Switch Power ON OFF switch 5 12V DC 12V DC power jack 6 Dip Switc...

Page 7: ... 8 Hardware Installation 7 PRO VideoWall as master 1 Connect the source s to HDMI DisplayPort Input s of the PRO VideoWall 2 Connect all displays to HDMI Outputs of the PRO VideoWall 3 Connect the 12V DC power supply to the PRO VideoWall ...

Page 8: ...0x720 60Hz 1920x1080 30Hz 1920x1080 60Hz 4K2K 30Hz 4K2K 60Hz 4 2 2 8bits 4K2K 60Hz 4 4 4 8bits 640x480 60Hz 720x480 60Hz 720x576 60Hz 800x600 60Hz 1024x768 60Hz 1280x720 60Hz 1280x768 60Hz 1280x960 60Hz 1280x1024 60Hz 1366x768 60Hz 1440x900 60Hz 1680x1050 60Hz 1920x1080 60Hz 1920x1200 60Hz 1600x1200 60Hz ...

Page 9: ...wer ON OFF the video wall processor Fast switch to VW1x1 Full Screen SOURCE Source setting HDMI or DisplayPort Fast switch to VW3x1 90 Fast switch to VW2x2 Fast switch to VW4x1 90 Fast switch to VW4x1 90 PRESET Previous custom layout PRESET Next custom layout Factory Reset Factory default reset 2160p 60 Default EDID 2160p 60 2160p 30 Default EDID 2160p 30 1080p 60 Default EDID 1080p 60 ...

Page 10: ...re you have secured the connection between your computer USB port and the PRO VideoWall After the software control setting is accomplished it will enter directly to the control interface Start the software control program After starting the control software the following dialog will pop up It has two ways to control the PRO VideoWall de vice under Microsoft Windows 7 please run as administrator 1 ...

Page 11: ...ion is 4K2K 60Hz Use the software for independent rotation for each input You can select clockwise or counterclockwise to rotate the screen In this part you can set up the screen resolution screen coordinate and split screen Firstly you should select the TV picture and you can set up the corres ponding function The different colors of frame represent the different output TVs The information of coo...

Page 12: ... DisplayPort or lock unlock the device Note that when you select the Synchronize function all windows need to set up in the same resolution otherwise the output will be abnormal If you lock the device only factory reset function can work Quick Selection From file Custom define 2 Step 2 output setting In here it has three modes that can set up the output TV resolution posi tion size and split scree...

Page 13: ... slide this white circle to resize the output screen In addition you also can input the number to adjust the coordi nate 4 Step 2 2 configuration from file You can load and read configuration from the existing file on your PC laptop 13 3 Step 2 1 quick selection 3x1 This mode will divide the screen into 3 parts and rotate the figure The remaining part shows the full screen 4x1 The mode will divide...

Page 14: ...s you also can click the button to save the configuration for future usage You can adjust the output position by setting coordinates 6 Step 3 adjust image Zoom In Out You can change pixel size from the edge of the image by clicking and button the edge of image has four directions After adjusting the image the rest of this image will be auto scaled to fulfill the screen Horizontal shift Vertical sh...

Page 15: ...DID 2 Learn EDID from Display Select the Output Click button to learn display EDID 3 Learn EDID from File Click button to select the EDID file and write it into input 4 View EDID content Select the EDID input source Input Output or From File Click button to read the EDID description and analysis Click button to save the EDID as a file in the connected computer ...

Page 16: ...ge Graph You can change the default graph splash screen on this machine Click button to select the graph After loading the graph step please click button to write this graph into device 3 Factory Reset Click button to do factory default reset This default reset process will take about 5 seconds After pop up a dialog indicates complete please restart this machine ...

Page 17: ... association code The device can use this code to pair with cloud server After a successful pairing you can reset cloud Please pair device to cloud within 2 minutes when you get an association code 7 IP Configure You also can use the Ethernet to control software program First you should click the button to setup network set Next you can read the Ethernet setting from device and manually set to dev...

Page 18: ...select the approach to connect this device Method C Firmware Update through mini USB Port 1 Please ensure the file of new firmware file is in the root directory of USB Flash Drive The file name should be firmware bin 2 Use mini USB to female USB type A cable to connect the USB interface of device and USB Flash Drive 3 Switch dip switch on F W mode 4 Power cycle the device and it will automatically...

Page 19: ...ess IntriCloud http www intri cloud and click Create new account 2 The Registration page will pop up and please fill in your email and password information to create your private account Create Account The first time to use the IntriCloud service please create a new account 19 ...

Page 20: ...te the software with device to get the association code Note the status of software is connected Add Device to IntriCloud 2 Access IntriCloud http www intri cloud and then log in your account on the right top corner Click Add device to add the device in which you just got its association code for 20 ...

Page 21: ...l for online support in the future and the Association Code for pairing with your device 4 After adding the device the list of device related to your account will show on the right top corner You can click the button to switch device for control ...

Page 22: ...d video resolutions to be commonly accep table among all HDMI displays In this case a 720p stereo HDMI signal output would be probably the safest choice Nevertheless the user can force the matrix to learn the EDID of the lowest capable HDMI display among others to make sure all displays are capable to play the HDMI signals normally Please refer to the software operation section for executing EDID ...

Page 23: ...implied including wit hout limitations any other implied warranty or fitness or merchantability for any particular purpose all of which are expressly disclaimed Proof of sale may be required in order to claim warranty Customers outside Tai wan are responsible for shipping charges to and from the SELLER Cables and power adapters are limited to a 30 day warranty and must be free from any mar kings s...

Page 24: ...Thank you for choosing gofanco www gofanco com Sep 2018 Ver A Copyright 2018 by gofanco LLC All rights reserved ...

Reviews: