background image


22

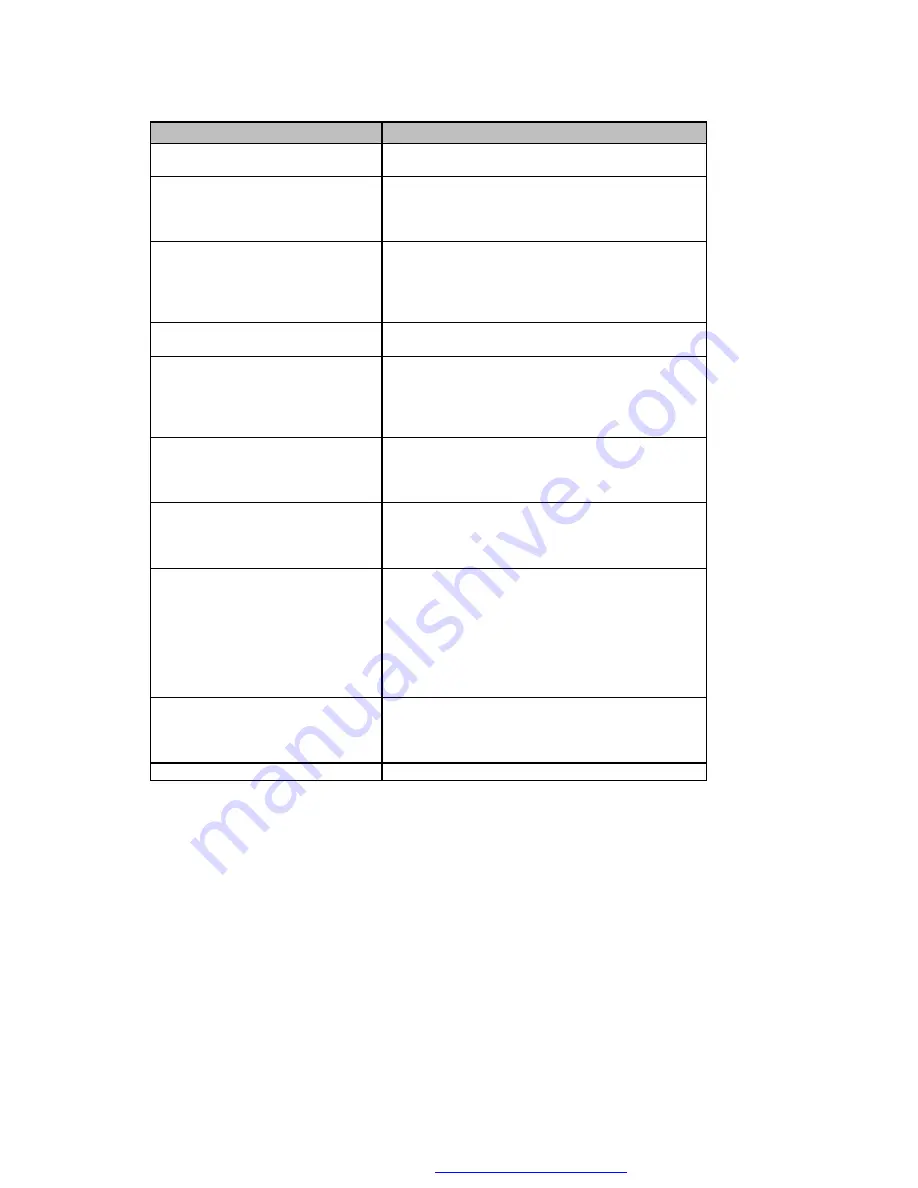
B. Troubleshooting 

Problems 

Recommended Solution 

Power switch already turned on but 
the LED does not light. 

Check Power connector. 

Printing stops and LED goes red. 

Probably software setting or programming 
problem. 

Check to use the correct paper 

Probably label jam, remove the stuck label 

Printer is working but nothing is 
printed on label. 

Check the label is facing up and the paper you 
use is thermal paper. 

Check to choose the correct printer driver. 

Make sure to choose the correct model of printer 
on platen. 

Label is stuck 

Remove the stuck label and use soft cloth 
soaked with alcohol to clean the adhesive glue. 

Only part of the label got printed 

Label is stuck on print head. 

Probably software problem 

Margins are not set properly 

Printer head is not fixed in proper position, 
re-positing printer head screws or clipper 

Difficult to load label roll 

Check if the label stuck on printer. 

Remove the stuck label. 

Make sure the width and thickness of label is 
within the specification. 

When printing out, some dots 
missing 

Clean printer head with alcohol. (If the label glue 
is attached to printer head, please apply alcohol 
to printer head; wipe with soft cloth softly.) 

Replace printer head for possible damage. 

Printing is not in the correct position 

Check the Label Transmit Sensor, it may be 
covered with dust. 

Check with your label supplier; make sure they 
have used the recommended backing material. 

Adjust the label transmit sensor if you are an 
experienced printer user. 

Check the label guide, it may not be in the proper 
position. 

Label printing jumps to next label 

Check if the label height setting is the same as 
actual label height. 

Check the Label Transmit sensor, it may be 
covered with dust. 

Printing is not very clear 

Check the printer darkness setting. 


Please call your agent for help if the above information can not help you. 


PDF created with FinePrint pdfFactory trial version 

http://www.fineprint.com

Summary of Contents for EZ-2

Page 1: ...0 P N 920 010210 00 Edition 0 April 02 EZ 2 4 Manual PDF created with FinePrint pdfFactory trial version http www fineprint com ...

Page 2: ...adio communications Operation of this equipment in a residential area is likely to cause harmful interference in which case the user will be required to correct the interference at his own expense EMS AND EMI COMPLIANCE STATEMENT FOR EUROPEAN USERS This equipment has been tested and passed with the requirements relating to electromagnetic compatibility based on the standards EN50081 1 EN55022 CLAS...

Page 3: ...ie dafür daß diese Ö ffnungen nicht adgedeckt werden 4 Durch die Belüftungsöffnungen dürfen niemals Gegenstä nde oder Flüssigkeiten in das Gerä t Gelangen 5 Dieses Gerä t kann bis zu einer Umgebungstemperatur von maximal 25 C betrieben werden 6 Die Ausgangswerte dürfen nicht die auf dem Typenschild angegebenen Werte überschreiten 7 Die Steckdose muß sich nahe dem Gerä t befinden und leicht zugä ng...

Page 4: ...Z 2 4 Printer to a PC 7 2 3 Loading the EZ 2 4 Printer with Labels 7 2 4 Testing the EZ 2 4 Printer 8 3 MAINTENANCE AND ADJUSTMENTS 8 3 1 Replacing the Label Roll 8 3 2 How to clean the EZ 2 4 printer head 9 3 3 How to clear a label jam in the EZ 2 4 Printer 9 3 4 Label gap sensor adjustment 9 4 SOFTWARE COMMAND 11 4 1 Introduction 11 4 2 Command description 13 4 3 Examples 19 APPENDIX 21 A PRINTE...

Page 5: ...ector Print head life 50K meters printing distance when apply on Thermal Labels Dimension 144 W x 215 H x 127 D mm With internal label roll 144 W x 215 H x 320 D mm With external label roll 198 W x 215 H x 127 D mm With internal label roll 198 W x 215 H x 320 D mm With external label roll Working Environment Operating Temperature 40oF to 104oF 5oC to 40oC Storage Temperature 40o to 140oF 40oC to 6...

Page 6: ...iner paper Liner paper will be stripped out through this window 4 Power light Used to indicate power condition When power on the light is green or red 5 Feed button Used for manually feeding out labels or adjusting label position 6 Rear cover Used to protect the roller and labels 7 Lock switch Used to lock the rear cover 8 Printer mechanism The engine of the printer 9 Label guide Label guide 10 La...

Page 7: ...ER 1 Strobe host 2 9 Data 0 7 host 10 N C printer 11 Busy printer 12 Paper empty printer 13 Select printer 14 16 N C 17 Chassis Ground 18 N C 19 30 Signal Ground 31 N C host 32 Fault printer 33 Signal ground 34 36 N C Serial Port Serial port is set at the factory with 9600 baud rate no parity 8 data bits and 1 stop bit and uses XON XOFF protocol as well as RTS CTS The connector is RS 232 DB9 femal...

Page 8: ...Power on 2 Press the two lock switches part 6 and lift up a little to open the rear cover see figure 2 3 1 Fig 2 3 1 3 Insert a small size label roll onto the core shaft see figure 2 3 2 4 Place the roll into the groove 5 Insert the edge of labels into the label guide until the edge is blocked by the printhead 6 Press feed button to drive the label under the printhead into the printer Fig 2 3 2 Lo...

Page 9: ...ease the feed button Wait a few seconds the printer will print the self test Note To Disable the Self test please power off the printer at least 2 seconds than power on again 3 Maintenance and Adjustments 3 1 Replacing the Label Roll A EZ 2 11 Face the front side of the printer Place your thumbs on the top cover and the other fingers on the left and right sides of the printer 12 Gently press down ...

Page 10: ...apart the two retaining clips from the assembly by gently pressing the clips the direction as figure 3 3 1 2 and afterward by lifting them a little 6 Lift the guide board the direction as figure 3 3 1 3 7 Clean with alcoholic cloth the label jam on the bottom of the assembly 8 Reassemble the printer Fig 3 3 1 3 4 Label gap sensor adjustment Due to different quality labels available it may be neces...

Page 11: ...se reverse the adjusting direction slowly until the LED light turns red then repeat step 1 Thermal Labels 1 Remove the sticker from the liner Load the liner paper under the sensor 2 Slowly adjust the Variable resistor and press the paper feed switch successively at least 7 times until the LED light turns red 3 Put the label paper with labels on the liner under the sensor then press feed button a f...

Page 12: ...rn reverse printing off LF decimal 10 Line feed Table 3 1 one byte control codes Function Description Page Esc Dn Set print darkness level 13 Esc In Select one of 9 country code character sets 13 Esc n Select one of 9 barcode types 13 Esc Mnn Set left margin 13 Esc Nnn Set the form feed length 01 to 25 mm for plain thermal paper printing 13 Esc On Adjust the stop position of the label when in stri...

Page 13: ...characters 17 Esc Gnnxx Graphics command 17 Esc Lxxx Graphics command only EZ 4 17 Table 3 3 Format commands Function Description Page Esc B Begin to store data in buffer buffer size is 30K 18 Esc E Flag end of data to be stored in the buffer 18 Esc Pnn Set the quantity of labels to print up to a maximum of 99 18 Esc pnnn Set the quantity of labels to print from at least 100 to 999 18 Esc P00 Allo...

Page 14: ...acters 3 Esc n Function Select Bar code type Parameter n Format 1 Code 128B C 2 Interleaved 2 of 5 3 Code 39 default 9 Code 93 K Codabar U UPC A E UPC A E add on 2 5 for EZ 4 E EAN 8 13 EAN 8 13 add on 2 5 for EZ 4 4 Esc Mnn Function Left Margin Parameter nn 01 99 millimeters default value is 03 mm 5 Esc Nnn Function Setting form feed length for plain paper Parameter nn 01 25 millimeters 6 Esc On ...

Page 15: ...016 25 mm Q 184 47 mm Q 008 26 mm Q 176 48 mm Q 004 27 mm Q 168 49 mm Q 384 Label height BLACK MARK PAPER The width of black strip of the black mark paper must be greater than 4 mm The description of the symbols on the drawings Z distance between tear line and the edge of black strip against paper feed direction in mm X distance between tear line and the edge of black strip from paper feed directi...

Page 16: ...ers Included label gap Parameter nnn label height Example q027 Label length is 25 mm label gap is 2 mm so control code is 027 10 Esc an Function Micro position adjustment Parameter n 0 7 n Value dot n Value dot 0 0 4 8 1 2 5 10 2 4 6 12 3 6 7 14 Example a3 Printing start position will be 6 dots from edge of label LABEL PAPER OUT edge of label printing start position 6 dots 11 Esc fnn Function Forw...

Page 17: ...16 Function Set print speed Parameter n 0 1 inch per second n 1 2 inches per second PDF created with FinePrint pdfFactory trial version http www fineprint com ...

Page 18: ...ze 0 1 x Vertical expansion 8x10 dot 1 1 x Vertical expansion bolded 2 2 x Vertical expansion bolded 3 3 x Vertical expansion bolded 4 2 x Vertical 2x horizontal expansion 3 Esc V Function Turn on text highlight printing Normal Highlight Parameter none TEXT 4 Esc v Function Turn off text highlight printing Parameter none 5 Esc XXX Function Bar code with human readable Parameter xxx barcode data 6 ...

Page 19: ...nds can be stored into the printer buffer 1 Esc B Function Begin to Store data in buffer 2 Esc E Function Ending of buffer mode 3 Esc Pnn Function Set the quantity of labels to print Do not send a CR LF at the end of the command Parameter nn 01 99 4 Esc pnnn Function Set the quantity of labels to print Be sure to send a CR LF at the end of the command Parameter nn 100 999 5 Esc P00 Function Allow ...

Page 20: ...ffer mode DOS command COPY TEST2 DAT PRN B D5 S2 Q176 3 M18 A12 code39 1234 M28 100 00 E P10 3 Using cutter with plain paper DOS command COPY TEST3 DAT PRN N10 3 M18 A12 code39 1234 M28 100 00 C 4 Using peeler DOS command COPY TEST4 DAT PRN B S2 D5 Q176 O3 3 M18 A12 code39 1234 M28 100 00 E P10 5 Text highlight with plain paper N15 S2 D5 3 M18 1234 V M18TEXT v PDF created with FinePrint pdfFactory...

Page 21: ...e FORMFEED 12 main printf n n PM 202 test n n printf Initial Step set the Q value n printf Press a key to start n getchar fprintf stdprn c s 27 F1 fprintf stdprn c s 27 Q992 fprintf stdprn c FORMFEED fprintf stdprn c s 27 S2 fprintf stdprn c s 27 D7 do printf Print label n printf Press a key to start n printf Press ctrl break to quit n getchar fprintf stdprn c s 27 M07 fprintf stdprn c s 27 A11 fp...

Page 22: ... H I J K L M N O 80 P Q R S T U V W X Y Z _ 96 a b c d e f g h i j k l m n o 112 p q r s t u v w x y z 128 Ç Ü é â ä à å ç ê ë è ï î ì Ä Å 144 É æ Æ ô ö ò û ù ÿ Ö Ü ƒ 160 á Í ó ú ñ Ñ 176 192 208 224 α β Γ π Σ σ μ γ Φ θ Ω δ Ø ε 240 ⁿ PDF created with FinePrint pdfFactory trial version http www fineprint com ...

Page 23: ...l l Check if the label stuck on printer l Remove the stuck label l Make sure the width and thickness of label is within the specification When printing out some dots missing l Clean printer head with alcohol If the label glue is attached to printer head please apply alcohol to printer head wipe with soft cloth softly l Replace printer head for possible damage Printing is not in the correct positio...

Page 24: ...o 40oC Storage Temperature 40o to 140oF 40oC to 60oC Humidity 10 to 90 non condensing free air Specifications are subject to change without notice D Communication Ports Specification Parallel Port Handshake DSTB to printer and BUSY to host Interface cable DB25 Male IBM PC 36 position parallel printer cable Pin out PIN NO FUNCTION TRANSMITTER 1 Strobe host 2 9 Data 0 7 host 10 N C printer 11 Busy p...

Reviews: