background image

User Manual                                                                                                            


Installing the Ribbon Cartridge


In order to avoid damaging the print head or mechanical gearings, this printer 

accepts only original Godex ribbon cartridges.  

Therefore, if you install a not original cartridge, the printer may not work. 


1. 

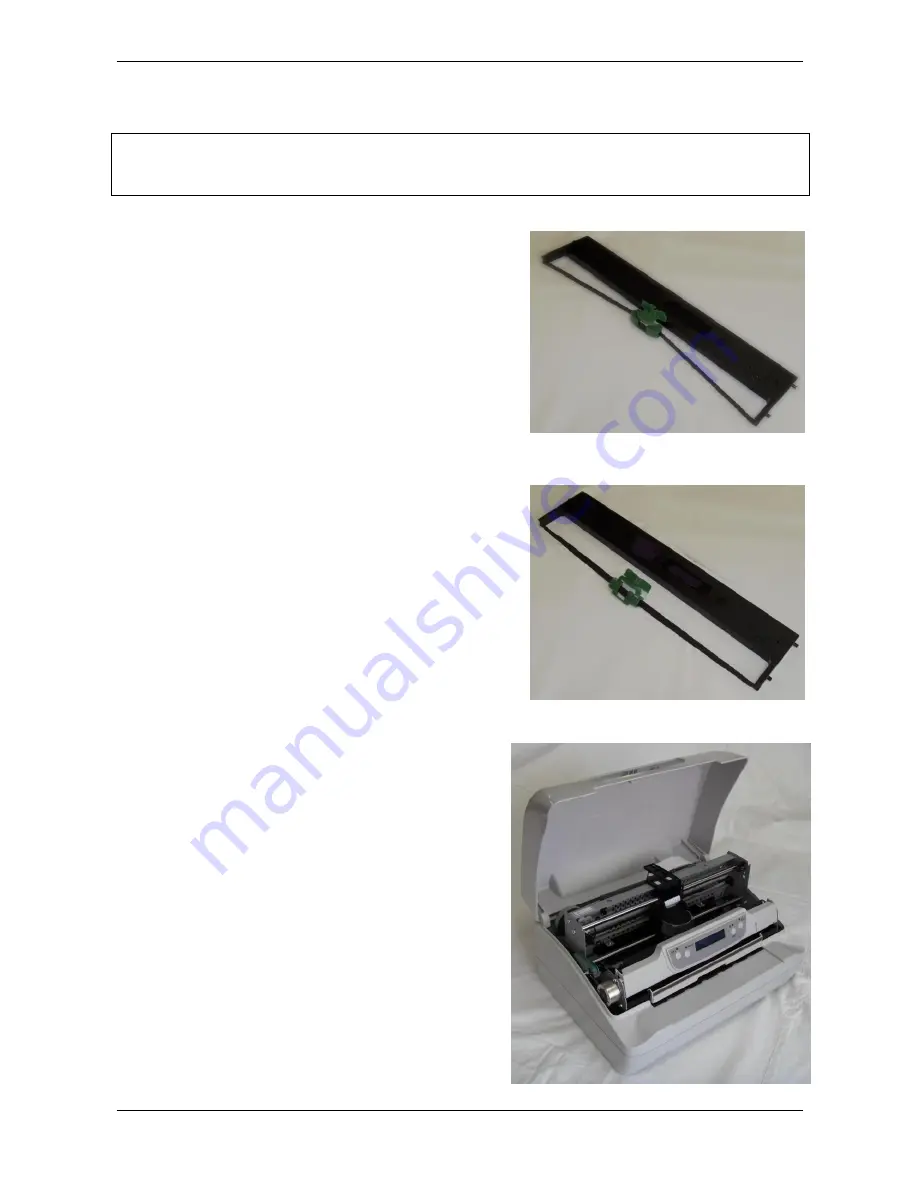
Remove the cartridge from its bag.  


2. 

Unhook the green ribbon mask from the cartridge pins. 


3. 

Open the printer cover. 

The print head will automatically move in the middle  

of the printer. 


Summary of Contents for C-650Plus II

Page 1: ...User Manual C 650Plus II Godex Europe GmbH Arnzhäuschen 36 42929 Wermelskirchen Germany ...

Page 2: ...the produce and follow the collection framework available locally for the return recycling and recovery of WEEE Customer participation to the separate collection is important to minimize any potential effects on the environment and human health due to the potential presence of hazardous substances in the equipment and aids the reuse and recycle of the materials by which the equipment is made Uncor...

Page 3: ...es This equipment has been tested and found to comply with the limits for a Class B digital device pursuant to Part 15 of the FCC Rules These limits are designed to provide reasonable protection against harmful interference when the equipment is operated in a commercial environment This equipment generates uses and can radiate radio frequency energy and if not installed and used in accordance with...

Page 4: ...aux limites de Classe B de la norme NMB 003 du Canada EEC Regulations This equipment conforms to the essential requirements of EU Directives 2006 95 EC 2004 108 EC Per the applicable requirements of EU Directive 2006 42 EC machines sound pressure of this product measured according to EN27779 does not exceed 70 dBA This product is also compliant to the EU directive 2002 95 EC RoHS and 2002 96 EC WE...

Page 5: ...Inside View 3 Paper Problems 35 Printer Installation 4 Paper Jams 35 Installing the Power Cable 4 Paper Damaged after printing 36 Installing the Ribbon Cartridge 5 Hexadecimal Dump 36 Paper Handling 9 Error Handling 37 Loading Paper 9 Recoverable Errors 37 The Operator Panel 10 Not Recoverable Errors 38 Function Keys 10 Ribbon Cartridge Problems 39 Leds 11 Paper Specifications 40 LCD display messa...

Page 6: ...ator places the paper on the front table and the printer loads it without any other user intervention The paper ejection towards the front or the rear of the printer allows an easy access to the printed document o Automatic document alignment feature The printer checks automatically the alignment of the top margin of the document and adjusts it if necessary The printout is therefore performed corr...

Page 7: ...User Manual 2 Printer Parts Never remove any printer part unless it is expressly indicated in this manual Front View ...

Page 8: ...User Manual 3 Rear view Inside view Inside View ...

Page 9: ...light extreme heat cold dust or humidity When printing on standard paper formats the paper comes out partially on the rear side of the printer Make sure that behind the printer there is sufficient clearance to correctly move the paper Installing the Power Cable 1 Find the power cable connector on the rear side of the printer Always use a grounded outlet 2 Insert the power cable into the connector ...

Page 10: ...is printer accepts only original Godex ribbon cartridges Therefore if you install a not original cartridge the printer may not work 1 Remove the cartridge from its bag 2 Unhook the green ribbon mask from the cartridge pins 3 Open the printer cover The print head will automatically move in the middle of the printer ...

Page 11: ...the printer 5 Unhook the green lever with the left hand towards the rear of the printer in the open position 6 Then rise up the lever to its maximum position in order to completely open the head assembly 7 Check for the click which means the correct open lever position showed in the inset picture ...

Page 12: ...he direction of the arrow to tighten the ribbon 10 Insert the upper cartridge pins onto the corresponding grooves on both sides of the upper mechanical frame 11 Then push the lower cartridge pins into the corresponding lower grooves on both sides of the upper mechanical frame until it clicks into place ...

Page 13: ...e tension knob in the direction of the arrow to tighten the ribbon 15 Carefully pull down the green lever following the step 3 4 and 5 in reverse order in order to securely close the Upper Mechanical Frame If you do not LOCK the Upper Mechanical Frame the printer does not print correctly 16 Close the printer cover Remark The printer detects the Ribbon Genuine type and the amount of printed charact...

Page 14: ...can therefore be inserted in any position within the detection area according to the rules described in the following paragraph The paper alignment sensors determine the alignment of the upper paper margin adjusting it if necessary Loading Paper The inserted documents must not have folds tears pins clips staples or any foreign material If you insert damaged documents or paper with foreign material...

Page 15: ...nts the Self Test Page See Printer Setup later in this manual When pressed while powering the printer on selects the Printer Setup Mode When pressed while powering the printer on with ST1 key select the T D mode diagnostic Pressing this key when the printer is offline or when the printer is online and no print data are in the buffer the printer ejects the paper if inserted EJECT function In the Ol...

Page 16: ... which setup page is selected for printing See Printer Setup later in this manual Blinks together with the ST1 led if a printer error occurs See Error Message later in this manual LCD display messages Upper line message Lower line message Indication STARTING UP The printer initialization phase is starting up INIT The printer initialization phase is ended FPB 650PII Rel xxx The printer firmware rel...

Page 17: ...omputer under Windows O S it automatically discovers the new hardware and it looks in the systems the proper drivers For this purpose together with the printer you receive a CD ROM containing the printer drivers for the Windows environment This printer supports the Plug Play facility in the 2000 XP Vista 32 or 64 bits Win 7 32 or 64 bits If you want to install the printer in the Windows environmen...

Page 18: ... 2 Serial RS 232 C interface 3 USB 2 0 full speed interface Proceed as follows Make sure that both the host and the printer are turned off Identify the connector for the interface you want to plug and firmly insert the cable into it Fix the cable by means of the corresponding hooks or screws on either side of the connector Parallel Interface Connection Serial Interface Connection USB Interface Con...

Page 19: ...configurations when you use the serial interface you will need to set the parameters accordingly To assure a correct functioning of the printer connected through the serial interface the transmission parameters set for the printer must match the values set for the host In case you need to modify the standard parameters see Printer Setup later in this section USB Interface Once the Godex FPB 650PII...

Page 20: ...inter reads the form the new values are set The following is the complete description of the Setup Procedure Entering the Printer Setup Mode To enter the Printer Setup Mode press and hold the READY key pressed for at least 1 second while powering the printer on The printer enters the Setup Mode The leds ST1 ST2 and READY are unlit the DATA led is flashing You can now Print the Self Test See Printi...

Page 21: ...tings 1 With the printer in the Setup Mode insert a single sheet in A4 or Letter format 2 The printer loads the sheet and stops 3 Press the READY key again The printer prints the Self Test page Check that the printout is correct The following printout example shows the Printer Setup default values Once the self test is finished the printer remains in Setup Mode ...

Page 22: ...User Manual 17 ...

Page 23: ... Page printout is reported because the other are exactly the same except for the marker The printer setup forms contain all printer parameters and the values that can be set The current value is indicated by an asterisk For a detailed description of the parameters and the settings see Setup Parameters later in this manual Each Setup form is identified by a marker in the upper left corner of the pa...

Page 24: ...User Manual 19 ...

Page 25: ...User Manual 20 ...

Page 26: ...ion xxxx Setup Parameter Values Description RESTORE TO MFG No all config prog 1 prog 2 prog 3 prog 4 The selected values are not set to factory defaults The values set in all printer setups are reset to factory defaults The values set in the configuration setup are reset to factory default values PROGRAM prog 1 prog 2 prog 3 prog 4 on interface Defines the default Program Setup Selecting prog 1 pr...

Page 27: ...ion of the buffer protocol When the financial interface is selected this setting is ignored ROBUST XON Enabled disabled Perform the Robust XON enabled or not disabled WORD LENGTH 7 bit 8 bit Sets the number of the data bits When the financial interface is selected this value is always set to 8 bits BAUD RATE 1200 2400 4800 9600 19200 38400 bps Sets the data transfer rate PARITY BIT even odd space ...

Page 28: ...i LOCK no lock font hor pitch font hor pitch The following selections made in the printer setup may be locked font horizontal pitch hor pitch or both the font and horizontal pitch font hor pitch The locked settings cannot be changed via software commands FORM LENGTH lines A4 letter A5 legal Sets the page length in number of lines or standard formats A4 Letter A5 or Legal If you select lines you mu...

Page 29: ...ering that the first line corresponds to the tens the second line to the units See the example below Example How to set the Top Margin to 15 TOP MARGIN 10x 0 1 2 3 4 5 6 7 8 9 1x 0 1 3 4 5 6 7 8 9 Setup Parameter Values Description BOTTOM MARGIN 10 x 1 x Sets the bottom margin in number of lines The values range between 0 and 90 To set the values combine the numbers considering that the first line...

Page 30: ...tion Setting used for the OLIVETTI protocols CUT SHEET EJECT on front on rear Selects whether the cut sheet loaded into the printer is ejected towards the front or the rear of the printer PRINT DIRECTION unidir bidir sw control Selects the printing direction of the print head unidirectional unidir bidirectional bidir or selected via software sw control LINE MODE LF LF CR CR CR LF CR LF LF CR LF CR...

Page 31: ...ge format no or ejects a cut sheet loaded into the printer yes RESET WITH EJECT no yes When the printer receives a reset command if this item is set to yes the paper inserted in the printer is ejected If the item is set to no the printer performs only the reset command CUT SHEET EJECT On front on rear Selects wheter the cut sheet loaded into the printer is ejected toward the front or the rear of t...

Page 32: ...y adjust the first line and the first printing column as follows 1 When the printer is in Setup Mode insert a blank sheet into the printer press the ST1 key until the leds are in the configuration showed in previous SETUP STATUS table 2 Press ST2 key the following sheet will be printed 3 Fill in the marker corresponding to the value you want to set ...

Page 33: ... X X X X Vertical Offset Tuning Vertical Offset Tuning VERT DEF POS HORIZ DEF POS Horizontal Offset Tuning FIRST PRINT POSITION Reading the Preprinted Setup Forms When the Printer Setup Forms have been filled in insert them back into the printer when the printer is in Setup Mode The printer is able to recognize the Setup Forms by means of the markers on these pages The printer reads the values mar...

Page 34: ...User Manual 29 Printer Setup Flow Chart Printer OFF Printer Ready Setup Mode Parameters are set Self Test ...

Page 35: ...directly or RS232 C Serial connection directly or via a serial USB adapter This chapter described how to install the driver and the utility This utility can be used also for the Firmware downloading but this features is not covered with this manual Godex CDC RS 232 Emulation Driver installation If the printer is connected through the USB interface and the Setup mode is running the Windows gives a ...

Page 36: ...User Manual 31 If the installation is positively ended in the Windows hardware resources a new COMn port will be found ...

Page 37: ...PII Setup icon will appear Double click on it and the FBP 650PII Setup utility will be run See next chapter for details Remote Setup When this utility is running the following home mask will be displayed In the left top side under Option there is the choice of the FPB 650PII Program Setup selection In the right to side there are the following selection window 1 port selection choice COMn The follo...

Page 38: ...ssage will be displayed by the operator panel LCD REMOTE SETUP FROM USB REMOTE SETUP FROM SERIAL Read NVM In the left part are displayed the current Setup parameters when the Read NVM selection are done The parametes are read from the selected port Through the vertical cursor it is possible to change each of them for all the Setup selection pages Configuration Program 1 to 4 Offset Tuning and writ...

Page 39: ...ter will reboot The configuration file dmp can be simply used to duplicate the same configuration on more printers FPB 650PII unit has to be powered on in normal mode connected to the PC through any active interface Centronics or Serial port and prompt copy file dmp lpt1 b command from a DOS shell After that the printer will reboot Send Setup When Send Setup action key is activated the host will d...

Page 40: ...per Jam In case a paper jam condition occurs proceed as follows 1 Open the printer cover And rise the upper mechanical frame as explained in the chapter Installing the Ribbon Cartridge page 5 2 Remove the jammed paper pulling it towards the front of the printer 3 To have an even better access to the paper path unlock and rotate down the Operator Panel Group ...

Page 41: ...e paper is damaged after printing it probably does not correspond to the specifications given in this manual or was not loaded according to the indications given Verify that the paper corresponds to the specifications see Paper Specifications later in this manual and has been loaded according to the indications given see Paper Handling before in this manual Hexadecimal Dump The hexadecimal dump fu...

Page 42: ...bbon cartridge installed is near its end of life 500 000 characters to be printed Prepare a new Godex genuine ribbon cartridge See Installing the Ribbon Cartridge RIBBON EXHAUST REPLACE RIBBON The ribbon cartridge installed has reached the 105 of the its nominal life Install a new Godex genuine ribbon cartridge See Installing the Ribbon Cartridge CARRIAGE ERROR The carriage movement has been stopp...

Page 43: ...e problem may depends by the home carriage or paper sensor initialization errors Check for paper inside the paper path Check for the carriage free movement SOFTWARE FAULT SUPERVISOR The software of the printer detects a failure during the displayed phase The problem may depends by an internal software routine error SOFTWARE FAULT PARSER The software of the printer detects a failure during the disp...

Page 44: ...the ribbon cartridge The ribbon is used up or torn Change the ribbon cartridge NOTE Godex FPB 650PII printer can signal with a specific display message or by means of a blinking led configuration when original Godex ribbon near to be replace Installing the Ribbon Cartridge The printer does not print The ribbon cartridge is not an original Godex cartridge or it is an exhausted cartridge The printer...

Page 45: ...f the printing unit o Recycled paper is permitted on principle o It is preferable to print on multiple forms with a narrow glue strip or top gluing The gluing must not cause waving in the set of forms Cuts Sheets Insertion direction Print Area A B C C D E Dimensions Maximum Minimum A Form width 244 mm 9 606 in 65 mm 2 559 in B Form length 470 mm 18 50 in 65 mm 2 559 in C Distance between dot posit...

Page 46: ...urope CP1251 Cyrillic CP1252 Windows Latin1 Ansi Gost Tass Mazowia ISO 8859 1 2 3 4 5 6 7 8 9 15 96GREEK Ukrainian ID 12 ID 14 ID 17 Roman 8 Sanyo Ku Philip Character set Olivetti CS000 CS010 International CS020 Germany CS030 Portugal CS040 Spain1 CS050 Denmark Norway CS060 France CS070 Italy CS080 Sweden Finland CS090 Switzerland CS100 Great Britain CS110 USA ASCII CS140 Greece CS150 Israel CS170...

Page 47: ... Interface Connection RTS DCD Female connector 5 9 4 8 3 7 2 6 1 Solder side view GND To printer CTS To PC IBM compatible CTS DSR DSR DTR RX DTR Solder side view DCD TX RTS GND RI Female connector 5 9 4 8 3 7 2 6 1 RI RX TX ...

Page 48: ......

Reviews: