background image

08

6


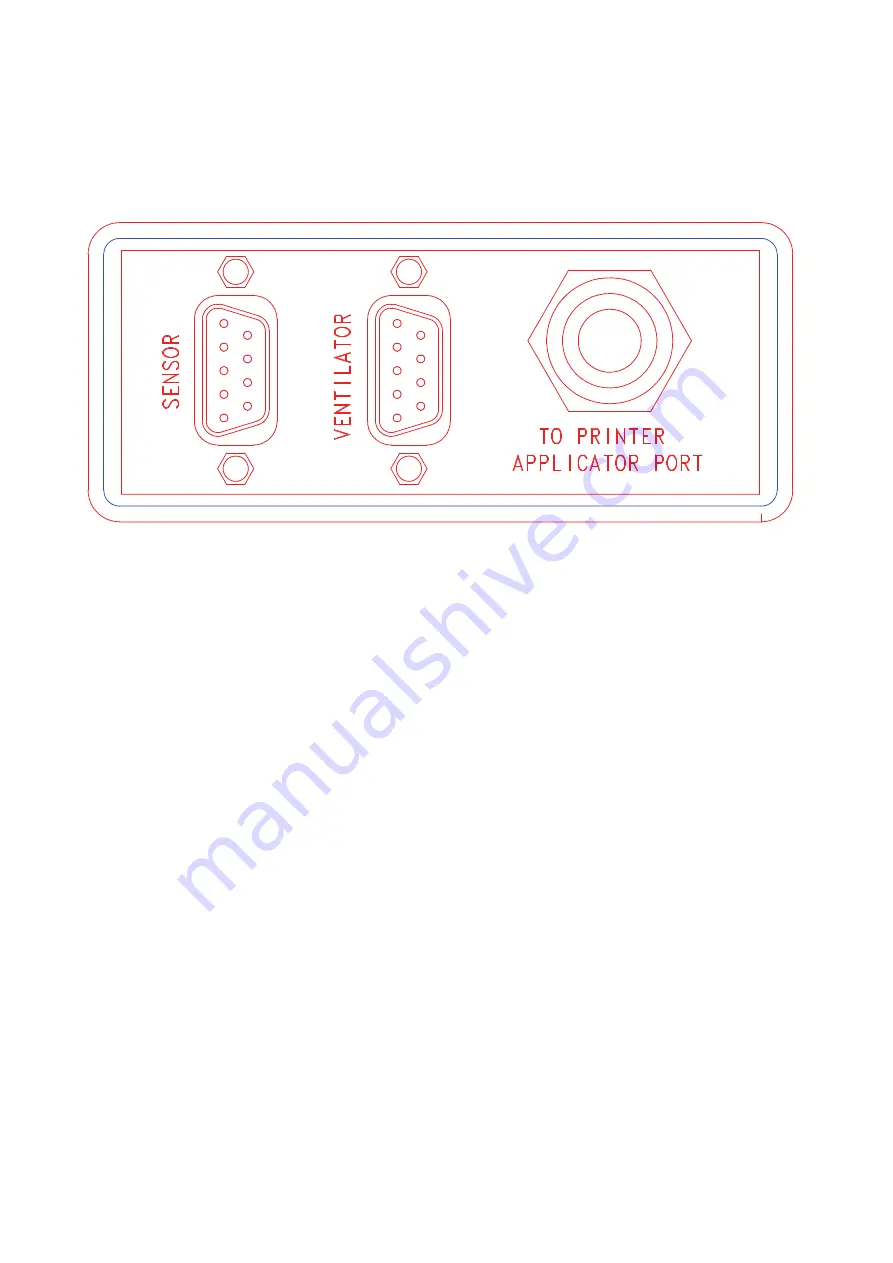
Controls

Rear Panel

7


Connection of product sensor

Use only 24V PNP sensors using the DB9 connector on the rear of the control panel. Sensor is 
powered from the printer (max 300mA). Printing is triggered with the leading edge of the 
24V signal. 

Pin layout: 6:  Input signal (+)
                   7:  GND
                   8:  +24V
You might also use a volt-free signal to initiate labelling by switching between pins 6 and 8.

Summary of Contents for AG2000

Page 1: ...AG2000 LABEL APPLICATOR USER MANUAL GODEX Europe GmbH Arnzhäuschen 36 42929 Wermelskirchen Germany Tel 49 2193 533 96 13 49 2193 533 96 24 Mail technik godex eu www godexintl com ...

Page 2: ...ANUAL CONTENTS 1 Description 03 2 Assembly 04 3 Operation 06 4 Adjusting the applicator and ventilator unit 06 5 Control unit 07 6 Controls 07 7 Connection of product sensor 09 8 Warranty 09 9 Certifications 09 10 Support 09 ...

Page 3: ...el is positioned under roller 3 After roller 1 the labels are routed to the dispense edge where the backing paper is removed From the dispense edge just the backing paper is returned to the printer where the internal rewinder collects the backing paper Dispensed labels will be kept in position by the ventilator unit 4 until they are applied to the product using foam rubber roller 3 to firmly roll ...

Page 4: ...bly 04 1 Set up the stand and install the applicator arm on the stand tightly in position 2 Fasten EZ 2000 Plus printer onto the arm using the 4 bolts included 3 Bolt control box on the side of applicator arm ...

Page 5: ...e printer applicator port 6 Connect the ventilator power cable with the control unit 7 Connect a sensor with the CAN9 connector on the control unit 8 Connect the power cable to the printer 9 Switch on the printer Never connect or disconnect printer or sensor to control unit whilst printer is ON SWITCH OFF PRINTER BEFORE CONNECTING OR DISCONNECTING ...

Page 6: ...re avoiding more than one label being applied to a product By changing the horizontal position of the product sensor you will be able to adjust the label position on the product 4 Adjusting the applicator and ventilator unit Setting of label length The label length is set by moving roller 1 along the applicator bracket 2 The roller should be set to a position such that the gap between the labels s...

Page 7: ...ggered In the OFF position labels are not applied when the sensor is triggered BLOCK DELAY Used to prevent multiple labels being applied to the same product caused by false reading of the product sensor During the time period set by the BLOCK DELAY control the product sensor will be ignored after the initial triggering of the sensor For example if a product has irregular shape or colour pattern wh...

Page 8: ...the DB9 connector on the rear of the control panel Sensor is powered from the printer max 300mA Printing is triggered with the leading edge of the 24V signal Pin layout 6 Input signal 7 GND 8 24V You might also use a volt free signal to initiate labelling by switching between pins 6 and 8 ...

Page 9: ... environments may shorten the ventilator life cycle and raw product surfaces may reduce the pressure roller life cycle 9 CE Compliance The AG2000 applicator system is not subject to CE certification as it is a device that can only be operated as a subordinate extension of another device the printer The integrated ventilator is CE certified 10 Support For technical questions support and special req...

Reviews: