background image

Emulzní  disk

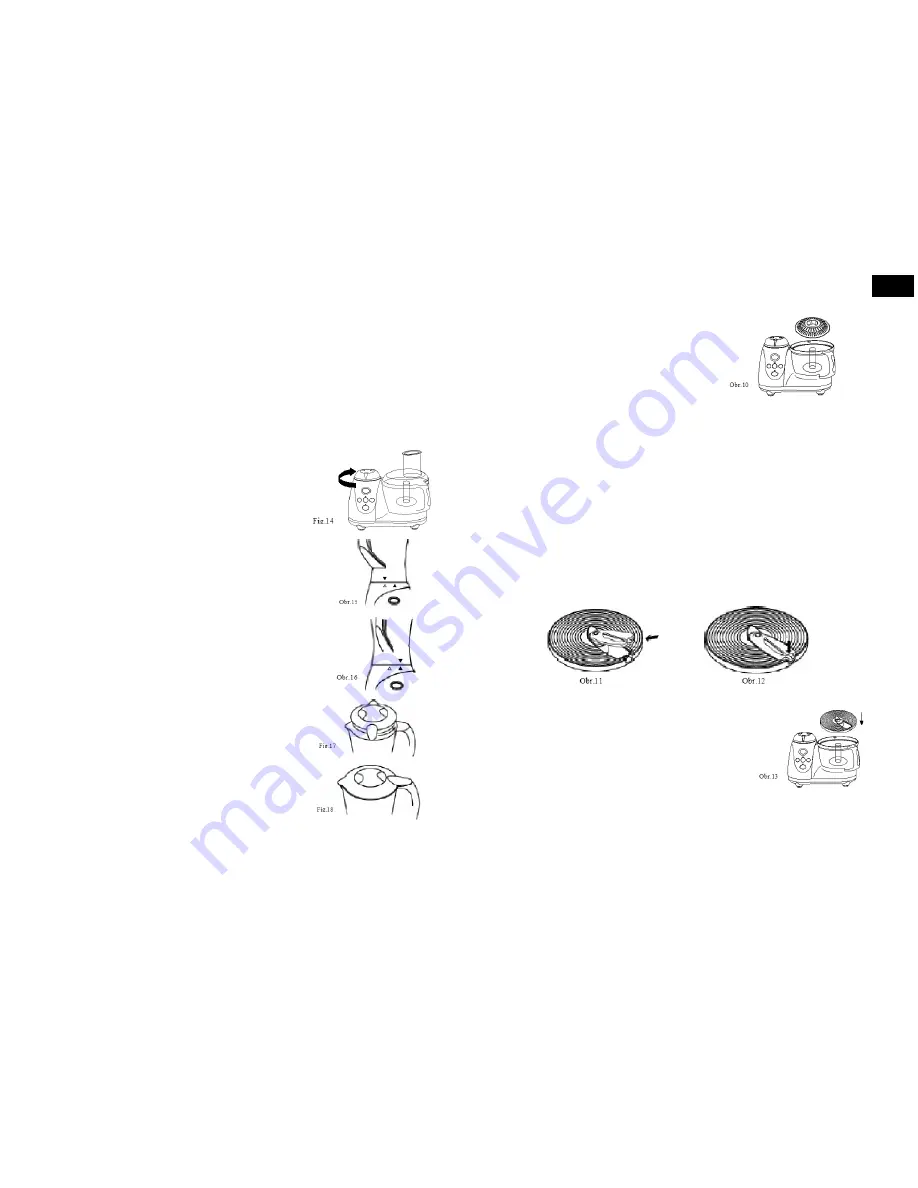
1.  Mísu a držák příslušenství instalujte, jak je uvedeno výše
(obr. 2, 3, 6).
2.  Na  držák  příslušenství  nasa te  emulzní  disk  a  pevně
zatlačte  na  místo  (obr.  10).
3.  Vložte  přísady  do  mísy.
* Disk používejte ke tření a šlehání.
*  Nikdy  disk  nepoužívejte  k hnětení  těsta.  Při  šlehání  smetany  a  přípravě  jemných  omáček
používejte  nižší  rychlosti.
*  Můžete  takto  připravit  domácí  majonézu,  omáčky,  ušlehat  vaječné  bílky,  pusinky  a  připravit
šlehačku.
4.  Na  mísu  nasa te  víko  a  do  plnicího  otvoru  vložte  pěchovátko.

Poznámka: 

Vršek  držáku  příslušenství  zapadne  zespodu  do  víka  mísy.

5.  Napájecí  kabel  zapojte  do  vhodné  zásuvky  a  robot  zapněte  vypínačem.
6.  Zvolte  požadovanou  rychlost.
7. Po dokončení zpracování robot vypněte a napájecí kabel odpojte od zdroje energie,
z mísy  před  vyjmutím  zpracovaných  přísad  odstraňte  držák  příslušenství  a  emulzní  disk.

Nože  na  krájení,  sekání,  strouhání  a  krouhání

1.  Do  držáku  nožů  vložte  požadovaný  krouhací  nebo  krájecí  nůž  a  nasa te  na  držák
příslušenství.  Nůž  přidržte  za  držák  nožů  a  jemně  zatlačte  konec  nože  do  klipu  držáku,  až
zapadne na své místo (obr. 11, 12). Nůž by měl být v jedné rovině s držákem. Nůž je
v držáku  přidržován  dvěma  malými  pojistkami.

Poznámka: 

Všechny  kovové  disky  mají  ostré  hrany,  proto  při  manipulaci  s nimi  a  jejich

instalaci  a  snímání  dbejte  zvýšené  opatrnosti.

2.  Mísu  a  držák  příslušenství  instalujte,  jak  je  uvedeno  výše
(obr. 2, 3, 6).
3.  Držák  nožů  nasa te  na  držák  příslušenství  a  pevně
zatlačte na místo (obr. 13). Držák nožů by měl být v jedné
rovině  s okrajem  hnětací  mísy.

4.  Na  mísu  nasa te  víko  a  do  plnicího  otvoru  vložte  pěchovátko.

Poznámka:

Vršek  držáku  příslušenství  zapadne  zespodu  do  víka  mísy.

5. Plug the power cord into a suitable power outlet and turn the power ‘ON’.
6. Select the required speed.
7. Remove the pusher from the feed tube. To use the grating/slicing discs insert the
ingredients into the feeding tube and use the pusher to guide them through the tube. Never
use fingers or other utensils to push down the feed tube as sharp blades are located inside
the  disc.
* The lower and middle settings are recommended. The highest settings can be used if
needed.
*  Use  the  blades  to  slice  potatoes,  cucumber  and  grate  cabbage,potatoes  and  large  carrots.
* When slicing/chipping potatoes lower them solwly down the feed tube with the pusher feed
tube.
8. When processing is complete, switch off and unplug the food  processor, remove the
blade holding disc and tool holder from the bowl before removing the processed food.

Blender

1.  Remove  the  screw  cap  from  the  food  processor  body.
Simply  twist  the  safety  cover  clockwise  snd  remove  (fig.14).

2. Position the blender onto the processor body above the speed
control dial with the handle to the left. The solid gray arrow under
the handle of the blending jar should align with the gray arrow
on  the  food  processor  body  (fig.15).

3. To lock the blender into place, simply hold the handle of the jar
and turn it to the right. The solid arrow on the blender jar should
now be aligned with the solid arrow on the food processor
body  (fig.16).


4.Place ingredients into the jar.

Note: 

Do not exceed the maximum indicated level - 1.5 litres.

Always ensure that the lid is blender.

5. Position the lid onto the blender jar so that the long holding
lip is facing towards you (fig.17).

6Turn the holding lip to the right, the holding lip should be aligned
with the top of the jar handle (fig.18).

7. Fit the processor bowl and lid as detailed previously.

Note: 

The blender will not operate if the blender jar, lid and the

processor  lid  are  not  all  correctly  locked  in  place.

8. Plug the power cord into a suitable power outlet and turn the power ‘ON’.
9 Select the required blending speed 1-10 or PULSE.

Tip: 

Further ingredients can be added while blending by pouring through the lid hold  once

the measuring cup has been removed. The blender can be used for liquidizing, pureeing and
mixing.

CZ - 9

ENG - 36

CZ

Summary of Contents for FP 612

Page 1: ...N VOD K POU IT N VOD NA POU ITIE INSTRUCTION MANUAL FP 612 Kuchy sk robot kuchynsk robot food processor...

Page 2: ...stit nebo v p pad poruchy P stroj nesm z stat v provozu bez dozoru Jestli e mus te pracovi t opustit v dy p stroj vypn te resp vyt hn te z str ku ze z suvky v dy tahejte za z str ku nikdy ne za kabel...

Page 3: ...na ulo en no 14 Tla tko vyp na 4 V ko hn tac m sy 15 Tla tko 5 Mini p chov tko 16 Displej 6 P chov tko 17 T lo kuchy sk ho robota 7 Plnic otvor 18 P edn panel 8 Madlo m sy 19 Madlo mix r 9 Pry ov pov...

Page 4: ...uje pou it pouze po adovan d lky kabelu M sa Kapacita m sy je 1 75 l tekutin a 1 5 kg t sta M sa se usazuje na motor a je vyrobena tak aby zajistila rovnom rn a efektivn zpracov n potravin V ko m sy s...

Page 5: ...owl capacity is 1 75 litre for liquids and 1 5 kg for solids such as dough and scone mixers The blender kapacity is 1 5 l Accessories 6 stainless steel blades speci l stainless steel blade kneading bl...

Page 6: ...by the open arrow Remove the silicone rubber deal from the blade assembly Wash the lid jar silicone rubber seal and the blade assembly in warm soapy water Reassembly of the jar blade assembly is a re...

Page 7: ...d zdroje energie V dy se ujist te e je ve ker p slu enstv spr vn instalovan Instalace dr ku p slu enstv 1 Usa te m su kuchy sk ho robota 2 Dr k p slu enstv instalujte na hnac h del obr 6 Processing bo...

Page 8: ...7 Po dokon en zpracov n robot vypn te a nap jec kabel odpojte od zdroje energie z m sy p ed vyjmut m t sta odstra te dr k p slu enstv a epele Pozn mka Z d vodu v t bezpe nosti doporu ujeme v dy nech...

Page 9: ...er to guide them through the tube Never use fingers or other utensils to push down the feed tube as sharp blades are located inside the disc The lower and middle settings are recommended The highest s...

Page 10: ...zapn te vyp na em 9 Zvolte po adovanou rychlost od 1 do 10 nebo pulzn interval Tip B hem mixov n m ete p idat dal p sady pomoc plnic ho otvoru mus te sejmout odm rku Mix r m ete pou vat k rozm ln n mi...

Page 11: ...ut large pieces of ingredients into pieces Ensure that all cores and stones have been removed before processing as it may damage the blade Note Never exceed with any ingredient the maximum capacity in...

Page 12: ...lock the processor bowl lid into position ready for use turn the cover to the right The holding lip should be flush with the top of the bowl handle fig 5 Check to ensure that the bowl position hasn t...

Page 13: ...i zjevn mechanick po kozen Z ruka se nevztahuje na opot eben zbo nad r mec b n ho pou v n Po kozen p slu enstv nen automaticky d vodem pro bezplatnou v m nu kompletn ho p stroje Tento p stroj byl test...

Page 14: ...grip handle and is marked in both cups and milliliters mls for ease of use The transparent jug allows you to observe the food as it is being blended for perfect results every time The blender will no...

Page 15: ...ontaktu s potravinami pred prv m pou it m umyte V etky kovov kr ja e a str ha e s ve mi ostr pri manipul cii s nimi dbajte na zv en opatrnos Ne za nete in talova pr slu enstvo uistite sa e je nap jac...

Page 16: ...sa 20 Pry ov povrch mix r 10 Hnetacia misa 21 Mix r 11 Ulo enie nap jacieho k blu 22 Bezpe nostn kryt ENG 29 Description of the Controls 1 lngredient 12 Buton 2 Blend cove 13 Buton pulse 3 Box for bla...

Page 17: ...read the operating instructions carefully before putting the appliance into operation and keep the instructions including the warranty the receipt and if possible the box with the internal packing Gen...

Page 18: ...ochrane ivotn ho prostredia Urobili sme to najlep ie pre zn enie mno stva obalov a zaistili sme ich jednoduch rozdelenie na 3 materi ly lepenka papierov dr a roztiahnut polyetyl n Tento pr stroj obsah...

Page 19: ...je ozna en pkou Vyberte z no ov silik nov tesnenie Opl chnite veko n dobu silik nov tesnenie a no e v teplej mydlovej vode Znovu v etko zostavte v opa nom porad ne je uveden vy ie Skontrolujte e ste...

Page 20: ...dzi t mito intervalmi chodu nech vajte prest vku minim lne 1 min tu IN TAL CIE PR SLU ENSTVA NA KUCHYNSK ROBOT Pred zostaven m zariadenia sa uistite e je vypnut a odpojen od zdroja energie V dy sa uis...

Page 21: ...ku pr slu enstva zapadne zospodu do veka misy 5 Nap jac k bel zapojte do vhodnej z suvky a robot zapnite vyp na om 6 Zvo te po adovan r chlos Pri spracovan cesta hneten za nite r chlos ou 1 Pozn mka P...

Page 22: ...eho otvoru vyberte piest Pokia pou vate str hadlo kr ja na pl tky vlo te pr sady do plniaceho otvoru a pomocou piestu ich pretla te plniacim otvorom Nikdy nepou vajte prsty alebo in kuchynsk n radie p...

Reviews: