background image


In  photo  mode,  press  the  Menu  button  to  select  the  self-timer  mode  as  single  shot,  two 

seconds timing, five seconds timing, ten seconds timing and continuous shooting. 


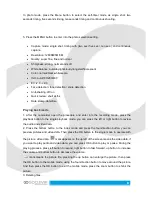
5. Press the MENU button to enter into the photo selection setting. 


  Capture  mode:  single  shot,  timing  with  (two  sec./five  sec./,  ten  sec.)  and  continuous 

capture. 

  Resolution: 12M/8M/5M/3M 

  Quality: super fine, fine and normal 

  Sharpness: strong, normal and soft 

  White balance: auto/daylight/cloudy/tungsten/fluorescent 

  Color: normal/black-white/sepia 

  ISO: auto/100/200/400 

  EV:-2.0 - +2.0 

  Face detection: face detection / smile detection 

  Anti-shaking: off/ on 

  Quick review: shut/ 2s/5s 

  Date stamp: date/time 


Playing back mode 

1.  After  the  camcorder  open  the  procedure  and  enter  into  the  recording  mode,  press  the 

playback button to the single playback mode, you can press the left or right button to review 

the audio and video data. 

2.  Press  the  bottom  button  to  the  index  mode  and  press  the  four-direction  button,  you  can 

preview pictures and video data. Then press the OK button to the single mode to operate with 

the picture  video data. 

 mark appears on the up left of the screen means the video data, if 

you want to play audio and video data, you can press OK button to play or pause. During the 

playing process, press left button to rewind, right button to fast forward, up button to increase 

the volume and bottom button to decrease the volume.  

 mark means the picture file,  pressing the up button can enlarge the picture, then press 

the OK button to the mobile mode, using the four-direction button to move around the picture. 

And  then  press  the  OK  button  to  exit  the  mobile  mode,  press  the  zoom  button  to  shrink  the 

picture. 

3. Deleting files. 

Summary of Contents for DVR FULL HD PRO

Page 1: ...GOCLEVER DVR FULL HD PRO OWNER S MANUAL GOCLEVER DVR FULL HD PRO INSTRUKCJA OBS UGI ODWIED NASZ STRON WWW GOCLEVER COM ABY ZAPOZNA SI Z INNYMI PRODUKTAMI TAB NAVIO DVR DVB T...

Page 2: ...2 Przed skorzystaniem z urz dzenia zapoznaj si z niniejsz instrukcj obs ugi oraz zachowaj j na przysz o Contents Spis tre ci English 3 Polski 12 Warunki gwarancji 22 Karta gwarancyjna 25...

Page 3: ...camcorder is aimed at the market demand with many leading functions as high definition digital video recorder photograph high speed USB data transmission and USB charging Features Small Size a perfect...

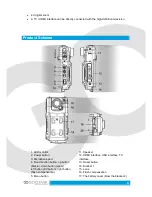
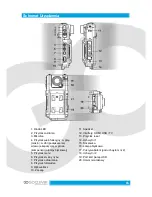
Page 4: ...monitor 2 Power button 3 Microphone port 4 Five direction button up button Macro down button zoom left button EV button right button flash compensation 5 Menu button 11 Speaker 12 HDMI interface USB i...

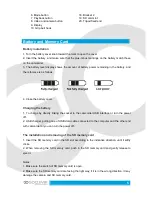
Page 5: ...cover Charging the battery 1 To charge by directly linking the socket to the camcorder USB interface or turn the power off 2 USB charger putting one of USB data cable connected to the computer and th...

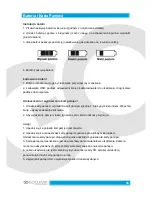
Page 6: ...off the power Switching the operation mode 1 Press the mode button to switch the video and photography mode recording mode icon photography mode icon They are marked on the top left corner of the scr...

Page 7: ...ed with the indicator on the left bottom of the screen 3 Settings of the recording options Press the MENU button to enter into the recording option settings Resolution 1080p 720p 480p Loop recording 5...

Page 8: ...de press the playback button to the single playback mode you can press the left or right button to review the audio and video data 2 Press the bottom button to the index mode and press the four direct...

Page 9: ...pen Screen Rolling Information backup USB Backup Mode Firstly connect the camcorder with the computer by USB cable and then press the power button it will appear a picture as followings select the sto...

Page 10: ...boot the machine which will return to normal Technical Specifications LCD screen 2 5 LTPS 4 3 Camera lens 130o A level degrees high resolution lens Language English German French Spanish Italian Portu...

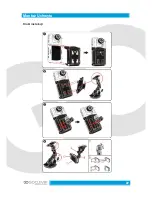
Page 11: ...11 Note This product retained design and specification change without notice Rack Mounting Installation steps...

Page 12: ...12...

Page 13: ...orzystaniem z urz dzenia zapoznaj si z niniejsz instrukcj obs ugi oraz zachowaj j na przysz o DVR PRO INSTRUKCJA OBS UGI ODWIED NASZ STRON WWW GOCLEVER COM ABY ZAPOZNA SI Z INNYMI PRODUKTAMI TAB NAVIO...

Page 14: ...ach konsumenta Urz dzenie pozwala na rejestrowanie wysokiej rozdzielczo ci film w oraz zdj Kamera obs uguje szybk transmisj danych oraz adowanie baterii poprzez port USB Funkcje Ma y rozmiar soczewki...

Page 15: ...prawo kompensacja lampy b yskowej 5 Przycisk menu 6 Przycisk zmiany trybu 7 Przycisk odtwarzania 8 Przycisk foto wideo 9 Wy wietlacz 10 Zaczep 11 Speaker 12 Interfejs HDMI USB i TV 13 Przycisk reset...

Page 16: ...kart pami ci w gnie dzie kart pami ci zgodnie z intuicyjnym kierunkiem Wepchnij kart us yszysz delikatne klikni cie 2 Aby wyj kart pami ci lekko j naci nij Gdy karta odskoczy wyjmij j Uwagi 1 Upewnij...

Page 17: ...m g rnym rogu ekranu 2 Naci nij tryb odtwarzania aby przej do trybu przegl dania nagranego materia u Uruchamianie opcji systemowych Naci nij dwa razy przycisk MENU aby przej do menu opcji systemowych...

Page 18: ...pcje wideo Naci nij przycisk MENU aby przej do menu opcji wideo Rozdzielczo 1080p 720p 480p Zap tlanie nagrywania 5 minut 10 minut 15 minut Wykrywanie ruchu w wy Datownik w wy Wykonywanie zdj opcje tr...

Page 19: ...ybem odtwarzania fotografii oraz wideo 2 Naci nij przycisk OK aby rozpocz prac z wybranym materia em Ikona w lewym g rnym rogu ekranu oznacza aktywny tryb przegl dania materia w wideo Je eli chcesz od...

Page 20: ...erd wyb r Uruchom M j Komputer a nast pnie kliknij na ikon pami ci masowej Wybierz folder DCIM i skopiuj jego zawarto na dysk twardy komputera PAMI STANDARDU PICTBRIDGE URZ DZENIA Uwagi 1 Obs ugiwane...

Page 21: ...w oski portugalski TC SC japo ski rosyjski Wideo 1080p 720p 480p Format wideo AVI Rozdzielczo 12M 8M 5M 3M Format zdj JPG Gniazdo kart pami ci SD Mikrofon Wbudowany Tryb przechwytywania Pojedyncze wy...

Page 22: ...22 Monta Uchwytu Kroki instalacji...

Page 23: ...cze niejszym uzyskaniu numeru RMA zgodnie z procedur reklamacyjn Natomiast koszt przesy ki do klienta po naprawie pokrywa gwarant 6 Okres gwarancji na akcesoria do czone do urz dzenia np pilot kable i...

Page 24: ...rancyjne w przypadku zerwania plomb gwarancyjnych tabliczki znamionowej z numerem seryjnym lub stwierdzenia przez serwis producenta dokonywania nieautoryzowanych napraw lub zmian systemowy b d konstru...

Page 25: ...skie Czechy BOUNCER S R O SLAVONICKA 324 67531 Jemnice Czech Republic servis goclever cz Serbia ET Servis d o o Beograd Member of Logo d o o Group Bulevar kralja Aleksandra 261 11000 Beograd Srbija 38...

Page 26: ...D DATE SOLD DATE MANUFACTURED DEVICE MODEL GOCLEVER DVR FULL HD PRO SERIAL NUMBER DEALER S NAME STAMP SIGNATURE Date and customer s signature Repairs history Date Confirmed defect made repairs Service...

Reviews: