2
Getting Started
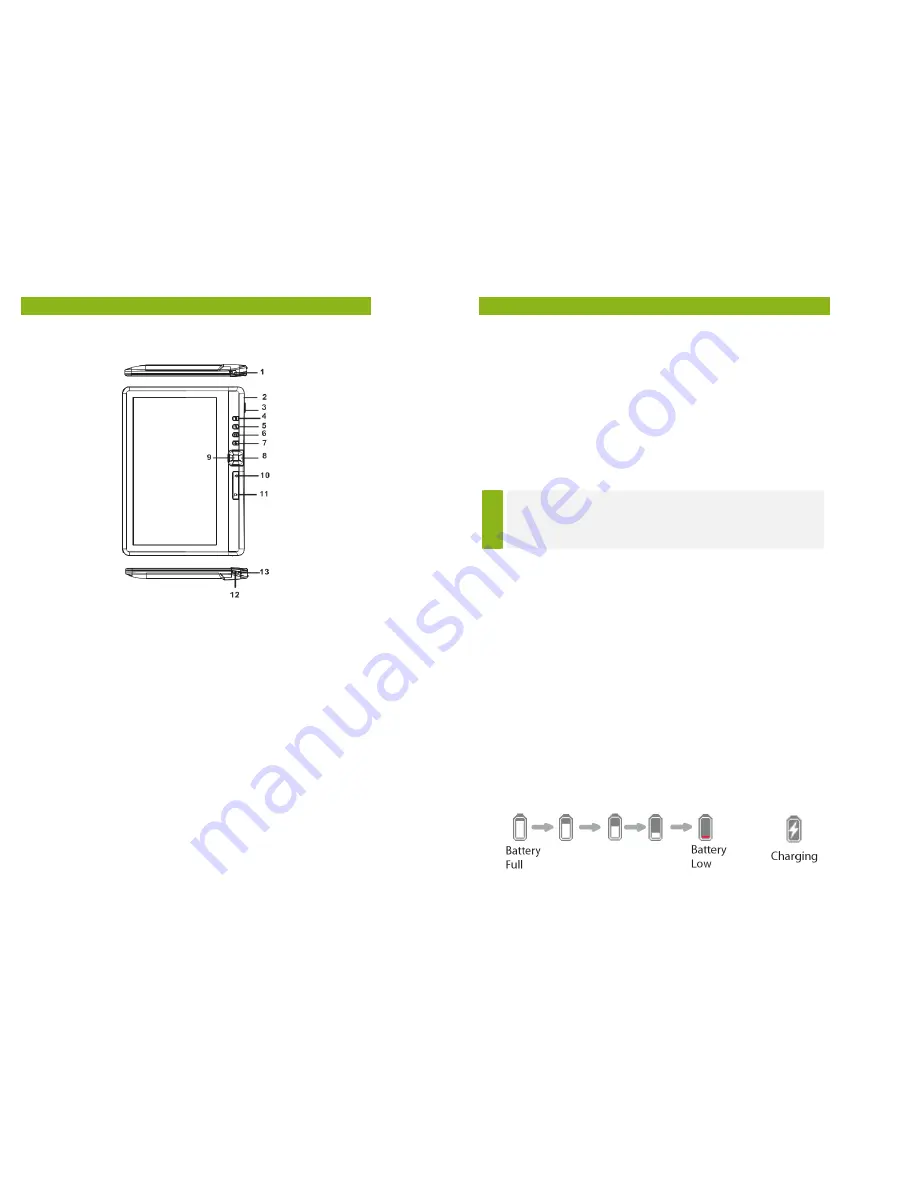
Parts and Controls
1.
Audio jack
2.
Mini USB port
– for data transfer and emergency charging
3.
microSD card slot
– supports microSD card
4.
Menu button
– press to display Option Menu
5.
Zoom button
– press to adjust font size or to zoom in/out
6.
Play/Pause button
– to enter into music playing menu
7.
Return button
– press once to return to previous menu,
press and hold to return to Home menu
8.
Directional buttons
– to move cursor
9.
OK/Enter button
10.
Previous page button
– press to turn to previous page
11.
Next page button
– press to turn to next page
12.
Power button
– press and hold for 3 seconds to turn on/off,
press and hold 6 seconds to reset
13.
Charging indicator
– when the reader is being charged, red
light is on, when fully charged, blue light is on.
3
Getting Started
Turning the eReader’s Power On and Off
•
Press and hold the [Power] button for 2 seconds to turn the
eReader on.
•
It may take a few moments for the eReader to turn on and load
its contents.
•
If the eReader does not turn on, charging may be required.
•
To turn the eReader off, press and hold the [Power] button for
2 seconds.
Charging the eReader
T
IP
Please charge your eReader for a
minimum of 6 hours
before you use it for the first time. See more info in
‘Battery Care Tips’
section on page 22.
•
You need to charge the eReader prior to using it for the first
time or when battery power is low.
•
Charge the eReader by connecting it to your computer using
the USB cable supplied.
•
Please switch the eReader to standby mode to shorten the
charging process.
•
It will take about 6 hours to fully charge the eReader in standby
mode (LCD off).
•
When the USB cable is connected to the eReader for charging,
the eReader will automatically enter into standby mode after
remaining idle for 60 seconds. Press the [Power] button to
resume full functionality.
•
The battery status is displayed in the bottom left corner. The
remaining battery playback time is displayed right next to the
battery icon.


