background image

CARE OF YOUR DUAL-DECK VCR 

   97

▲ ▲ ▲ ▲ ▲ ▲ ▲ ▲

Humidity Requirements

If your Dual-Deck VCR is suddenly moved from a cold to a
warm place, moisture may form inside the unit. Before
operating, allow at least 2 hours after plugging in the power
cord for your Dual-Deck VCR to dry completely. Failure to
do so may cause damage to your Dual-Deck VCR and the
tape. See "Environment" in the Technical Specifications
section of thie Guide for specifications.

Service and Warranty

Never open your Dual-Deck VCR cabinet or touch the inside
parts. To do so is dangerous and may cause damage. Do not
try to disassemble your Dual-Deck VCR - there are no user-
serviceable parts inside.

Servicing of your Dual-Deck VCR should be done by an
authorized service center. For service information, see the
Limited Warranty section of this guide.

Energy Conservation

Save energy. If you will not be using your Dual-Deck VCR
for a long period of time, unplug the electrical cord.

Shipping Your Dual-Deck VCR

Carefully pack your Dual-Deck VCR in the original packing
materials and carton for shipping.

Summary of Contents for GV8050

Page 1: ...8mm VHS DUAL DECK PC COMPATIBLE V C R U S E R S G U I D E G V 8 0 5 0 G E T T I N G S T A R T E D...

Page 2: ...enny s first step is Dual Deck Director won t EASY TO INSTALL Go Video s new Dual Deck Director includes video editing software and an exclusive multimedia edit controller No other hardware is needed...

Page 3: ...ing a Tape 9 Recording a TV Program 10 Setting the Timer to Record Later 11 Recording a Date and Time Stamp 13 Automatic Assembly Editing 14 Manual Editing 16 Adding New Audio 17 Custom Titling 19 Go...

Page 4: ...witches control to that deck You can also switch control between the two decks by pressing the 8mm VHS key on the front panel or on the remote control or by changing the TV View Remote Control Your Du...

Page 5: ...Owner s Guides To get the most out of your new Dual Deck VCR take a few minutes to familiarize yourself with this User s Guide and with the Reference Guide Be sure to read all Safety Instructions on...

Page 6: ...u have a cable converter box leading into your VCR you will need to note which channel 2 3 or 4 your VCR is tuned to Basic Hookup 1 Place your 8mm VHS Dual Deck VCR next to your TV and plug the VCR po...

Page 7: ...ENNA IN connection on the back of your 8mm VHS Dual Deck VCR If your antenna cable is twin lead use the supplied adaptor 7 Use the number keys on your remote control to change to a channel in your are...

Page 8: ...1994 Day Enter today s date If today is the fourth enter 0 4 Hour Enter only the hour At 4 28 the hour is 0 4 Minute Enter only the minute At 4 28 the minute is 2 8 AM or PM Enter 1 for AM or 2 for PM...

Page 9: ...el programming The VCR will go through all the possible TV and cable channels and will automatically put the channels which you receive into Channel Memory This will take a few minutes to complete 5 I...

Page 10: ...a time or adjust the VHS tracking See the Special Playback Functions section of the Reference Guide for details on these functions See the discussion of Video SequencingTM and Loop Play in the Specia...

Page 11: ...e 8mm VHS Dual Deck VCR or on the remote control That s it The 8mm VHS Dual Deck VCR will make a perfect VHS copy of your 8mm tape If you wish to stop the copying procedure press COPYTAPE again Summar...

Page 12: ...the recording by pressing PAUSE and start record ing again by pressing REC Use One Touch Recording to record in 30 minute incre ments Each time you press REC after the first time you add another 30 m...

Page 13: ...rogram you want to record Month January is 0 1 October is 1 0 etc Year Enter only the last two digits for example 9 4 for 1994 Day Enter the date If your program will air on the fourth enter 0 4 Hour...

Page 14: ...sing the TRK MENU and keys to highlight that event and pressing SELECT to enter the Timer Record Calendar Then keep pressing SELECT until you get to the item you want to change see step 3 above change...

Page 15: ...once 2 Press SELECT at the SET DISPLAY OPTIONS item to enter the DISPLAY MENU 3 Press SELECT more than once if necessary at the TIME STAMP item to choose one of three choices OFF No Date and Time Stam...

Page 16: ...utomatically playing when you insert it giving you more control over the tape Editing an 8mm tape onto VHS with Automatic Edit 1 Insert the 8mm tape that you want to edit and a blank VHS tape 2 Press...

Page 17: ...the begin ning of your 8mm tape to appear at the end of your VHS copy enter the Scene Edit List and press SCENE repeatedly until Scene 8 is flashing Mark the beginning and end of Scene 8 Then program...

Page 18: ...it your 8mm tapes 1 Insert the 8mm tape that you want to edit and a blank VHS tape 2 Press COPYTAPE 3 When the unwanted scene begins press SYNCEDIT Both decks will pause 4 Find the place on the 8mm ta...

Page 19: ...xample to the Line 1 front panel or Line 2 rear panel audio input jacks on the 8mm VHS Dual Deck VCR See the Audio Connections section of the Reference Guide for hookup instructions 2 Press MENU until...

Page 20: ...Screen Display will say DUB PAUSE 6 Prepare your external audio source turn on the radio start the tape etc 7 Press DUB DUB on the Front Panel Display will be ON The On Screen Display will say DUB REC...

Page 21: ...character in your title The charac ters will blink as you move the character choice arrows 5 Press the SELECT key to set this first character and ad vance to the next position Press SELECT repeatedly...

Page 22: ...CATV Indicator 18 CH Indicator 18 CHANNEL Keys 22 Counter 18 Channel Memory 32 7U CLK CTR Key 25 Clock 18 Clock setting 34 6U Connecting the Dual Deck VCR 53 60 4 5U Connecting Video Equipment 67 Con...

Page 23: ...1 Jacks 15 LINE Key TV View 23 Linear Audio 48 Loop Play 28 29 LOOP Indicator 18 LP Indicator 17 Manual Editing 43 44 16U Memory Stop 51 MEMORY Key 25 26 Menu Keys 24 Menu System 30 MENU Key 24 30 Mon...

Page 24: ...aining 18 35 51 Time Setting 34 6U Time Stamp 36 13U Timer Record Errors 40 Timer Record Event 39 11 12U Timer Record Menu 38 40 11U Timer Record Priorities 40 Timer Record Summary 39 12U Timer Record...

Page 25: ......

Page 26: ...Printed in Korea 1994 Go Video Inc 7835 East McClain Drive Scottsdale Arizona USA 85260...

Page 27: ...8mm VHS DUAL DECK PC COMPATIBLE V C R R E F E R E N C E G U I D E G V 8 0 5 0...

Page 28: ...Dual Deck VCR a a l Catalog d l Direct Mailer g l Electronics Superstore b l TV Appliance store e l Audio Video specialty store h l Department store c l Discount store f l Gift i l Other _____________...

Page 29: ...41 8mm and VHS Formats 48 Tape Counter Memory Stop 51 VHS Index Search System 52 Connecting Your 8mm VHS Dual Deck VCR 53 Audio Connections 61 Adding New Audio 63 Monitor Connections 66 Connecting Ot...

Page 30: ...he warranty registration card and mail it in WARNING To reduce the risk of fire or electric shock do not expose this appliance to rain or moisture Do not open the cabinet dangerous high voltage is pre...

Page 31: ...sser aucune partie d couvert NOTE TO CATV SYSTEM INSTALLER This reminder is provided to call the CATV system installer s attention to Article 820 40 of the National Elec tronic Code that provides guid...

Page 32: ...tomatically switches control to that deck You can also switch control between the two decks by pressing the 8mm VHS key on the front panel or on the remote control Remote Control Your Dual Deck VCR is...

Page 33: ...R The Owner s Guides To get the most out of your new Dual Deck VCR take a few minutes to familiarize yourself with the User s Guide and with this Reference Guide Be sure to read all safety instruction...

Page 34: ...be hazardous 7 WATER MOISTURE Do not use this video unit near water for example near a bathtub wash bowl kitchen sink laundry tub in a wet basement near a swimming pool or the like 8 ACCESSORIES Do no...

Page 35: ...r local power company For video units intended to be operated from battery power or other sources refer to the operating instructions 11 GROUNDING OR POLARIZATION This video unit may be equipped with...

Page 36: ...unit due to lightning and power line surges 15 POWER LINES An outside antenna system should not be located in the vicinity of overhead power lines or other electric light or power circuits where it ca...

Page 37: ...trols that are covered by the operating instructions Improper adjustment of other controls may result in damage and will often require exten sive work by a qualified technician to restore the video un...

Page 38: ...manual edits p 43 Easily Locate Tape Segments with Video Index Search System Every time the Dual Deck VCR enters record mode an index mark is placed on the tape Use the Index Scan and Search System t...

Page 39: ...can make exceptional recordings from a variety of accessories such as laser disc players satellite receivers camcorders and other VCRs using the front and rear panel jacks p 67 Keep Track of Your Rec...

Page 40: ...back of VHS tapes p 27 Eliminate Re Programming with Non Volatile Memory If you unplug your Dual Deck VCR or have a power outage programmed settings will remain in the VCR s memory Eliminate Programmi...

Page 41: ...and Fast Forward back and forth between 8mm and VHS decks REW Press to rewind the tape in the active deck Press while tape is playing to rewind while viewing the picture Reverse Picture Search Press a...

Page 42: ...Y Editing Functions SCENE Press to begin Automatic Editing or to return to an already programmed edit list While in an edit list pressing SCENE advances you through the 8 scene list one scene at a tim...

Page 43: ...le in Copy Tape to Pause operation of both decks Press while 8mm deck is in Play Still and VHS deck is in record pause and VCR will start both decks at the same time for a smooth edit DUB Press while...

Page 44: ...ots The left hand section shows indicators which refer to the status of the 8mm deck and the right hand section shows indicators which refer to the VHS deck The middle section shows indicators which r...

Page 45: ...em section in the Reference Guide for indexing procedures DUB The DUB indicator will be ON when you are dubbing audio onto a VHS tape The DUB indicator will BLINK when the VCR is ready to begin an aud...

Page 46: ...tor will be ON if the TV program being broadcast has a Second Audio Program signal SAP SET The SAP SET indicator will be ON if you have selected the Second Audio Program from a TV broadcast Do this by...

Page 47: ...s paused from recording VHS only Deck is rewinding blinking Deck is in Reverse Picture Scan or Jet Search VU Meter The VU or Volume Unit Meter gives you a visual indication in decibels of the relative...

Page 48: ...to come on auto matically you can set the DISPLAY MODE in the DISPLAY MENU in the AMERICHROME COPY MENU to OFF You can also set the DISPLAY MODE to TAPE if you don t want to see the TV VIEW and CH inf...

Page 49: ...ation will be displayed if One Touch recording is in progress TV VIEW TV VIEW indicates the Source of the picture on your TV screen If TV VIEW is set to 8mm or VHS and no tape is playing in that deck...

Page 50: ...NEL Press to return to the channel you were watching before you switched to the current channel MUTE Press to turn off the audio Press again to turn audio back on VOLUME Use the VOLUME UP and DOWN key...

Page 51: ...viewing the picture Picture Scan Press and hold while a tape is playing to speed up picture scan Jet Search VHS only PAUSE Press to pause while recording or to still the picture during playback TV Vi...

Page 52: ...ing 100 2 3 Set cable channel 100 by pressing 100 0 0 Menu Keys TRK MENU and Press while in an On Screen Menu to move up or down to the menu item you wish to select While not in a menu press to manual...

Page 53: ...nual for more detailed information on the Tape Counter MEMORY Press to toggle the Tape Counter Memory Stop for the active deck on and off M will appear on the On Screen display Deck Status line for th...

Page 54: ...for more information RESET Press to reset the Tape Counter to 00 00 00 see Tape Counter and Memory Stop section in this Guide Press while in the Timer Record Summary to clear an event from the event...

Page 55: ...nce the picture one frame VHS only If the deck remains in Play Still mode for five minutes it will Stop Press SLOW or SLOW to enter Slow Motion Playback VHS deck only The tape will play at slow speed...

Page 56: ...r you insert a tape to play Sometimes however you may need to use the manual tracking keys to adjust the picture Press the TRK MENU or the TRK MENU key to move the white streaks up or down and out of...

Page 57: ...ain This process will repeat until you press the STOP key To activate Sequential or Loop Play 1 Press MENU until the SETUP MENU appears 2 Press 3 or use the TRK MENU key to select the AUTO FEATURES ME...

Page 58: ...ote control One of four main menus will appear TIMER RECORD MENU SETUP MENU VHS MENU or AMERICHROME COPY MENU As you press MENU over and over you will cycle through these four main menus Try it We ve...

Page 59: ...ess to CHOOSE an item if it s a submenu to enter that submenu In the SET CLOCK and SET TIMER RECORD submenus pressing this key moves you to the next field To enter numerical data such as date and time...

Page 60: ...nd tuner audio The TUNER CHANNEL MENU has four items 1 Press 1 or press SELECT to set ANTENNA IN to the source of your antenna signal Select TV if you do not subscribe to a cable system If you subscri...

Page 61: ...ices for an item you may need to press SELECT more than once While in the TUNER CHANNEL MENU you can press MENU to return to the SETUP MENU or QUIT to exit the menu system The Dual Deck VCR will remem...

Page 62: ...nd to go back to the SETUP menu Warning Do not press QUIT from the SET CLOCK menu unless you want to lose your new settings Press QUIT to leave the SET CLOCK menu if you enter it accidentally AUTO FEA...

Page 63: ...it is a TV channel the 8mm deck or a Line input Set RECORD SOURCE to 8mm if you only want to record from the 8mm deck to TUNER if you want to record a TV or cable channel and LINE1 or LINE2 if you wan...

Page 64: ...AUDIO IN front panel connections and to L2 if you use the LINE 2 AUDIO IN rear panel connections DISPLAY MENU 1 Press 1 or SELECT to set TIME STAMP to OFF TIMER or ALL Select OFF if you don t want th...

Page 65: ...alphanumeric characters Compose your title by selecting characters one at a time Use the arrow keys to move to the desired character In the TITLER SETUP SCREEN the TRK MENU key always moves down and t...

Page 66: ...be sure your tape is long enough Set the program Type Press 1 for NOR if you want to record only once 2 for DLY if you want to record a show that is on Monday through Friday 3 for EVD if you want to...

Page 67: ...ORD SUMMARY From the TIMER RECORD MENU use the arrow keys to move to the TIMER RECORD SUMMARY Press SELECT to enter the TIMER RECORD SUMMARY screen An asterisk next to an event means that the event is...

Page 68: ...Timer Record errors First the TIMER indicator on the Front Panel Display will blink You will also see a message on the Screen Display telling you what the error is VHS TAPE MISSING This means that you...

Page 69: ...tape press the Copy Tape key and your Dual Deck VCR does the rest Preparing an Automatic Assembly Edit List The key to making clean edits easily is planning Using the playback mode of the 8mm deck rev...

Page 70: ...00 11 06 to 00 15 46 Kids eating birthday cake Performing an Automatic Assembly Edit Once your notes are complete you re ready to edit your 8mm tape onto VHS Let s say you ve decided to copy your scen...

Page 71: ...toy car then Scene 2 opening the tool kit then Scene 3 eating cake then Scene 4 playing with toys Manual Assembly Editing You can also do assembly editing manually on the 8mm VHS Dual Deck VCR Let s s...

Page 72: ...ding and end the scene Glitches Glitches may occur during a manual assembly edit usually at the end of a scene that is being recorded over old material This is because the VCR s full erase head which...

Page 73: ...w ever you can perform insert editing of the linear audio track of your VHS tapes See the Adding New Audio section of this Guide to learn how to do Audio Inserts and Audio Dubbing More Editing Tips Re...

Page 74: ...lenges There are two methods for monitoring the video enhancer Method 1 requires you to adjust your enhancer make a short record ing and then play it back to check the results Method 2 allows you to r...

Page 75: ...of your 8mm VHS Dual Deck VCR to inputs of the video distribution amplifier Connect one set of amplifier outputs to the AUDIO VIDEO INPUTS of your VCR Then connect the other set of amplifier outputs t...

Page 76: ...of three speeds SP LP and SLP Set the record speed in the VHS Menu Your Dual Deck VCR will automatically play a tape at the speed at which it was recorded SP or Standard Play is the fastest speed A T...

Page 77: ...of a VHS tape contains a series of markers which the VCR uses to keep the tape playing smoothly similar to the sprocket holes along the edge of movie film These markers are also what the VCR uses to k...

Page 78: ...of adhesive tape over the opening On an 8mm tape you can slide the tab open and closed If the tab is open you will be able to record on the tape If the tab is closed it will be red you won t be able t...

Page 79: ...o reset the Tape Counter to the zero point in the exact middle of the tape the Counter would run from 1 00 00 to 1 00 00 Any time you insert a tape into your 8mm VHS Dual Deck VCR the Tape Counter wil...

Page 80: ...Press STOP when you ve reached the desired Index Mark The second way to locate Index Marks is to use Index Search Use Index Search to look for a particular Index Mark 1 Press the INDEX key on the remo...

Page 81: ...h a tuner a cable box or VCR and have a cable going from this device into another tuner This means that the channel selected in the first tuner is the only one that the second tuner will be able to pi...

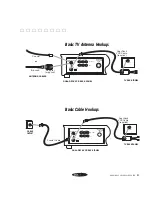
Page 82: ...TV 3 Turn on the power for your VCR and your TV 4 Turn your TV to channel 3 5 Press the MENU key on your VCR remote control You should see a blue screen and a menu Press QUIT to exit the menu 6 Attach...

Page 83: ...DECK VCR BACK PANEL Twin lead Coaxial ANTENNA CABLES or Adapter supplied VHF UHF TV BACK PANEL Dual Deck VCR Cable supplied MUL TIMEDIA CONTROL POR T IN FROM ANTENNA OUTTOTV VIDEO L R AUDIO IN LINE 2...

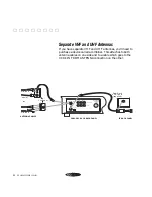
Page 84: ...er This attaches to both antenna cables on one side and to a cable which goes to the VCR s IN FROM ANTENNA connection on the other IN FROM ANTENNA OUTTOTV VIDEO L R AUDIO IN LINE 2 OUT 3 4 CH DUAL DEC...

Page 85: ...f this cable to the OUT TO TV connection on the back of your 8mm VHS Dual Deck VCR Connect the other end of the cable to the VHF IN or CABLE IN connection on the back of your TV 3 Turn on the power fo...

Page 86: ...ur cable box at the same time A disadvantage of this hookup is that it does not allow you to record premium channels that require your cable converter box for descrambling you can still watch those ch...

Page 87: ...is supplied with your 8mm VHS Dual Deck VCR Attach the round end of this cable to the output connection on the back of your cable box Attach the other end to the CABLE IN connection on the back of yo...

Page 88: ...elect the desired channel on the cable con verter box To record and view a basic channel set the TV VCR selector to TV On both the 8mm VHS Dual Deck VCR and the cable converter box select the desired...

Page 89: ...TUNER AUDIO to STEREO in the TUNER CHANNEL SETUP menu 3 On your stereo receiver select the appropriate input TAPE or AUX Now turn on your 8mm VHS Dual Deck VCR your TV and your stereo and enjoy full...

Page 90: ...r stereo system 1 Connect your stereo amplifier tape or record output connections to the LINE 2 AUDIO IN connections on the back of your 8mm VHS Dual Deck VCR 2 Set TUNER AUDIO to SIMUL2 in the TUNER...

Page 91: ...n you set AUDIO INSERT in the AMERICHROME COPY menu to LINE 1 or LINE 2 the 8mm VHS Dual Deck VCR will copy the audio from the Line 1 or 2 input and the video from the 8mm deck Audio Dub is used to co...

Page 92: ...opy Tape will come from the Audio Input jacks and the video will come from the 8mm deck Audio Dub 1 Connect the source of your new audio a tape player for example to the Line 1 front panel audio input...

Page 93: ...n connect the OUTPUT of the mixer to the LINE 1 AUDIO IN on the front of the Dual Deck VCR Follow the above procedures for Audio Insert or Audio Dub For Audio Insert set the TV View to 8mm so that the...

Page 94: ...separate video and audio input connections use the VIDEO and AUDIO OUT connections on the back of your VCR instead of the OUT TO TV connection To view the VCR output on the monitor you may have to swi...

Page 95: ...HS Dual Deck VCR right front panel until Line 2 is selected To record the input from this other video equipment set RECORD SOURCE in the VHS MENU to LINE2 and press the RECORD key If the RECORD SOURCE...

Page 96: ...holes on the back sides and bottom of the cabinet Cleaning the Video Heads Playing poor quality or damaged tapes in your Dual Deck VCR can contaminate the video heads Use only high quality tapes in yo...

Page 97: ...tions Service and Warranty Never open your Dual Deck VCR cabinet or touch the inside parts To do so is dangerous and may cause damage Do not try to disassemble your Dual Deck VCR there are no user ser...

Page 98: ...O TRACK VHS Normal 1 track Hi Fi 2 track AUDIO TRACK 8mm AFM 1 track TAPE WIDTH VHS 12 7 mm 1 2 inch TAPE WIDTH 8mm 8 mm 5 16 inch TAPE SPEED VHS SP 33 35 mm s LP 16 67 mm s SLP 11 12 mm s TAPE SPEED...

Page 99: ...5 Hi Fi COMPUTER PORT Go Video Multi Media control port 8 pin connector Requires optional propri etary hardware and software interface FREQUENCY RESPONSE 20 20 000 Hz Hi Fi TV TUNER 181 channel freque...

Page 100: ...e and always use high quality tapes in your 8mm VHS Dual Deck VCR Check the VHS record SOURCE indicator on the right hand side of the Front Panel Display or the On Screen Display Source screen It shou...

Page 101: ...ly play a tape whenever you load it It will also automatically rewind at the end of a tape If you wish you can set the Dual Deck VCR so that it auto plays only auto rewinds only does both or does neit...

Page 102: ...ject the 8mm tape using the Eject key behind the Left Tower Door A strong static electricity shock or other unforeseen circum stance can cause the control system of your Dual Deck VCR to lock up To re...

Page 103: ...ish the date of purchase HOW LONG IS THIS PRODUCT WARRANTY FOR AND WHAT WILL GO VIDEO DO DURING THE WARRANTY PERIOD This warranty covers internal operating parts and labor to repair or replace covered...

Page 104: ...of the product in any way or incorporation of the product into any other products or damage to the product caused by accident fire floods lightening or acts of God or any use violative of instructions...

Page 105: ...icator 18 CH Indicator 18 CHANNEL Keys 22 Counter 18 Channel Memory 32 7U CLK CTR Key 25 Clock 18 Clock setting 34 6U Computer Control Port 10 71 Connecting the Dual Deck VCR 53 60 4 5U Connecting Vid...

Page 106: ...LAST CHANNEL Key 22 Line 1 Jacks 15 LINE Key TV View 23 Linear Audio 48 Loop Play 28 29 LOOP Indicator 18 LP Indicator 17 Manual Editing 43 44 16U Memory Stop 51 MEMORY Key 25 26 Menu Keys 24 Menu Sy...

Page 107: ...echnical Specifications 70 71 Time Remaining 18 35 51 Time Setting 34 6U Time Stamp 36 13U Timer Record Errors 40 Timer Record Event 39 11 12U Timer Record Menu 38 40 11U Timer Record Priorities 40 Ti...

Page 108: ...t of little Jenny s first step is Dual Deck Director won t EASY TO INSTALL Go Video s new Dual Deck Director includes video editing software and an exclusive multimedia edit controller No other hardwa...

Page 109: ...Dual Deck VCR Go Video is rapidly developing a national reputation for its sophisticated product line and technological expertise A leader in VCR technology Go Video through continuous research is ad...

Page 110: ...VHS Deck Quasi Hi 8 Playback Real Time Tape Counter Frame Counter VU Meter Automatic Record Source On Screen Titler MTS Stereo Sound Hi Fi Stereo on VHS Deck 181 Channel Tuner 100 Year 8 Event Timer T...

Reviews: