go-e go-eCharger HOMEfix Operating Instructions Manual Download Page 23

Establish internet connection

Ÿ

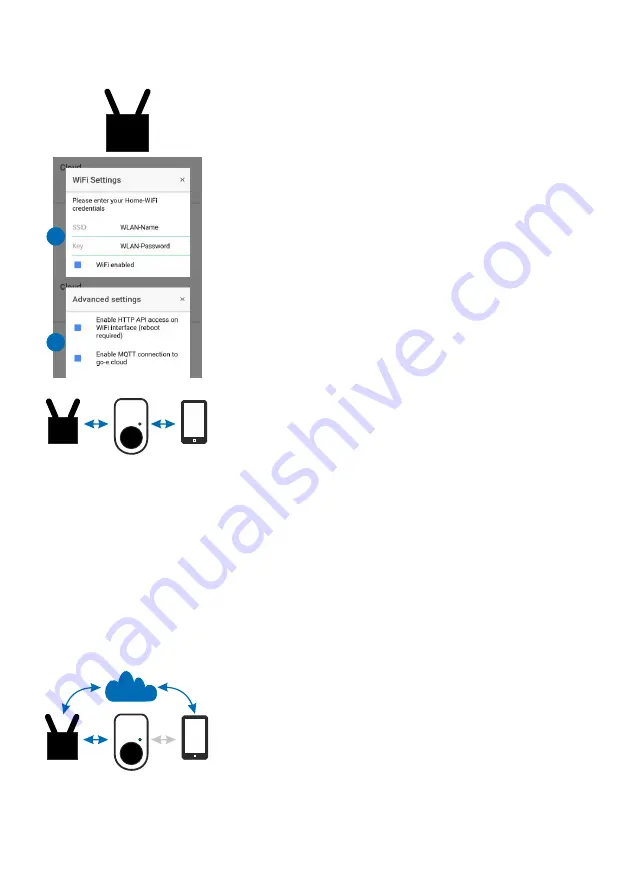
If the connection between the charging unit and 
the  app  is  established  (indicated  by  the  blue 
arrow), tap on the graphic of the WiFi router in the 
app. A pop-up window opens.

Ÿ

Enter the SSID (name of your WiFi network) and 
the password (key) of your WiFi router in the pop-
up window (C). Check the box "WiFi enabled" and 
then confirm with "Save".

Ÿ

Open  "Advanced  settings"  in  the  app  (A)  and 
check that both ticks are set (D). Then reboot the 
Charger (B).

The arrow between the graphics of the go-eCharger 
and the WiFi router should now appear blue.

Access to the charging unit via the Internet

Ÿ

Terminate the hotspot connection between your 
mobile  phone  and  the  charging  unit  and 
reconnect to your home WiFi router in the mobile 
phone's WiFi settings.

Ÿ

Change back to the go-eCharger app.

Ÿ

Tap  on  the  Internet  Cloud  graphic  to  start  the 
connection with the charging unit. 

Ÿ

In the window that opens, enter the Cloud Token 
that you will find on the reset card supplied and 
confirm with "Save". In the app, the connection 
arrows from the graphic of the mobile phone via 
the  Internet  Cloud  and  the  WiFi  router  to  the 
charging unit should now appear blue.

Now  you  have  access  to  your  go-eCharger  from 
anywhere in the world, as long as your mobile phone 
and your charging unit are connected to the internet.

Page 23

In order to be able to use the WLAN/Cloud function of 
the  go-eCharger,  you  first  always  need  a  direct 
hotspot  connection  of  your  smartphone  with  the 
charging unit for the initial setup.

You can carry out all the individual set-up steps as 
described in the short instructions or alternatively, as 
shown  below,  via  the  interactive  graphic  in  the 
"Cloud"  area  of  the  app  by  tapping  the  individual 
graphic elements / connection arrows.

Setup via the interactive graphic

Establish hotspot connection

Ÿ

In the Cloud section of the app, tap on the graphic 
of  the  charging  unit  so  that  your  mobile  phone 
connects  to  it  via  hotspot.  The  WiFi  settings  of 
your smartphone should then open.

Ÿ

Select the go-eCharger (go-e-XXXXXX) from the 
list  of  displayed  devices.  Then  enter  the 
password  that  you  will  find  on  the  reset  card 
under "Hotspot key".

Ÿ

After connecting, switch back to the go-eCharger 
app.  The  arrow  between  the  mobile  phone 
symbol  and  the  charging  unit  should  now  be 
displayed  in  blue.  If  this  is  not  the  case, 
temporarily switch off the mobile data.

This  means  you  can  already  control  the  Charger 
locally via the built-in hotspot.

Page  22

WiFi settings

WiFi settings

W-LAN

Internet

<

<

A

B

C

W-LAN

D

W-LAN

Internet

<

W-LAN

<

Summary of Contents for go-eCharger HOMEfix

Page 1: ...Operating instructions for the product variants 11 kW and 22 kW Version 1 2 EN...

Page 2: ...pyright by go e GmbH The content of this document may not be copied partly or published or circulated in any form other than that approved by go e GmbH without the written permission of go e GmbH Page...

Page 3: ...allow mobile charging unlike the go eCharger HOME However the other functions correspond to the usual full range of go e features Therefore smart and intelligent solutions that make charging electric...

Page 4: ...rged In order to save energy and charge in an environmentally friendly manner you should transfer your charging processes to lunchtime or early in the morning as there is an abundance of electricity i...

Page 5: ...ry Page 10 Technical specifications Page 11 Installation Page 12 Commissioning Page 13 Error indication Page 14 The app Page 15 WiFi settings Page 22 Troubleshooting What does the colours of the LED r...

Page 6: ...to inform the operator where you use the charging box You can then immediately start charging your vehicle If the charging station has a power output of more than 12 kW like the go eCharger HOMEfix 22...

Page 7: ...necessary The circuit to which the go eCharger is connected has to be independently of this fitted with an RCCB typeAand MCB miniature circuit breaker Any modification or repair of hardware or softwar...

Page 8: ...own The type 2 connectors are not waterproof and water could penetrate to the contacts while lying down The go eCharger is suitable for charging gassing vehicle traction batteries only in well ventila...

Page 9: ...1 Connection cable 6 LED ring 4 Button 3 Housing 5 Typ 2 socket Page 9 7 Fine wire fuse on the back Product overview 2 Strain relief...

Page 10: ...1 kW charging box or RFID chip Reset card Wall mounting plate Mounting set 4 x dowels screws for mounting plate 1 x dowel screw for u piece 1 x u piece for optional cable protection Spare fine wire fu...

Page 11: ...pp Charging power adjustable via button and app Security features RFID access control with DC detection 30 mA AC 6 mA DC RCD protection device Phase and voltage test of the input voltage Phase test af...

Page 12: ...d the following cable cross sections but the electrician has to decide according to the local situation HOMEfix 11 kW as surface mounted min 2 5 mm in wall min 4 mm in insulation min 10 mm HOMEfix 22...

Page 13: ...the charging unit All LEDs light up yellow during the test The charging process is started with a clicking sound in the charging unit and is indicated by switching the LEDs During charging the LEDs r...

Page 14: ...he LEDs You will also find the error message in the Status display of the app More detailed information about the causes and appropriate measures are described in the Troubleshooting section of these...

Page 15: ...go eCharger as described in the short instructions or on page 22 of these instructions Charging The go eCharger is in charging mode The LEDs on the charger rotate around the type 2 socket Finished The...

Page 16: ...ting can also be used to regulate the charging current during the charging process The overview also shows you the approximate theoretical charging time depending on how many phases your car is chargi...

Page 17: ...d charging levels 11 by repeatedly pressing the blue Charger push button Entry fields with the value 0 are skipped Default values are already predefined when the unit is delivered Access control 10 Yo...

Page 18: ...f Access control 10 You can Always allow 16 or only allow or prohibit charging at certain times Two time periods can be defined for weekdays and the weekend The current time is determined automaticall...

Page 19: ...never the go eCharger reset card until 5 red LEDs light up and then press Learn 18 in the app at the same time Now 5 green dots should light up which means that the card has been learned You can now...

Page 20: ...his ID for all other chargers of the group You also have to enter all the other load balancing settings again for the other chargers of the group If the cloud connection is temporarily interrupted the...

Page 21: ...IT mains If you are not sure you should leave the setting at Ground check enable The so called Norway mode earth detection is deactivated is visualised by 4 red LEDs on the go eCharger 3 6 9 12 o clo...

Page 22: ...t connection In the Cloud section of the app tap on the graphic of the charging unit so that your mobile phone connects to it via hotspot The WiFi settings of your smartphone should then open Select t...

Page 23: ...g unit via the Internet Terminate the hotspot connection between your mobile phone and the charging unit and reconnect to your home WiFi router in the mobile phone s WiFi settings Change back to the g...

Page 24: ...in the short instructions All added charging units are displayed in the Cloud area of the app under the heading My chargers You can control each individual charger by going to Tap for action F in the...

Page 25: ...t the Charger from the power supply for a short time If necessary the charging current can be reduced but the connection used must also be checked The charging device in your vehicle may also be defec...

Page 26: ...rical connections and the resultant damage to the product by the purchaser or other technical defects caused by the purchaser the warranty shall lapse or a reduction in value shall be made In this cas...

Page 27: ...2 Load balancing via App Smart home capable due to MQTT connection Smart grid capable through connection to aWATTar Recording of charging energy kWh total and broken down by RFID card Modbus TCP firmw...

Page 28: ...Page 28 CE Declaration of Conformity...

Page 29: ...Page 29 Contact details M a i l o f c e g o e c o T e l 4 3 4 2 7 6 6 2 4 0 0 1 0 www go e co go e GmbH S a t e l l i t e n s t r a e 1 A T 9 5 6 0 F e l d k i r c h e n...

Page 30: ...MEfix Please dispose of the device and the packaging after use in accordance with the national legal regula tions Old appliances are not allowed to be disposed of with household waste Help protect the...

Reviews: