background image


8


Ignition key 

(1):    When the ignition 

switch is placed in the (ON) position the 
engine can start when the ignition key is 
turned to the right.    When the ignition 
switch is placed in the      (OFF) position 
the engine will not start, or will turn off, 
if running. 
Note:    Always make sure the ignition 
switch (1) is placed in the        (OFF) 
position after operation. Leaving the 
switch (ON) will drain the battery. 
 

Brake Pedal

 (2):    Depressing the brake 

pedal will stop the Go Kart. 
Note: Always check brakes before 
operation 
 

Gas Pedal

 (3): Depressing gas pedal will 

increase engine RPMs causing Go Kart 
to move. 
 

Parking Brake Lever

 (4): Lever pulled 

to back position will set the parking brake. 
  Always use parking brake when 
engine is not running or    while engine 
is running and is in a   
stopped position for an extended period 
of time. 
 

Forward and Reverse lever

 (5):  

Lever placed in forward position will 
allow the kart to move forward. Lever 
pulled to back position places kart in 
reverse. 
Note: Never try to shift Go Kart in Forward or reverse while the Go Kart is   
moving. Before shifting, make sure kart is 
  stopped and engine is at low idle.

Summary of Contents for Rumble 150cc

Page 1: ...this entire manual before riding DO NOT RETURN TO STORE NOTE Manual illustrations are for demonstration purposes only Illustrations man not reflect exact appearance of actual procduct WWW GMXMOTORBIKES COM AU RUMBLE 150cc 200cc Dune Buggy ...

Page 2: ...AMAGE THE ENGINE AND CLUTCH AND VOID YOUR WARRANTY DO NOT USE MOTOR CAR OIL DO NOT USE OIL WITH FRICTION MODIFIERS OIL WILL NEED TO BE CHANGED EVERY 3 MONTHS IN A HOTTER CLIMATE OR THE NOTHERN HEMISPHERE There is an oil drain plug located underneath you quad dirt bike and is highlighted with an oil drain plug sticker This is a 14mm bolt DO NOT remove the other bolt located under the engine Place a...

Page 3: ...embly is required and in the interest of safety and warranty it is recommended that you have this product assembled by a qualified skilled small engine mechanic You may need to provide proof of being assembled by a skilled mechanic if not a report from a small engine mechanic advising of the issues to process your warranty claims The warranty is a parts replacement warranty and labor is not includ...

Page 4: ...art To emphasize important information the word NOTE has special meaning Indicates key information to make procedures easier or clearer to understand This manual is based on the latest product information available at the time of publication We has a policy of continually improving its products Due to improvements or other changes there may be some discrepancies We reserve the right to make produc...

Page 5: ...LMET EYE PROTECTION PROTECTIVE CLOTHINGError Bookmark not defined SEAT BELTS Error Bookmark not defined STARTING ENGINE Error Bookmark not defined STARTING OFF Error Bookmark not defined CLIMBING A HILL 19 DESCENDING A HILL 19 TRAVERSING A HILL 19 SKIDDING OR SLIDING Error Bookmark not defined OPERATING THROUGH WATER Error Bookmark not defined OPERATING IN COLD WEATHER PRE RIDE INSPECTIONError Boo...

Page 6: ...k not defined BRAKES Error Bookmark not defined BRAKE FLUID INSPECTION Error Bookmark not defined VALVE CLEARANCE Error Bookmark not defined FUSE REPLACEMENT Error Bookmark not defined CHAIN Error Bookmark not defined CHAIN TENSION Error Bookmark not defined CHAIN LUBRICATION Error Bookmark not defined TIRES Error Bookmark not defined REPLACING TIRES 36 STORAGE 37 RETURNING TO SERVICE 37 WASHING T...

Page 7: ...hown on the sales receipt During this period of time Authorized dealer will at its option either repair or replace any original part which is covered by this warranty and is proven to be defective in workmanship or material To qualify for this warranty the part 1 Must have been purchase from an Authorized dealer or Retailer 2 This warranty does not apply to any vehicle which is used in competition...

Page 8: ...not consistent with the original design of the product or in a manner not approved by Original Manufacturer 6 Tires 7 Damage or failures due to abuse neglect or misuse of the product Limitations of this Warranty This warranty does not cover and Manufacturers disclaims any responsibility for 1 Loss of time or loss of use of the product 2 Transportation costs to and from the authorized center 3 Othe...

Page 9: ...5 IMPORTANT LABELS WARNING LABELS ...

Page 10: ... public roads Pavement may cause the Go Kart to become unstable 10 The brush guard surrounding the driver and passenger is not intended to provide rollover protection Before each use make sure all tubes are securely in place and bolts are tight 11 Never operate Go Kart with long hair loose jewelry or loose clothing that could get caught in moving parts 12 Always go slow on unfamiliar terrain Be al...

Page 11: ...IPTIONS AND PART LOCATIONS 1 Front Wheel 2 Front Shocks 3 Steering Wheel 4 Brush Guard 5 Seat Belts 6 Fuel Tank 7 Seat 8 Rear Shocks 9 Rear wheels 10 Engine 11 Muffler 12 Drive Chain 2 4 6 5 8 7 9 3 12 11 10 1 ...

Page 12: ...e Always check brakes before operation Gas Pedal 3 Depressing gas pedal will increase engine RPMs causing Go Kart to move Parking Brake Lever 4 Lever pulled to back position will set the parking brake Always use parking brake when engine is not running or while engine is running and is in a stopped position for an extended period of time Forward and Reverse lever 5 Lever placed in forward position...

Page 13: ...to remove To re install cap turn cap clockwise until snug Make sure cap is seated properly Oil Fill plug Dipstick 2 To open Oil fill plug Dipstick turn cap counter clockwise to remove To re install cap turn cap clockwise until snug Make sure cap is seated properly 1 2 ...

Page 14: ...seat latch up to move the seat forward or backward Before operating the Go Kart make sure the seats are bolted in properly and that the seat latch is locked in place in desired position WARNING Failure to have the seat locked in position could be hazardous The seat coming loose could cause the operator to loose control Never operate the Go Kart without the seat locked in place 1 ...

Page 15: ...uel vapor are highly flammable and toxic You can be burned or poisoned while refueling Before refueling make sure to fol low the procedures listed 1 Shut off engine Make sure there are no flames sparks or heat sources close by 2 Make sure engine has cooled 3 Refuel only outdoors in a well ventilated area 4 Do not smoke while refueling 5 Wipe up any spills immediately 6 Avoid breathing any fuel vap...

Page 16: ...on the engine during the break in process however too much stress could cause damage to the engine components Be careful not to load the engine too much Allow oil to circulate before operating Always allow the Go Kart engine to warm up before operating This allows the oil to circulate throughout the engine which lubricates the components Observe your initial and most critical maintenance service T...

Page 17: ...lights and Tail lights Engine Ignition switch Switch shuts off engine when activated Engine Oil Correct oil level Forward reverse lever No damage Operates as intended Drive Chain Proper tension Lubricated No excessive wear or damage General Condition All nuts and bolts tight No rattles from engine or frame while running OPERATING THE GO KART WARNING Performing maintenance and checks while the engi...

Page 18: ... go slow and do not make sudden turns or stops WARNING Operating this Go Kart on any public road or highway could be hazardous You could collide with another vehicle if you operate on public roads or highways resulting in severe injury or death Never operate on public roads or highways WARNING Operating this Go Kart in a irresponsible manner which includes jumping or other stunts could be hazardou...

Page 19: ...ing a Go Kart Wear protective clothing Long sleeve shirt 3 Gloves 4 Long pants 5 over the ankle boots 6 Operating a Go Kart exposes the operator to many hazards wearing protective clothing can help protect the operator from injury WARNING Operating a Go Kart without a helmet eye protection and protective clothing can be hazardous Operating a Go Kart without a helmet increases the chance of severe ...

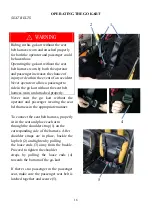
Page 20: ...tighten the shoulder straps by pulling the loose ends 4 towards the bottom of the go kart If there is no passenger in the passenger seat make sure the passenger seat belt is latched together and secure 5 WARNING Riding in this go kart without the seat belt harness worn and attached properly for both the operator and passenger could be hazardous Operating the go kart without the seat belt harness w...

Page 21: ...s at a time doing so could damage the starter Note Do not depress the gas pedal while starting engine doing so will disengage the choke making it difficult for engine to start 7 Once engine has started allow engine to warm up 3 to 5 minutes before operating WARNING Starting or running the Go Kart in an enclosed area such as a garage or shed where there is no ventilation is hazardous Inhaling exhau...

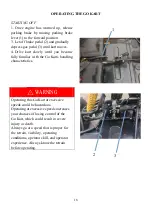
Page 22: ...til you become fully familiar with the Go Karts handling characteristics WARNING Operating this Go Kart at excessive speeds could be hazardous Operating at excessive speeds increases your chances of losing control of the Go Kart which could result in severe injury or death Always go at a speed that is proper for the terrain visibility operating conditions operator skill and operator experience Alw...

Page 23: ... back the Go Kart down the hill safely set the parking brake 3 Carefully dismount the Go Kart 4 Get help to turn the Go Kart around always stay uphill of the Go Kart in case it starts to overturn 5 Re mount the Go Kart and follow the Descending hill procedures listed in this manual DESCENDING A HILL To operate the Go Kart going down a hill follow the instructions below 1 Stop and evaluate the hill...

Page 24: ...k up and the Go Kart to slide out of control The Go Kart could turn over or slide into an object This could result in severe injury or death Apply the parking brake only after the Go Kart has come to a complete stop WARNING Skidding or sliding of the Go Kart could be hazardous Skidding or sliding could result in the Go Kart sliding into an object or overturning suddenly by regaining traction resul...

Page 25: ...ater if doing so could damage the river bank or shore line Brakes need to be inspected cleaned and replaced more often if Go Kart is used in muddy wet or sandy conditions Inspect the Go Kart brakes regularly have a service center clean or replace as needed WARNING Operating this Go Kart through fast or deep water could be hazardous Deep or fast moving water could cause the Go Kart to loose tractio...

Page 26: ... warm area to thaw out Once brakes are thawed check again for proper operation if they still do not work take the Go Kart to a authorized service center Do not attempt to operate the Go Kart with brakes that do not work correctly Preventive maintenance in cold weather operating is important after operating in cold weather with snow slush water or ice dry off the Go Kart including brake and throttl...

Page 27: ...while carrying cargo The more weight on the Go Kart the longer distance it will take to stop AFTER MARKET PARTS After market parts and accessories are available from many manufactures Cannot confirm the quality safety or suitability of all the accessories available When purchasing an accessory use caution the handling of the Go Kart could become affected Some accessories may make the Go Kart unsaf...

Page 28: ...y Shut off engine when performing maintenance and inspection checks with the exception checking the ignition switch and throttle WARNING Failing to perform the recommended maintenance on this Go Kart could be hazardous Failing to perform proper maintenance on this Go Kart could result in an accident Always perform the recommended maintenance for the Go Kart as listed in this manual CAUTION Failing...

Page 29: ...and muffler bolts T I T Air cleaner element I I Valve Clearance I Spark Plug I R Fuel Line I Idle speed I I Condition of throttle and brake cables I I Engine oil R I R Oil filter screen I I Transmission oil R Drive Chain Inspect drive chain before each ride Clean and lubricate as necessary Brakes I I Brake hose I I Brake fluid Inspect brake fluid level before each ride if low check brake pads for ...

Page 30: ... medical attention Make sure work area is well ventilated Always wear goggles or face shield when working with the battery Always wear protective plastic gloves to protect hands Always wear a protective smock to protect clothing Battery preparation 1 Remove battery 1 and electrolyte bottle 2 from box Remove battery cap strip 3 from electrolyte bottle 2 Pull tape strip 4 off top of battery and disc...

Page 31: ... black wire to the NEG side of the battery Make sure the connections are tight 3 Install battery protective cap 2 and rubber strap 3 to hold battery in place CAUTION Reversing the battery lead wires can damage the charging system and the battery The red lead clip must go to the POS side of the battery The black lead clip must go to the NEG side of the battery WARNING If not performed the correct w...

Page 32: ... carburetor Remove filter element by loosening and removing screws 1 2 Remove the foam element 2 from inside the cleaner housing Inspect element if torn or if element shows signs of wear replace 3 Clean foam element with warm soap and water 3 then squeeze out excess water 5 and allow to dry completely 4 Place a small amount of air filter oil on the foam element 4 Wring out any excess oil 5 5 Re in...

Page 33: ... plug Use a thickness feeler to inspect the spark plug gap 2 The spark plug gap should be 0 6 0 7mm 0 024 0 028 in Re install the inspected plug or a new plug until finger tight Finish tightening plug with a wrench If spark plug is a new plug tighten approximately 1 2 turn more with the wrench If plug is an old plug tighten approximately 1 8 turn more with a wrench CAUTION Dirt can damage the engi...

Page 34: ... oil this could damage the engine CHANGING THE ENGINE OIL 1 Make sure engine is warm before attempting to drain the oil A warm engine will help the oil drain quicker 2 Remove the oil fill plug 1 3 Remove the drain bolt 2 located on the bottom of the engine 4 Allow the oil to drain in an appropriate container Note Dispose of oil at an oil reclaim facility 5 Install the drain plug and fill with the ...

Page 35: ...nt and grade of engine oil TRANSMISSION OIL Go kart is sent from the factory with the correct transmission oil type and quantity Refer to maintenance schedule for oil change intervals Checking the level of transmission oil can only be done by draining and replacing with the correct oil type and quantity 1 Locate and remove transmission oil fill plug 4 located on bottom side rear portion of engine ...

Page 36: ...R ADJUSTMENT The front and rear shocks each have five adjustable positions The default position has been set by the manufacture The tension of the shock will change depending on the position of the adjustment ring 2 To increase to a stiffer suspension rotate the adjustment ring counter clockwise To decrease to a lighter suspension turn adjustment ring clockwise Generally heavier riders will want s...

Page 37: ...r brakes If fluid level is below the lower mark inspect the brake hoses 3 for leaks or cracks If there are no leaks inspect the brake pads for excessive wear If brake pads are worn take to a service center for replacement To add brake fluid remove the lid 4 Use only DOT3 or DOT4 brake fluid WARNING Failing to inspect brakes before each use could be hazardous Inspect brakes before each use accordin...

Page 38: ...ormance Follow the valve gap adjustment intervals listed in the maintenance chart FUSE REPLACEMENT If starter motor does not turn over it may be the 15 amp fuse is bad To access 15 amp fuse remove electronics cover 1 located on top of engine assembly Locate and open fuse holder 2 Inspect fuse 3 if damaged replace Proper Valve Clearance Intake 0 002 in 0 05mm Exhaust 0 003 in 0 0762mm 1 2 3 ...

Page 39: ...5 15mm 0 2 0 6in Chain tension slack Adjustment 1 Loosen jam nuts 3 on Chain tensioners 4 2 Adjust chain tension by turning tensioner nuts 5 Clockwise will tighten the chain Counter clockwise will loosen the chain 3 Once the chain is at the correct tension re tighten Jam nut 3 4 Re check chain tension CHAIN LUBRICATION Lubricating the chain before each ride will help to ensure maximum life of the ...

Page 40: ...enters have the correct equipment and expertise to change tires without causing damage Punctures to tires can usually be repaired by using plug type patches Plug type patches cannot repair tires that have been cut If the tire has been cut or has a puncture in a location or size that cannot be repaired replace the tire Be prepared for flat tires always carry a plug type patch kit and air pump with ...

Page 41: ...n the starter key and allow the Go Kart turn over a few times If Go Kart starts shut off immediately This is to coat the inside cylinder head with oil 6 Cover the muffler outlet and air intake with oily rags so the Go Kart will be protected from humidity in storage 7 Remove the Battery and clean battery case and terminals with soap and water Store battery in a cool dark place Charge battery at lea...

Page 42: ...ning materials that could scratch the Go Kart Note Be careful not to allow water to enter the muffler outlet air filter intake brake cables or switches TRANSPORTING 1 Open the drain screw 1 Allow all fuel to drain from the carburetor Once fuel is drained re tighten drain screw 1 Note Make sure to drain fuel in a proper storage container 2 Transport the Go Kart in the upright position tied down sec...

Page 43: ...fresh fuel Replace fuel valve Replace fuel filter Tighten spark plug Clean or replace plug Gap the plug Attach spark plug cap Do not apply throttle while starting doing so disengages auto choke Take to a service center for repair Take to a service center for diagnostics and repair Engine stalls or runs erratically Air filter dirty Low fuel Stale or contaminated fuel Spark plug is fouled or defecti...

Page 44: ... 69 104 in lbs 8 12 nm 8mm bolts and nuts 13 18 ft lbs 18 25 nm 10 mm bolts and nuts 22 29 ft lbs 30 40 nm 12 mm bolts and nuts 36 43 ft lbs 50 60 nm 4 mm screws 22 30 22 30 in lbs 2 5 3 4 nm 5mm screws 30 43 in lbs 3 5 5 nm 6 mm hex bolts 87 121 in lbs 10 14 nm 8 mm hex bolts 17 22 ft lbs 24 30 nm 10 mm hex bolts 25 32 ft lbs 35 45 nm ...

Page 45: ...oil Tire pressure 10psi 69kpa Ignition Type CDI Dimensions and Weights Number of Cylinder Single Length 84 252in 2140mm Combustion Cycle 4 stroke Height 53 543in 1360mm Compression Ratio 10 1 Width 52 362in 1330mm Bore and Stroke 62 5x57 8mm Wheelbase 67 3in 1710mm Horse Power HP 8 8 7000RPMHP Vehicle Wt 401 2lbs 182kg Rated Power 6 5Kw 7000rpm Weight Cap 353lbs 160kg Max Torque 10N m 6000rpm Fuel...

Page 46: ...42 CIRCUIT DIAGRAM ...

Page 47: ...er help or when registering your Go Kart Locate the numbers and list the numbers below for your reference The 17 digit Vehicle Identification Number VIN is stamped on the right side of the go kart on the metal frame Vehicle Identification Number The engine number is located on the left bottom rear portion of he Go Kart Engine Engine Number ...

Page 48: ...VEHICLE MAINTENANCE ...

Page 49: ...sure is correct and even in each tyre Check wheel nuts Throttle Check the throttle operates smoothly across its range Accumulated mud and dirt can restrict cable movement and prevent the throttle from closing Brakes Check brakes operate properly before reaching full speed Check it is not choked with dirt Clean and replace regularly Lights and switches Check lights and switches work VEHICLE MAINTEN...

Reviews: