GP450X
INSTRUCTION MANUAL
PAGE 15
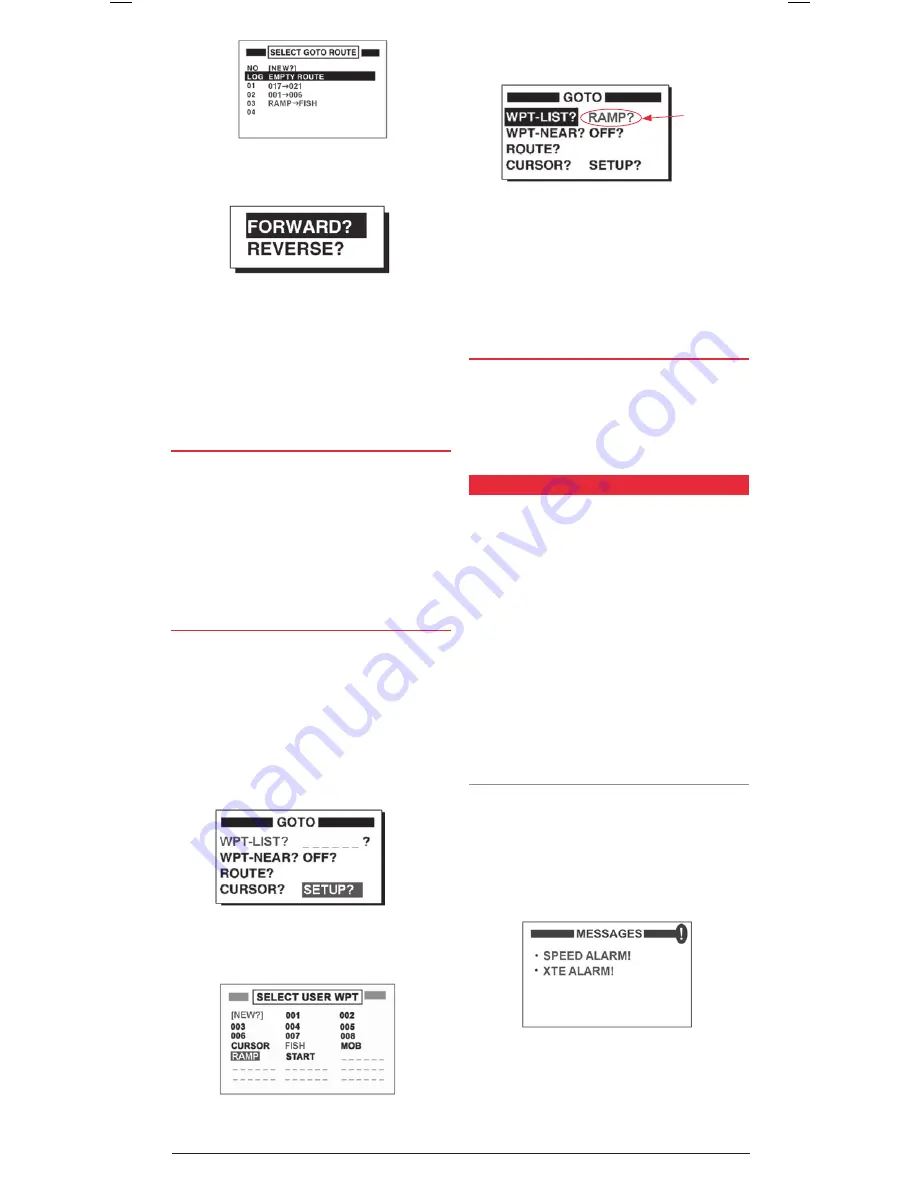
3 . Select a route from the list and press the
ENt
key . The Route
Direction window appear .
4 . Choose
forWard
or
rEvErsE
to select the route
direction . Choosing
forWard
will guide you along the
route starting from the first Waypoint in the route and ending
at the last . Choosing
rEvErsE
guides you back along
the route in the opposite direction, starting from the last
Waypoint and ending at the first . The
rEvErsE
option can
be useful for finding your way back home at the end of
the day .
sEttING dEstINatIoNs By moB
Normally when you save an MOB you are offered an option to
immediately navigate to it . If you choose not to do so, you can
use the GOTO function to call up the MOB later on .
1 . Press
Goto
2 . Select
WPt-lIst
? and press the
ENt
key .
2 . Choose the
moB
Waypoint and press the
ENt
key .
3 . The plotter screen will appear with a dotted line extending
from your ship’s position towards the
moB
point .
sEttING usEr WayPoINts as a dEstINatIoN
You can insert a User Waypoint into the
Goto
Options list . This
allows you to quickly select a commonly used Waypoint
for navigation .
For example you could save the location of your local Boat
Ramp as a Waypoint then insert this into the
Goto
Options
list . This makes your boat ramp Waypoint easy to find when you
need to navigate yourself back to the ramp at the end of
the day .
1 . Press
Goto.
The
Goto
options window appears .
2 . Select
sEtuP
and press the
ENt
key . The Select User
Waypoint list appears .
3 . Select the desired Waypoint (
ramP
is selected in the
example) and press the
ENt
key . The
Goto
window
reappears and your selected Waypoint (
ramP
) is now listed
as a
Goto
Waypoint .
4 . Press
mENu
to exit and return to the navigation screens .
To navigate to your user Waypoint at any time, simply press
Goto
, select your User Waypoint and press the
ENt
key . The
plotter screen will appear with a dotted line extending from
your vessel to the User Waypoint .
caNcEllING your dEstINatIoN
You can cancel your selected destination as follows;
1 . Press the
Goto
key .
2 . Select
off
? and press the
ENt
key .
3 . The plotter screen will reappear and the selected Waypoint
and dotted navigation line will no longer be visible .
alarms
Your GP450X has a number of alarm conditions that can
generate both visual and audible alarms . The available
alarms are;
• Arrival Alarm
• Anchor Watch Alarm
• Cross Track Error (XTE) Alarm
• Speed Alarm
• Trip and Odometer Alarm
• SBAS Alarm
When an alarm is activated the buzzer sounds and the name
of the offending alarm appears on the display along with an
alarm Icon . To silence the buzzer and remove the visual alarm
notification, simply press any key . The alarm Icon remains on the
screen until the reason for the alarm is cleared .
message Board
In some instances, multiple alarms may be triggered . These
alarm messages can be viewed on the Message Board .
To view the message board;
1 . From the main menu, select
mEssaGEs
and press the
ENt
key
2 . Current messages will be listed .
For more information about the message board please refer to
the
maINtENaNcE
section later in this manual .
route list
route direction Window
GOTO Options window with new User
Waypoint (RAMP) inserted
New GOTO
Waypoint
Symbol
message Board


