background image

6

Installation (continued)

A

3

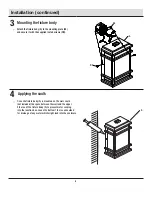
Mounting the fixture


body

Attach


the


fixture


body


(A)


to


the


mounting


plate


(EE)


and


secure


it


with


the


supplied


install


screws


(DD).

4

Applying the caulk

Once


the


fixture


body


(A)


is


mounted


on


the


wall,


caulk

(not


included)


the


space


between


the


wall


and


the


upper

3/4


area


of


the


fixture


body


(A)


to


prevent


water


seeping

into


the


junction


box.


Leave


the


bottom


1/4


area


uncaulked


for


drainage


of


any


water


which


might


leak


into


the


enclosure.

EE

DD

A

Summary of Contents for 39454-HBCLED

Page 1: ...ty products designed to enhance your home Visit us online to see our full line of products available for your home improvement needs Thank you for choosing Gluckstein Elements GLUCKSTEINELEMENTS COM Questions problems missing parts Before returning to the store call Gluckstein Elements Customer Service 8 a m 7 p m EST Monday Friday 9 a m 6 p m EST Saturday 1 833 695 2045 HOMEDEPOT CA Item 1001 641...

Page 2: ...fically disclaims any warranty whether express or implied of fitness for a particular purpose other than the warranty contained herein The manufacturer specifically disclaims any liability and shall not be liable for any consequential or incidental loss or damage including but not limited to any labor expense costs involved in the replacement or repair of said product Contact the Customer Service ...

Page 3: ...ping Keep your receipt and these instructions for proof of purchase TOOLS REQUIRED HARDWARE INCLUDED NOTE Hardware not shown to actual size Safety goggles Wire strippers Phillips screwdriver Flathead screwdriver DD CC AA BB EE Ladder Wire cutters Caulk Part Description Quantity AA Wire nut 3 BB Outlet box screw 2 CC Ground screw 1 DD Install screw EE 1 2 Mounting plate 3 HOMEDEPOT CA GLUCKSTEINELE...

Page 4: ...4 Pre Installation continued PACKAGE CONTENTS A Part Description Quantity A Fixture body 1 ...

Page 5: ... fixture around the ground screw CC on the mounting plate EE and then connect the ground wire from the fixture to the ground wire from the junction box Connect the black wire of the power supply to the black wire of the fixture and connect the white wire of the power supply to the white wire of the fixture WHITE WIRE WHITE WIRE FROM FIXTURE FROM FIXTURE FROM FIXTURE GROUND WIRE BLACK WIRE BLACK WI...

Page 6: ...lied install screws DD 4 Applying the caulk Once the fixture body A is mounted on the wall caulk not included the space between the wall and the upper 3 4 area of the fixture body A to prevent water seeping into the junction box Leave the bottom 1 4 area uncaulked for drainage of any water which might leak into the enclosure EE DD A ...

Page 7: ...switch The fuse blows or the circuit breaker trips when the light is turned on There are crossed wires or power wire is grounding out Check the wire connections Contact a qualified electrician or call the Customer Service Team at 1 833 695 2045 P Pr ro ob bl lem em P Po os ssi sib bl le e C Ca au use se C Co or rr re ect cti iv ve e A Ac ct ti ion on 7 HOMEDEPOT CA GLUCKSTEINELEMENTS COM Please co...

Page 8: ...ssing parts Before returning to the store call Gluckstein Elements Customer Service 8 a m 7 p m EST Monday Friday 9 a m 6 p m EST Saturday 1 833 695 2045 HOMEDEPOT CA GLUCKSTEINELEMENTS COM Retain this manual for future use ...

Reviews: