24
221788B
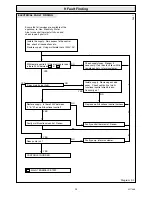
9 Fault Finding
FUNCTIONAL FLOW
Diagram 9.4
Diagram 10.1
8050
3817
PHIAL POCKET
GLAND
SEAL
CONTROL KNOB
SECURING
SCREW (2)
SPLIT
PIN
CONTROL
THERMOSTAT
MULTI- FUNCTIONAL
CONTROL
PERMANENT
LIVE
230V ~ 50HZ
FUSED
AT 3A
L
N
br
bk
bl
N
MAIN TERMINAL STRIP
CONTROL THERMOSTAT
PHIAL
Replacement of parts must only be carried out by a competent
person.
Gain access as Section 8.1
Before replacing any parts isolate the boiler from the electrical
supply and turn the gas supply off at the gas service cock,
indicator slot to be vertical.
Unless stated otherwise, all parts are replaced in the reverse
order to removal.
After replacing any parts always test for gas soundness and if
necessary carryout functional check of controls.
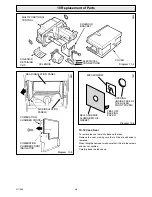
10.1 Control Thermostat - diagram 10.1
Open and support the electrical control box, refer to Section 5.4.
Remove the control knob. Remove the electrical connections
from the control thermostat body.
Release the control thermostat body by unscrewing the two
screws and shakeproof washers in the front of the control box.
Remove the split pin and withdraw the control thermostat phial
from its pocket. Remove the control thermostat complete from
the boiler.
Re-assembly note. When fitting the control thermostat, make
sure that the control thermostat phial is covered with heat sink
compound and then fully inserted into the phial pocket and that
the capillary is within the gland seal. Remake the electrical
connections. There must be no kinks or sharp bends in the
capillary.
Make sure that the capillary is positioned so that it passes
through the cut out in the control box.
10.2 Pilot Burner and Pilot Injector
Proceed as relevant parts of Section 8.2 and 8.5.
10.3 Electrode - diagram 8.2
Proceed as relevant parts of Section 8.2, release the electrode
by removing the spring clip.
10.4 Piezo Unit - diagram 10.2
Open and support the electrical control box, refer to Section
5.4.
Disconnect the ignition lead at the piezo unit.
10 Replacement of Parts
8041
CAPILLARY
CONTROL
THERMOSTAT
ELECTRICAL
CONNECTIONS


