11
221788B
4 Flue and Appliance Preparation
4.1 Unpacking
Open the carton containing the boiler, remove the end fitting
which contains, wall mounting bracket, heat exchanger baffles
and loose items pack. Check the items supplied against the
contents list on the flap and diagram 4.1.
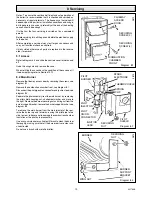
With the boiler still in the bottom tray, slide the controls cover
upward and remove it as shown in diagram 4.2. Remove the
case by undoing the wing nuts and lifting the case off, see
diagram 4.2.
Remove the packing piece from inside the case.
Place on one side until required.
Place the boiler on one side until required.
4.2 Positioning
Select the boiler position. Take due account of the position of
the flue terminal, see diagram 2.1.
Use the template, making sure it is square and mark out the
position of the flue opening, see diagram 4.3.
Cut a hole through the wall as neatly as possible.
Note. If the hole is oversize or of an irregular shape it must be
faced off to the hole dimensions shown.
Use template, again, making sure that it is positioned both
square and central to the flue hole, marking the fixing points at
the top, bottom and clearance holes for wall duct.
Remove the wall template after marking, then check marked
positions against diagram 4.3.
Drill holes to accept the plugs and screws supplied in the loose
items pack.
Secure the bottom bracket to the wall, using the plugs and
screws.
Make sure the bracket is level.
Drill a 7mm clearance hole to a depth of 10mm.
Fit plugs into top fixing holes and fit screws, leaving about 5mm
proud.
Take the balanced flue assembly and wall duct from its carton,
place the balanced flue assembly on one side until it is required.
Note. If fitting a short flue it will be necessary to cut wall duct,
see Table 4.
Position the wall duct, see diagram 4.4.
Diagram 4.1
3795
WALL TEMPLATE
BALANCED
FLUE TERMINAL
PACK
(Supplied separately)
WALL
MOUNTING
BRACKET
INSTALLATION
& SERVICING
LITERATURE
CONTENTS LIST
Printed on carton flap
BOILER
LOOSE ITEMS
PACK
HEAT
EXCHANGE
BAFFLES
CARTON
Diagram 4.2
3796
SECURING WING NUTS (2)
CARTON
CASE
CONTROLS COVER


