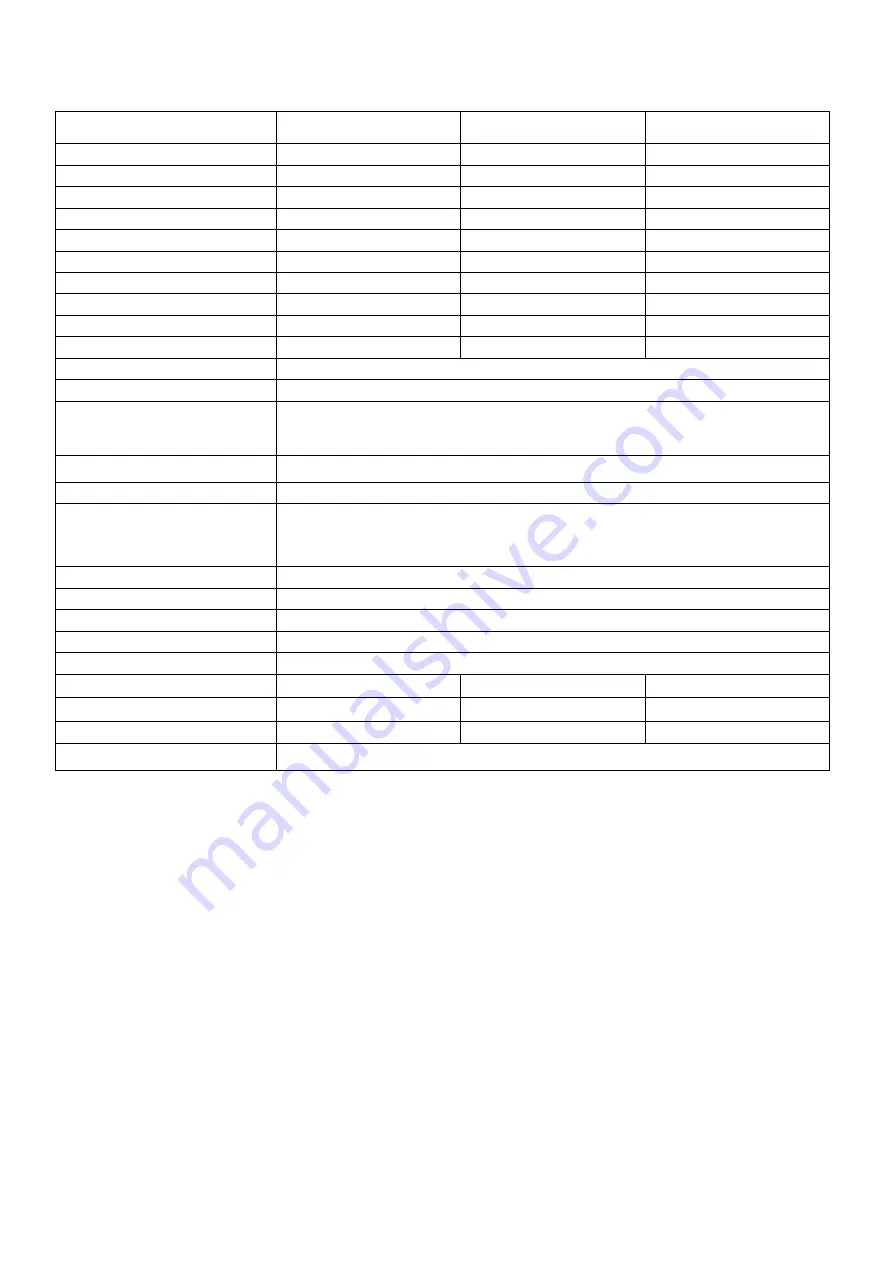
Globalmediapro HDVS IP Series User Manual Download Page 15

15 

Monitor model 

T

215-1HDVSL-IP 

T

240-1HDVSL-IP 

T

270-2HDVS-IP 

LCD panel 

21.5

“ 

24

“ 

27

” 

Visible area (mm) 

476.6 x 268.1 

531.3 x 298.8 

597.6 x 336.15 

Picture format 

16 : 9 

16:9 

16:9 

Max. resolution 

1920 x 1080 

1920x1080 

1920x1080 

Pixel dot pitch (mm) 

0.248x0.248 

0.276.7 x0.276 .7 

0.276.7 x0.276 .7 

Colours 

16.7M 

16.7M 

16.7M 

Brightness 

250 cd/m² [LED] 

250 cd/m² [LED] 

300 cd/m² [LED] 

Contrast 

1000 :1 

1000:1 

5000:1 

Response time(Tr/Tf) 

1.3/3.7 ms 

1.5/3.5 ms 

3.5/5 ms 

View angle (U/D/L/R) 

80/80/85/85 

 80/80/85/85 

89/89/89/89 

Full HD input 

1x Full HD 

Audio input(R/L) 

2x (RCA) 

PC input 

1x VGA input 

1x DVI-D input 

Earphone out 

1xPhone jack ,

3.5ψ 

Speaker 

2x built-in speaker (2 watt) 

IP Video support 

4x(12sub(960*576)+4Play 
4x(192sub(960*576)+1Play 
1x(192sub(960*576)+1Play 

OSD setting 

Yes 

Network Port 

1x RJ45, 10M/100M 

USB Port 

2x USB 2.0 ports 

HDD Port 

1x e-SATA port 

Power input 

AC 100-240V 50/60Hz, Adapter DC 12V/5A 

Power consumption 

Approx. 24 watt 

Approx. 27watt 

Approx. 35watt 

Dimensions (WxHxD) mm  531.2 x 322.5 x 71.2 

586 x 353.3 x 61.6 

658 x 396.5 x 63.9 

Weight 

5.7 kg 

5.8 kg 

7kg 

Operating temperature 

0° to 40° C 

Subject to technical changes without prior notice. Error excepted

Summary of Contents for HDVS IP Series

Page 1: ...TFT LCD MONITOR USER MANUAL HDVS IP Series LCD_12 1 15 6 LCD_21 5 24 27 LCD_32 42 46 V 1 5...

Page 2: ...for Display problem 17 11 IP Camera Device Side Setting 18 12 HDVS IP Host Side Operation 19 13 HDVS IP Display Setting 21 14 HDVS IP Network Setting 21 15 NTP Setting 22 16 Connect With IP Camera 22...

Page 3: ...the cabinet unplug the unit and have it checked by the qualified personnel before operating it any further Unplug the unit from the wall outlet if it is not going to be used for several days or more...

Page 4: ...r television reception which can be determined by turning the equipment off and on the user is encouraged to try to correct the interference by one or more of the following measures Reorient or reloca...

Page 5: ...appliance please read this manual carefully and retain it for further reference Verify that all appliance items are included in the delivery Should items be missing do not operate the appliance and c...

Page 6: ...e viewing angle of LCD to fit most comfortable monitoring status B Wall mount Free your space with wall mount design Please follow the fix hole size in back panel to install the LCD to the wall 12 1 1...

Page 7: ...7 VESA Bracket 32 VESA Bracket 42 46...

Page 8: ...8 4 Monitor Controls 12 1 15 6 21 5 24 27 32 42 46 Aluminum 32 42 46 Aluminum...

Page 9: ...n Or Decrease value on the OSD Menu And as a hot key for auto adjust function 4 Item Hot key for OSD adjustments of Volume Contrast Brightness and Red Green Blue 5 Menu Push to call out OSD menu Or Us...

Page 10: ...tions HDVS IP Series 12 1 15 6 21 5 24 27 2 3 4 5 6 7 8 9 1 e SATA 2 RJ 45 Ethernet Interface 3 USB IN 2 USB Mouse Record Backup Connector 4 DC 12V IN 5 DVI IN 6 Full HD IN 7 VGA IN 8 AUDIO R L IN 9 E...

Page 11: ...11 32 42 46 2 3 4 5 6 7 8 9 1 e SATA 2 RJ 45 Ethernet Interface 3 USB IN 2 USB Mouse Record Backup Connector 4 DC 12V OUT 5 DVI IN 6 Full HD IN 7 VGA IN 8 AUDIO R L IN 9 Earphone OUT...

Page 12: ...aring as horizontal or noise on the screen Sharpness Adjust the clarity and focus of the screen images H Position Move the screen image left or right V Position Move the screen image up and down Back...

Page 13: ...een saver Back Exit the OSD menu 7 PC Timing Mode Resolution 1 800 600 60 2 800 600 72 3 800 600 75 4 1024 768 60 5 1024 768 70 6 1024 768 75 7 1280 1024 60 8 1280 1024 75 9 1360 768 60 10 1920 1080 6...

Page 14: ...l HD Audio input R L 2x RCA PC input 1x VGA input 1x DVI D input Earphone out 1xPhone jack 3 5 Speaker 2x built in speaker 2 watt IP Video support 4x 1280X960 sub 960 576 4Play 4x 1920X1080 sub 960 57...

Page 15: ...5 89 89 89 89 Full HD input 1x Full HD Audio input R L 2x RCA PC input 1x VGA input 1x DVI D input Earphone out 1xPhone jack 3 5 Speaker 2x built in speaker 2 watt IP Video support 4x 1280X960 sub 960...

Page 16: ...9 89 89 89 89 89 Full HD input 1x Full HD Audio input R L 2x RCA PC input 1x VGA input 1x DVI D input Earphone out 1xPhone jack 3 5 Speaker 2x built in speaker 2 watt IP Video support 4x 1280X960 sub...

Page 17: ...cted to the unit 2 Is the video input signal within the unit s specified frequency range 1 Make sure the signal cable has been properly connected to the unit 2 Make sure the input signal is within the...

Page 18: ...ter Configure your IP Camera Network settings Please reference your IP Camera manual Run the IE browser and login to setup To set an IP address for the Camera unit Disable DHCP setting Stream Type Dua...

Page 19: ...switch button on the right rear side and reference page 9 Key Board function the power LED will be on and the HDVS IP Monitor will start Notice After booting the video output default to multi window o...

Page 20: ...e IP Subnet Mark Default Gateway is HDVS IP Monitor host side default setting 3 IP Channel Setting IP address setting menu recommend used Manual to setting the IP Channel and please click No 4 Power o...

Page 21: ...rk Setting Connect HDVS IP Series with network cable to LAN switch After power on click Setting on the menu bar Network Network Setting to enter setting menu set HDVS IP address subnet mask and gatewa...

Page 22: ...er name admin no password can access IP If access IP by IE in WAN please use static IP or dynamic domain name the operation is same as LAN 15 NTP Setting IP camera time synchronization To click Settin...

Page 23: ...23 Onvif device select UDP network Type IPCAM device select TCP network Type Example To click Save and click Exit button than the image will come out...

Page 24: ...frustrating to match channel position respectively when searching Dragging channel sequence can better solve this problem Right Mouse to click IP channel setting choose drag to change channel sequence...

Page 25: ...connected IP camera channels and resolution after change the model click save and reboot the device When the image is good in 4CH screen modes after double click the image to zoom the image is stuck o...

Page 26: ...lection When connect with audio please select video audio mode or there will be no audio when playback 3 Resolution IP will get IP camera main stream and sub stream resolution automatically when the i...

Page 27: ...orresponding channel will begin recording Schedule Record Right click to bring main menu click Setting Channel Schedule Record the default setting is 24 hours recording users can set the recording pla...

Page 28: ...ay the video during specific time D AREA Stop Stop the playback Frame Play Play video frame by frame Record Backup Before back up please make sure the hard disk has been saved with video Preview Backu...

Page 29: ...he drive will be displayed double click it to show its content You can capture the screen while viewing the video 22 System HDD e_SATA Setting HDD Setting Click Setting System HDD setting In order to...

Page 30: ...S IP Monitor s username and password should be correctly filled in 3 IP Camera IP address can be searched multi images sub stream and single image main stream all cannot have image Possible reasons 1...

Reviews: