


3
ASSEMBLY INSTRUCTIONS
Tools and Parts
Check that you have everything necessary for correct assembly.
Proper assembly is your responsibility.
Tools Needed:
Parts Supplied for 24 in. (60.96 cm) Cabinet:
Parts Supplied for 30 in. (76 cm) Cabinet:
Cabinet Use Requirements
■
Not intended for flammable material storage.
■
Intended for use in a garage.
■
Maximum weight limit is 50 lbs (22 kg) for each shelf.
■
Maximum weight limit is 200 lbs (91 kg) for the 30 in. (76 cm)
cabinet.
■
Maximum weight limit is 150 lbs (68 kg) for the 24 in.
(60.96 cm) cabinet.
Unpack the Cabinet
1. Open the cabinet door.
NOTE: On the 30 in. (76 cm) cabinet you must first remove
the keys and unlock the door.
2. Remove and verify the contents (see “Parts Supplied”).
3. Properly dispose of packaging.
Mount the Cabinet to the Wall
Install Cabinet to GearWall™ Panels
IMPORTANT: Check to ensure that the GearWall™ panels are
installed with mounting screws in every slot and at every stud
location with a maximum of 24 in. (60.96 cm) horizontally
between screws.
Install 24 in. (60.96 cm) cabinet - 1 mounting bracket
1. Close the cabinet door.
2. Determine cabinet mounting location on GearWall™ panels.
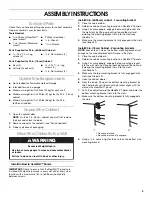
3. Using 2 or more people, engage the mounting bracket into
the wall slots by lifting up, pushing toward the wall and
lowering the mounting bracket rims into the slots (see
Graphic 1).
4. Make sure the mounting bracket is fully engaged in the slots
(see Graphic 2).
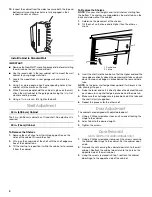
Install 30 in. (76 cm) Cabinet - 2 mounting brackets
NOTE: Loosen the 3 nuts on the bottom mounting bracket just
enough so the mounting bracket will move in the slots.
1. Close the cabinet doors.
2. Determine cabinet mounting location on GearWall™ panels.
3. Using 2 or more people, engage the top mounting bracket
into the wall slots by lifting up, pushing toward the wall and
lowering the mounting bracket rims into the slots
(see Graphic 1).
4. Make sure the top mounting bracket is fully engaged in the
slots (see Graphic 2).
5. Open the cabinet doors.
6. From the inside, lift up on the bottom mounting bracket by
the 2 outer bolts until the mounting bracket aligns with the
slots on the GearWall™ panel.
7. Push the cabinet toward the GearWall™ panel and lower the
bottom mounting bracket rims into the slots.
8. Make sure the bottom mounting bracket is fully engaged in
the slots.
9. Using a
¹⁄₂
in. wrench, tighten the 3 nuts on the bottom wall
mounting bracket.
■
¹⁄₂
in. Wrench (GearWall™
panel mount)
■
⁷⁄₁₆
in. Wrench (Standard
mount)
■
Phillips screwdriver
■
¹⁄₄
in. Wrench
■
¹¹⁄₃₂
in. Wrench
■
¹⁄₄
– 20 x 1
¹⁄₂
in. Lag
screws (4)
■
¹⁄₄
in. Flat washers (4)
■
Keys (2)
■
Full-width shelves (2)
■
¹⁄₄
– 20 x 1
¹⁄₂
in. Lag
screws (4)
■
¹⁄₄
in. Flat washers (4)
WARNING
Excessive Weight Hazard
Use two or more people to move and assemble cabinet
or locker.
Failure to do so can result in back or other injury.
1. Mounting brackets
2. Mounting brackets fully engaged.
1
2


