background image

DE

BENUTZERHANDBUCH  

FFN

25

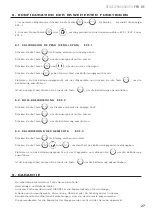
3. Pulsar la tecla 

 para confirmar.

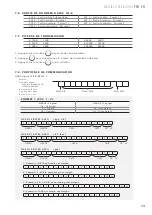
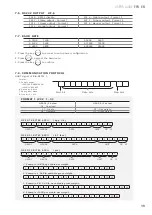
7 - 6 .   D AT E N A U S G A N G   R S 2 3 2   R S 2 3 2  

U F - 6

232 0 - Ausgang RS-232 deaktiviert 

232 4 - Ausgang stabil - Format 2 

232 1 - Ausgang stabil - Format 1

232 5 - Ausgang normal - Format 2

232 2 - Ausgang normal - Format 1

232 6 - Ausgang manuell - Format 2 

232 3 - Ausgang manuell - Format 1

7 - 7 .   Ü B E R T R A G U N G S G E S C H W I N D I G K E I T

b 1200 

1200

b 9600 

9600

b 2400 

2400

b 19200 

19200

b 4800 

4800

b 38400 

38400

1. Drücken Sie die Taste 

 , um auf den Parameter zuzugreifen.

2. Drücken Sie 

 , um die gewünschte Übertragungsgeschwindigkeit auszuwählen.

3.. Drücken Sie die Taste 

 , um zu bestätigen.

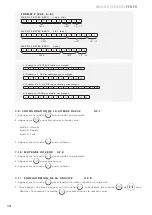
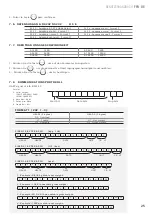
7 - 8 .     K O M M U N I K AT I O N S P R O T O K O L L

UART signal of EIA-RS232 C

Format: 
5. Serial output:

1200/2400/4800/9600/
19200/34800 BPS

6. Data bits: 8 bits
7. Parity bits: None
8. Stop bits: 1 bit

      Start bit 


     Data bits 

             Stop bits

F O R M AT   1   ( 2 3 2     1 – 3 ) :

HEAD1 (2 bytes)

HEAD 2 (2 bytes)

OL - Overload

ST - Stable

NT - Net weight

US - Unstable

GS - Gross weight

F I X E D   1 8   BY T E S   A S C I I  

( k g   g   t   l b )

1

2

1

1

2

1

1

2

3

4

5

6

7

8

1

2

1

2

HEAD1

HEAD2

DATA

UNIT

CR   LF

F I X E D   2 1   BY T E S   A S C I I  

( t l . T   l b o z )

1

2

1

1

2

1

1

2

3

4

5

6

7

8

9

1

2

3

4

1

2

HEAD1

HEAD2

DATA

UNIT

CR   LF

F I X E D   1 9   BY T E S   A S C I I  

( p c s )

1

2

1

1

2

1

1

2

3

4

5

6

7

8

1

2

3

1

2

HEAD1

HEAD2

DATA

UNIT

CR   LF

1. E0.876 kg Stable net weight:

S

T

,

N

T

,

+

0

0

0

.

8

7

6

k

g

0D

0A

2. Example -1.568 lb unstable gross weight:

U

S

,

G

S

,

-

0

0

1

.

5

6

8

l

b

0D

0A

3. Example -20. 5.40 lb oz unstable gross weight:

S

T

,

G

S

,

-

1

0

.

0

5

.

4

0

l

b

o

z

0D

0A


4. E1000 pcs stable net weight:

S

T

,

N

T

,

+

0

0

0

1

0

0

0

P

c

s

0D

0A

Summary of Contents for 260304

Page 1: ... F 34 972 527 211 El fabricante se reserva el derecho de modificar sin previo aviso las características de sus productos para introducir mejoras técnicas o cumplir con nuevas regulaciones oficiales Le constructeur se réserve le droit de modifier les caractéristiques de ses produits en vue d y apporter des améliorations techniques ou de respecter de nouvelles réglamentations The manufacturer reserv...

Page 2: ...DE PESO CERO SPAN ECF 1 9 8 2 CALIBRACIÓN DEL CERO ECF 2 9 8 3 CALIBRACIÓN DE PESO ECF 3 9 9 GARANTÍA 9 INDICE 1 CARACTÉRISTIQUES 10 2 ALIMENTATION 10 3 AVANT UTILISATION 10 4 CONSOMMATION 10 5 ÉCRAN 10 6 FONCTIONS DE BASE 11 7 CONFIGURATION DE PARAMETERS 11 7 1 COMPTES A D UF 1 11 7 2 LIMITES DE POIDS SUPÉRIEURE INFÉRIEURE UF 2 11 7 3 AUTO DÉCONNEXION AUTOMATIQUE UF 3 12 7 4 ECLAIRAGE DE L ÉCRAN ...

Page 3: ...ECF 3 21 9 WARRANTY 21 INDEX 1 SPEZIFIKATIONEN 22 2 STROMVERSORGUNG 22 3 VOR DER INBETRIEBNAHME 22 4 VERBRAUCH 22 5 DISPLAY 22 6 GRUNDBETRIEB 23 7 KONFIGURATION DER PARAMETER 23 7 1 TEST A D UND AKKU UF 1 23 7 2 KONFIGURATION DER GEWICHTSGRENZWERTE HÖCHST UND MINDESTWERT UF 2 23 7 3 AUTOMATISCHE ABMELDUNG UF 3 24 7 4 KONFIGURATION DER DISPLAYBELEUCHTUNG UF 4 24 7 5 HOLD FUNKTION UF 5 24 7 6 DATENA...

Page 4: ... llana no exponerla en ambientes con vibraciones nivelar la plataforma utilizando el nivel de burbuja Utilizar una fuente eléctrica independiente evitar perturbaciones eléctricas No colocar ningún objeto sobre la plataforma en el momento de poner en marcha el indicador Por favor permita que la balanza se precaliente durante 2 3 minutos antes de su utilización Evitar cambios de temperatura muy brus...

Page 5: ...ha realizado una Tara Cuando se visualiza el peso bruto del producto las demás teclas quedan deshabilitadas Función 2 Para incrementar los valores dentro del modo programación Función 1 Tecla de confirmación dentro del modo programación Función 2 Transmisión manual de datos a través del puerto RS 232 a un PC o impresora 7 C O N F I G U R A C I Ó N D E PA R Á M E T R O S Para acceder a la configura...

Page 6: ...AoFF 01 Autodesconexión activada la balanza se apagará automáticamente transcurrido 1 minuto sin ser utilizada 1 Pulsar la tecla para acceder al parámetro 2 Utilizar las teclas y para mover el cursor y la tecla para seleccionar el modo deseado 3 Pulsar la tecla para confirmar 7 4 CONFIGURACIÓN DE LA ILUMINACIÓN DEL DISPLAY UF 4 Modos A Automática ON Iluminación activada OFF Iluminación desactivada...

Page 7: ...2400 4800 9600 19200 34800 BPS 6 Data bits 8 bits 7 Parity bits None 8 Stop bits 1 bit Start bit Data bits Stop bits FORMAT 1 232 1 3 HEAD1 2 bytes HEAD 2 2 bytes OL Overload ST Stable NT Net weight US Unstable GS Gross weight FIXED 18 BYTES ASCII kg g t lb 1 2 1 1 2 1 1 2 3 4 5 6 7 8 1 2 1 2 HEAD1 HEAD2 DATA UNIT CR LF FIXED 21 BYTES ASCII tl T lboz 1 2 1 1 2 1 1 2 3 4 5 6 7 8 9 1 2 3 4 1 2 HEAD1...

Page 8: ...D 0A 4 Example 1000 pcs stable net weight 0 0 0 1 0 0 0 P c s 0D 0A 7 9 CONFIGURACIÓN DE LA VELOCIDAD RS232 UF 7 1 Pulsar la tecla para acceder al parámetro 2 Pulsar para seleccionar el modo deseado Modo 1 Normal Modo 2 Rápido Modo 3 Lento 3 Pulsar la tecla para confirmar 7 10 PROMEDIO DEL CERO UF 8 1 Pulsar la tecla para acceder al parámetro 2 Pulsar para seleccionar 3 Pulsar la tecla para confir...

Page 9: ...F 2 Pulsar la tecla el display mostrará CALZ Pulsar la tecla para poner la lectura del display a cero Pulsar la tecla para efectuar la calibración 8 3 CALIBRACIÓN DE PESO ECF 3 Pulsar la tecla el display mostrará un valor Pulsar las teclas y para introducir el valor de la pesa de calibración Colocar la pesa de calibración en la plataforma y pulsar para efectuar la calibración Una vez sea estable p...

Page 10: ...ieu où il y a des vibrations mettre à niveau la balance grâce à la bulle de niveau Utiliser une source électrique indépendante éviter les perturbations électriques Ne poser aucun objet sur la plateforme au moment de la mise en marche de la balance Mettre en marche la balance 2 3 minutes avant son utilisation pour permettre un préchauffage Eviter les changements brusques de température et les coura...

Page 11: ...es autres touches sont désactivées Fonction 2 Pour augmenter les valeurs dans le mode de programmation Fonction 1 Touche de confirmation dans le mode de programmation Fonction 2 Transmission manuelle de données grâce au port RS 232 à un PC ou une imprimante 7 C O N F I G U R AT I O N D E PA R A M È T R E S Pour accéder à la configuration des paramètres appuyer en même temps sur les touches et Appu...

Page 12: ...tomatiquement après une minute sans utilisation 1 Appuyer pour accéder au paramètre 2 Utiliser les touches et pour déplacer le curseur et la touche pour sélectionner le nombre voulu 3 Appuyer sur la touche pour confirmer 7 4 CONFIGURATION DE L ÉCLAIRAGE DE L ÉCRAN UF 4 Modes A Automatique ON Éclairage actif OFF Éclairage inactif 1 Appuyer sur la touche pour accéder au paramètre 2 Appuyer pour séle...

Page 13: ...ut 1200 2400 4800 9600 19200 34800 BPS 6 Data bits 8 bits 7 Parity bits None 8 Stop bits 1 bit Start bit Data bits Stop bits FORMAT 1 232 1 3 HEAD1 2 bytes HEAD 2 2 bytes OL Overload ST Stable NT Net weight US Unstable GS Gross weight FIXED 18 BYTES ASCII kg g t lb 1 2 1 1 2 1 1 2 3 4 5 6 7 8 1 2 1 2 HEAD1 HEAD2 DATA UNIT CR LF FIXED 21 BYTES ASCII tl T lboz 1 2 1 1 2 1 1 2 3 4 5 6 7 8 9 1 2 3 4 1...

Page 14: ... pcs stable net weight 0 0 0 1 0 0 0 P c s 0D 0A 7 9 CONFIGURATION DE LA VITESSE RS232 UF 7 1 Appuyer sur la touche pour accéder au paramètre 2 Appuyer sur pour sélectionner le mode voulu Mode 1 Normal Mode 2 Rapide Mode 3 Lent 3 Appuyer sur la touche pour confirmer 7 10 MOYENNE DU ZÉRO UF 8 1 Appuyer sur la touche pour accéder au paramètre 2 Appuyer sur pour sélectionner 3 Appuyer sur la touche p...

Page 15: ...O ECF 2 Appuyer sur la touche l écran affichera CALZ Appuyer sur pour mettre à zéro l affichage à l écran Appuyer sur la touche pour effectuer le calibrage 8 3 CALIBRAGE DE POIDS ECF 3 Appuyer sur la touche l écran affichera une valeur Appuyer sur les touches et pour introduire la valeur du poids de calibrage Placer le poids de calibrage sur la plateforme et appuyer sur la touche pour effectuer le...

Page 16: ... it in vibration or shaking use bench for use on four only adjust foot adjust the balance using the bubble level Use independent source avoid other electrical disturbance Don t put any object on the platter when turn on the balance Please turn on 2 3 minutes before using Avoid temperature change too large and air flow strenuous sites Don t overload the balance don t exceed the maximal capacity 4 S...

Page 17: ... the balance is on tare status All other keys will be disabled when gross weight is activated Function 2 To increase values upward in setup mode Function 1 Key of confirmation in setup mode Function 2 Manually transmitting data through RS232 to computer or printer 7 B A S I C PA R A M E T E R S E T T I N G To access to functions setting press the and key at the same time Press the to select the pa...

Page 18: ...ter 1 minute of non use 1 Press the key to access to auto power configuration 2 Use the keys and to move from one digit to other and the key to select the desired mode 3 Press the key to confirm 7 4 BACKLIGHT SET TING UF 4 Modes A Automatic ON Backlight on OFF Backlight off 1 Press the key to access to auto power configuration 2 Use the key to select the desired mode 3 Press the key to confirm 7 5...

Page 19: ...bits 8 bits 7 Parity bits None 8 Stop bits 1 bit Start bit Data bits Stop bits FORMAT 1 232 1 3 HEAD1 2 bytes HEAD 2 2 bytes OL Overload ST Stable NT Net weight US Unstable GS Gross weight FIXED 18 BYTES ASCII kg g t lb 1 2 1 1 2 1 1 2 3 4 5 6 7 8 1 2 1 2 HEAD1 HEAD2 DATA UNIT CR LF FIXED 21 BYTES ASCII tl T lboz 1 2 1 1 2 1 1 2 3 4 5 6 7 8 9 1 2 3 4 1 2 HEAD1 HEAD2 DATA UNIT CR LF FIXED 19 BYTES ...

Page 20: ...e 20 5 40 lb oz unstable gross weight 1 0 0 5 4 0 l b o z 0D 0A 4 Example 1000 pcs stable net weight 0 0 0 1 0 0 0 P c s 0D 0A 7 9 RS232 SPEED SET TING UF 7 1 Press the key to enter 2 Press the keye to select the desired mode Mode 1 Normal Mode 2 Fast Mode 3 Slow 3 Press the key to confirm 7 10 ZERO AVERAGE UF 8 1 Press the key to enter 2 Press the key to select 3 Press the key to confirm 7 11 CON...
Page 21: ...ill show CALZ Press the key to zero Press the key to calibrate 8 3 WEIGHT CALIBRATION ECF 3 Press the key display will show the value Use the keys and to enter the weight calibration value Put the calibration weight on the platform and press the key to calibrate When the weigh is stable press again to end 9 W A R R A N T Y This scale is warranted against defects of manufacturing and materials for ...

Page 22: ...ht an erschütterungsanfälligen Orten auf Nivellieren Sie die Wägeplatte mit Hilfe einer Wasserwaage Verwenden Sie eine unabhängige Stromquele um Stromstörungen zu vermeiden Platzieren Sie keinen Gegenstand auf der Wägeplatte wenn die Anzeige in Betrieb genommen wird Lassen Sie die Waage vor der Benutzung für 2 3 Minuten vorwärmen Vermeiden Sie plötzliche Temperaturschwankungen und Luftströme Überl...

Page 23: ...ogewicht eines Produkts angezeigt wird sind die anderen Tasten deaktiviert Funktion 2 Um die Werte im Programmiermodus zu erhöhen Funktion 1 Bestätigungstaste im Programmiermodus Funktion 2 Manuelle Datenübertragung an einen PC oder Drucker über die Schnittstelle RS 232 7 K O N F I G U R AT I O N D E R PA R A M E T E R Um auf die Konfiguration der Parameter zuzugreifen drücken Sie gleichzeitig die...

Page 24: ...01 Automatische Abmeldung aktiviert Die Waage schaltet sich automatisch ab wenn sie für 1 Minute nicht verwendet wird 1 Drücken Sie die Taste um auf den Parameter zuzugreifen 2 Verwenden Sie die Tasten und um den Cursor zu bewegen und die Taste um den gewünschten Modus auszuwählen 3 Drücken Sie die Taste um zu bestätigen 7 4 KONFIGURATION DER DISPLAYBELEUCHTUNG UF 4 Modi A Automatisch ON Beleuchtu...

Page 25: ...S232 C Format 5 Serial output 1200 2400 4800 9600 19200 34800 BPS 6 Data bits 8 bits 7 Parity bits None 8 Stop bits 1 bit Start bit Data bits Stop bits FORMAT 1 232 1 3 HEAD1 2 bytes HEAD 2 2 bytes OL Overload ST Stable NT Net weight US Unstable GS Gross weight FIXED 18 BYTES ASCII kg g t lb 1 2 1 1 2 1 1 2 3 4 5 6 7 8 1 2 1 2 HEAD1 HEAD2 DATA UNIT CR LF FIXED 21 BYTES ASCII tl T lboz 1 2 1 1 2 1 ...

Page 26: ...table net weight 0 0 0 1 0 0 0 P c s 0D 0A 7 9 KONFIGURATION DER GESCHWINDIGKEIT RS232 UF 7 1 Drücken Sie die Taste um auf den Parameter zuzugreifen 2 Drücken Sie um den gewünschten Modus auszuwählen Modus 1 Normal Modus 2 Schnell Modus 3 Langsam 3 Drücken Sie die Taste um zu bestätigen 7 10 MIT TELWERT NULL UF 8 1 Drücken Sie die Taste um auf den Parameter zuzugreifen 2 Drücken Sie um auszuwählen...

Page 27: ...2 NULL KALIBRIERUNG ECF 2 Drücken Sie die Taste Im Display erscheint die Anzeige CALZ Drücken Sie die Taste um die Anzeige auf null zu setzen Drücken Sie die Taste um die Kalibrierung auszuführen 8 3 KALIBRIERUNG DES GEWICHTS ECF 3 Drücken Sie die Taste Im Display erscheint ein Wert Drücken Sie die Taste und um den Wert des Kalibrierungsgewichts einzugeben Platzieren Sie das Kalibrierungsgewicht a...

Page 28: ...marca propiedad de est une marque de trade mark propiety of Pol Empordà Internacional Calle F Parcela 15 16 17469 VILAMALLA Girona SPAIN T 34 972 527 212 F 34 972 527 211 ...

Reviews: