background image

G

 L  3 

c   c   a a : 11

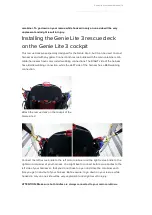
Installing the Genie Lite 3 rescue deck 

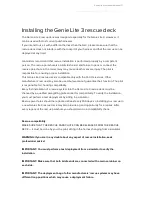
The Genie Lite 3 rescue deck was designed especially for the Genie Lite 3  However  it 
can be used with most current pod harnesses   
If you intend to use it with a different harness than the GL3  please make sure that the 
rescue deck does not interfere with the cockpit of your harness and that the rescue can be 
deployed at any time


Gin Gliders recommend that rescue installation is performed properly by a competent 
person  The rescue parachute is a pilots last resort and failure to pack or connect the 
reserve parachute in the correct way may cause death or severe injury  The pilot is 
responsible for ensuring proper installation  
This Genie Lite 3 rescue deck is compatible only with the Yeti UL rescues  Other 
manufacturers  rescues may also be used but we cannot guarantee their function  The pilot 
is responsible for checking compatibility  
Every first installation of a rescue system into the Genie Lite 3 rescue deck must be 
checked by a qualified paragliding professional for compatibility  To verify the installation  
you must perform a test deployment by sitting in a simulator  
Rescue parachutes should be repacked at least every 150 days  so installing your rescue in 
a new Genie Lite 3 rescue deck may also provide a good opportunity for a repack  After 
every repack of the rescue parachute you should also do a compatibility check  


Rescue compatibility 

MAKE SURE THAT THE RESCUE PARACHUTE CAN BE RELEASED FROM THE RESCUE 
DECK   it must be done by you  the pilot  sitting in the harness hanging from a simulator  
 

WARNING: If you are in any doubt about any aspect of rescue installation, seek 
professional advice  
 
IMPORTANT: You must perform a test deployment from a simulator to verify the 
installation. 
 
IMPORTANT: Make sure that both bridle ends are connected with a main carabiner on 
each side. 
 
IMPORTANT: The deployment bag of other manufacturers  rescue systems may have 
different loop positions which may cause a deployment failure.


Summary of Contents for Genie lite 3 rescue deck

Page 1: ...EN User Manual v1 0 09 2020...

Page 2: ...ditions Neither GIN Gliders nor the seller of GIN equipment can guarantee or be held responsible for the safety of yourself or anyone else Many countries have specific regulations or laws regarding pa...

Page 3: ...ant safety performance and maintenance information Read it before your first flight keep it for reference and please pass it on to the new owner if you ever re sell your equipment Any updates to this...

Page 4: ...on and operating limitations 8 Liability and warranty exclusion 8 Operating limitations 8 Introduction of the Genie Lite 3 rescue deck 9 Included with your Genie Lite 3 rescue deck 10 Installing the G...

Page 5: ...site GIN Gliders Homepage GIN Gliders has a comprehensive website which provides additional information about the Genie Lite 3 rescue deck any updates to the manual and many other issues related to pa...

Page 6: ...th you refrain from making unnecessary noise and respect the sensitive biological equilibrium of nature Consideration for nature is required even at the launch site Paragliding is of course an outdoor...

Page 7: ...pment and must not under any circumstances be flown without a valid certification Independent experimentation is strictly prohibited This Manual does not replace the need to attend training at a parag...

Page 8: ...flying under the supervision of an approved flying instructor There shall be no liability on the part of third parties in particular the manufacturer and the dealer Liability and warranty exclusion I...

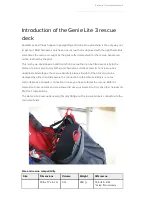
Page 9: ...so to most other pod harnesses on the market A front rescue has undeniable advantages the rescue handle is always in sight of the pilot and can be deployed by either hand Be aware the connection to th...

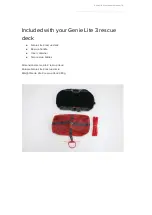
Page 10: ...luded with your Genie Lite 3 rescue deck Genie Lite 3 rescue deck Rescue handle Inner container Two rescue bridles Dimensions Genie Lite 3 rescue deck Volume Genie Lite 3 rescue deck Weight Genie Lite...

Page 11: ...ility Every first installation of a rescue system into the Genie Lite 3 rescue deck must be checked by a qualified paragliding professional for compatibility To verify the installation you must perfor...

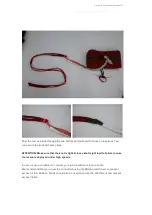
Page 12: ...ne Connecting the rescue bridle We recommend that the rescue is connected with a handshake knot with the rescue bridles see pictures bellow In case you use a different type of connector like a carabin...

Page 13: ...s tight A loose knot might lead to failure in case the rescue is deployed under high speeds In case us use a carabiner to connect your rescue with your rescue bridle We recommend that you cover the co...

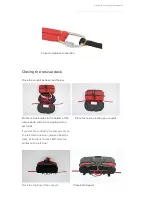
Page 14: ...below Put the rescue bridles in the bottom of the Place he e c e in he o en cock i rescue deck with one end going out on each side If o decide o a ach o e c e onl on he lef main ca abine lea e follo h...

Page 15: ...In alla ion The e c e deck ho ld no look like he If o decide o a ach o e c e onl on ic e abo e he lef main ca abine he e c e deck ho ld Look like he ic e abo e befo e in alla ion ATTENTION If you dec...

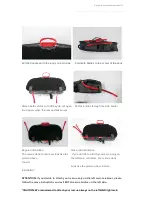
Page 16: ...g connections The RIGHT side of the harness has a BLUE webbing connection while the LEFT side of the harness has a RED webbing connection A ach he e c e deck on he cock i of he Genie Li e 3 Connec he...

Page 17: ...the strap connecting the rescue deployment handle to the rescue inner container It should be long enough that the reserve can be extracted without the danger of the pins not being pulled before the s...

Page 18: ...your level of experience This happens if you lack fundamental understanding are incapable of assessing the risk or simply do not pay sufficient attention to your surroundings or your own state of min...

Page 19: ...49 0 8334 534470 Fax 49 0 8334 534469 Email info para academy eu www para academy eu FAI F d ration A ronautique Internationale Maison du Sport International Av de Rhodanie 54 1007 Lausanne Switzerlan...

Reviews: