5
ITALIANO
Thank you for purchasing this product. To prevent damage to your product or injury to yourself or to others, read the
following safety precaution in their entirety before using this equipment. Keep these safety instructions where all those
who use the product will read them.
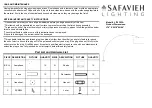
Symbols:
Internal electrical power source
Illumination adjustment mark
Class II
Cautions
1. Read this article for Cautions and instructions for use.
2. Do not use this instrument in damp rooms. Do not expose the instrument to water splashes, dripping water or spra-
yed water.
3. This product must not be used in the presence of flammable gases.
4. Do not shine the light directly into the eyes.
5. Ensure that the headband power cord is located in the clips provided. The headlight body should not be left covered
with a cloth or similar.
6. Please use special certificated adapter.
7. Never scratch the glass cover with fingers or any other hard materials.
8. Federal law restricts this device to sale or order of a physician.
1. Purpose and Features of the product
1.1 Purpose
Headlight 30939 is used for examination and surgical operation in multifarious microsurgery.
1.2 Features
• Light Source: LED source with color temperature of 5000 K. White, shadow-free light allowing the doctor to see tissue
characteristics without distortion.
• Enjoy the flexibility of operating the headlight using the rechargeable Lithium battery, can use without the direct power
source. It is one of the most comfortable lightweight headlights and suitable for all kinds of surgery.
• The headlight could be used when it is charging.
• Battery indicator lights.
• Adapts to any Binocular Loupes of Gima.
• Smart design, convenient for mobile diagnosis.
2. Operating Instructions
Attach the power cord by means of the clip provided. Place the device on your head and adjust for width and height to
that it fits comfortably.
Connect the Headlight to the power adapter. Use the headband right or left brightness control knob to select the required
brightness.
Loosen the fixing screw to adjust the light head up and down and backwards or forwards. After adjustment, retighten the
screw. The illuminated field of view can be selected by means of the slide control.
3. Maintenance
Caution: Qualified trained professional persons are needed to maintenance the product. Please contact with
authorized dealer or manufacture.
3.1 Battery charging and replacing
3.1.1 Battery case is charged
Battery box (hereinafter referred to as the battery) yellow light, prompted to charge or replace as soon as possible
to recharge the battery backup. If the power indicator only yellow light and continue to use, the battery will start self-
protection, cut off the power to prevent the battery over-discharge.
When charging, connect one end of the power adapter output line to the round hole on the side of the battery, and
the power adapter is plugged into the network power socket. At this point the charging indicator will flash from yellow
to green followed by charging. Charging lights are all off, indicating that the battery is full. When charging, the headset
inspection lamp can continue to use.
ENGLISH