Gilson's Porta-Screen
®
4
2.0 OPERATING INSTRUCTIONS
NOTE:
Please read and understand all safety and operat-
ing instructions for the Gilson Porta-Screen® before put-
ting it into service.
2.1 TIMER SETUP & OPERATION
This.unit.is.equipped.with.an.easy-to-operate.Gilson.interval.
countdown.timer..The.timer.has.a.large,.0.6in.LED.display.and.
will.operate.in.four.different.modes..It.is.powered.by.line.volt-
age. and. will. work. on. power. supplies. 100–265VAC,. 50/60Hz,.
with.up.to.20.amps.Inductive.or.Resistive.current.
NOTE:
The main device controlled by the timer may be
restricted to operating on a more limited electrical supply
range. Check the device carefully to ensure compatibility
with your electrical supply.
Current.timer.mode.is.indicated.by.the.four.red.LEDs.on.the.
timer.face:
.
•. A.=.MMSS. (99min:59sec.x.1sec).
.
•. B.=.HHMM. (99hr:59min.x.1min).
.
•. C.=.SSSS.
(9,999sec.x.1sec).
.
•. D.=.MMMM. (9,999min.x.1min)
(H.is.for.hours,.M.for.minutes,.and.S.for.seconds.).To.adjust.the.
timer.mode,.press.and.hold.both.the.up.and.down.arrow.keys.
at. the. same. time. until. the. display. shows. the. mode.. Once. the.
mode.letters.are.displayed,.press.either.the.up.or.down.arrow.
to.change.modes..Press.“START”/“STOP”.to.accept.new.mode..
To. set. the. run. time,. press. either. the. up. or. down. arrow. key..
The.first.digit.on.the.right.hand.side.will.flash.in.half-second.
intervals..Press.either.arrow.key.to.adjust.to.the.desired.value..
To. enter. the. displayed. digit. and. move. to. the. next,. press.
“START”/“STOP”..Once.the.last.digit.on.the.left.is.entered,.the.
timer.is.ready.to.start..
Press. “START”/“STOP”. to. initiate. the. current. run. program..
Once.running,.pressing.“START”/“STOP”.again.will.pause.the.
timer. with. the. current. amount. of. time. remaining. on. screen..
When. allowed. to. time-out,. the. timer. beeps. and. displays.
“DONE”..Press.any.key.to.continue..Setting.and.Mode.values.
are.saved.automatically.and.restored.on.power-up.
2.2 PROCEDURE
Read. and. be. sure. you. understand. all. safety,. operating,. and.
timer. instructions,. as. well. as. specifications. and. procedures.
for.your.test.
1.. Check.to.see.that.the.Porta-Screen®.is.level.
2.. Select.and.load.the.appropriate.trays.
.
Fill.all.the.slots:. 5.trays.and.a.pan.for.the.PS-3
.
.
7.trays.and.a.pan.for.the.PS-4
1.0 UNPACKING & SETUP
The. Porta-Screen®,. packed. for. shipment,. weighs. 225–255lb.
depending.on.the.model.and.the.number.of.trays.packed.in-
side..Use.equipment.to.adequately.handle.this.weight.safely..
Wear.safety.glasses.and.work.gloves.
1.. The. Porta-Screen®. is. shipped. in. a. cardboard. carton.. Be-
fore.you.accept.the.shipment,.check.the.carton.for.visible.
damage..Note.any.damage.on.the.freight.bill.and.proceed.
with.inspection.
2.. Place. the. carton. on. its. side. so. that. you. can. remove. the.
staples. from. the. bottom.. Open. the. bottom. flaps. and. set.
the. machine. upright. again.. Lift. off. the. carton. and. set. it.
aside. until. you. are. sure. that. the. Porta-Screen®. is. in. ac-
ceptable.condition.
3.. Check. the. machine. for. shipping. damage.. If. you. find.
concealed. damage. after. you. have. signed. for. the. Porta-
Screen®,. call. the. delivering. carrier. immediately. for. an. in-
spection..Save.all.packing.materials.and.leave.the.Porta-
Screen®.as.it.is.
4.. Check.the.tag.on.the.electric.motor.of.the.Porta-Screen®.
to.be.sure.that.the.machine.is.wired.as.ordered.
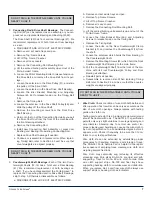
5.. Release.clamping.pressure.on.the.Porta-Screen®.trays.by.
rotating.the.clamp.levers.outward.and.upward.180°.
6.. Remove.trays.by.sliding.them.out.the.front.of.the.machine.
7.. Choose.your.operating.site:
•. The. Porta-Screen®. requires. a. properly-wired,. three-
pronged,.grounded.receptacle.with.appropriate.electri-
cal.current.for.the.machine.
•. Choose.a.well-ventilated.site.
•. Set.the.Porta-Screen®.on.a.solid,.rigid,.level.floor.with.
adequate. space. available. for. installation,. operation,.
and.maintenance..
8.. When. you. have. placed. the. Porta-Screen®. in. its. operat-
ing.location,.and.each.time.you.move.it,.level.the.unit.by.
adjusting.the.three.leveling.legs..DO.NOT.affix.the.Porta-
Screen®.base.to.a.floor.or.other.surface.
•.
To extend a leg,
.place.your.foot.on.the.edge.of.the.pad.
and.lift.up.the.machine.above.the.leg.
•.
To contract a leg,
.push.the.leg.lock.tab,.which.extends.
from.the.case.above.each.footpad.
•. Use. the. bullseye. level. in. the. top. frame. crossbar. as. a.
guide.
.
After.you.have.placed.the.Porta-Screen®.into.service,.ob-
serve. the. distribution. of. sample. material. in. the. trays. at.
the.end.of.a.test..If.the.material.is.not.evenly.distributed,.
re-level.the.machine.
9.. Reinstall. the. trays. in. the. Porta-Screen®.. Leave. them. un-
clamped.
10.. Do. not. plug. in. the. Porta-Screen®. until. you. are. ready. to.
use.it.
VIDEO TUTORIALS AVAILABLE AT
GLOBALGILSON.COM FOR PORTA-SCREEN
®
MAINTENANCE AND REPAIR.


