background image

14

single channel models

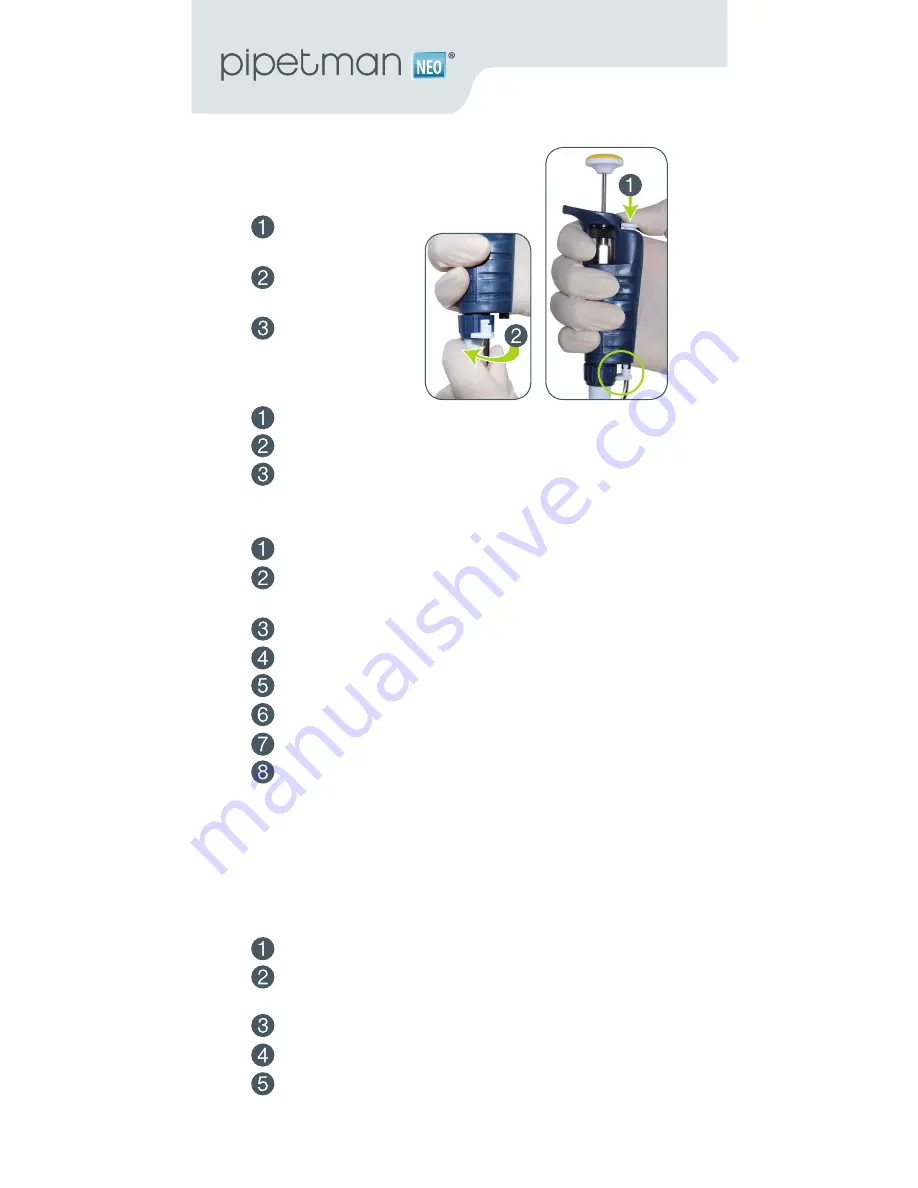
changing the Tip-ejector, to remove

Push the ejection 

button.
Push laterally the 

tip-ejector.
Slide and remove 

the tip-ejector.

To refit

Push the ejection button.
Slide the tip-ejector along the tip-holder.
Clip the tip-ejector on the body of the pipette.

changing the Tip-holder – no tools required

Remove the tip-ejector (see above).
Unscrew the connecting nut by turning it counter-

clockwise.
Carefully separate the lower and upper parts.
Remove the piston assembly, O-ring and seal.
Clean, autoclave, or replace the tip-holder.
Reassemble the pipette (refer to the figure, p 15).
Tighten the connecting nut (turn clockwise).
Refit the tip-ejector (see above).

Servicing the Piston Assembly


you may remove the piston assembly for cleaning pur-

poses only. If the piston assembly is changed, the pipette 

must be adjusted and calibrated in a Gilson authorized 

Service Center.

Remove the tip-ejector (see above).
Unscrew the connecting nut by turning it counter-

clockwise.
Carefully separate the lower and upper parts.
Remove the piston assembly, O-ring and seal.
Clean and decontaminate the piston assembly.

Summary of Contents for PIPETMAN Neo 12x20

Page 1: ...ThePipettingComfortwithImprovedComfort IMPORTANT NOTICE Do not lubricate this pipette The use of lubricant cancels the warranty of this pipette...

Page 2: ...robustness accuracy and precision of Pipetman Classic Six single channel models cover a volume range from 0 2 L to 1000 L Two8andtwo12multichannelmodelscoveravolume range from 2 L to 200 L Contents P...

Page 3: ...Safety bag Certi cate of conformity including bar code sticker 3 Description Please refer to the following chapters for a full description of the different parts and functions of the pipette Color co...

Page 4: ...N Diamond tips Tip holders Tip ejector Ejector spacer Cover Ejector support Ejector clip Ejector lock Model Color of volumeter numbers Black Red Increment P2N L 0 01 L 0 002 L P10N to P20N L 0 1 L 0 0...

Page 5: ...ecreasetoreach the volume making sure not to overshoot the mark 5 Pipetting Foroptimumperformance useofPIPETMANDIAMOND TipswithyourPIPETMANNeoisstronglyrecommended These Tips made from pure polypropyl...

Page 6: ...DIAMOND Tips are best tted from the pat ented Rocky Rack available only in our Tipacks and Tower packs Rocky Rack is the dome shaped part of the pack that containsthetips Rocky Rack makesiteasytosecu...

Page 7: ...e inside wall of the tip pre rinse the tip to minimize any errors that may be related to this phenomenon Pre rinsingconsistsofaspiratingthefirstvolumeofliquid and then dispensing it back into the same...

Page 8: ...the pipette tip from the liquid You may wipe any droplets away from the outside of the tip usingamedicalwipe howeverifyoudosotakecare to avoid touching the tip s ori ce Dispense Place the end of the...

Page 9: ...tton slowly and smoothly never turn the pipette upside down neverlaythepipetteonitssidewhenthereisliquid in the tip If you use the same tip with a higher volume pre rinse the tip For volatile solvents...

Page 10: ...g back into the pipette store the pipette vertically To identify or personalize your pipette Coloris clips are available WithTheJIMMY handsfreemicrotubeopener you canopenbothsnap capandscrew capmicrot...

Page 11: ...Service Center ensure that it is completely free of chemical biological or radioactive contamination Refer to Chapter 12 Cleaning and Decontamination Please use the included safetybagtoreturnthepipet...

Page 12: ...pacerisdamaged Replacetheejectorspacer Thetip ejectorisloose Assemblethetip ejectorproperly Theejectorlockismisaligned Aligntheejectorlock 10 LEAK TEST This test may be performed at any time to check...

Page 13: ...toclavingthepartsspeci edunderChapter12 Cleaning and Decontamination or to replacing the push button connecting nut tip ejector tip holder seal and O ring Pipetman Neo P2N and P10N should not be disa...

Page 14: ...er parts Remove the piston assembly O ring and seal Clean autoclave or replace the tip holder Reassemble the pipette refer to the gure p 15 Tighten the connecting nut turn clockwise Re t the tip eject...

Page 15: ...15 Color coded push button Connecting nut Seal O ring Tip holder Tip ejector Piston assembly The piston assembly must not be autoclaved...

Page 16: ...turning it counter clockwise Carefully separate the lower and upper parts Remove the piston assembly O ring and seal Clean or replace the seal then the O ring Reassemblethepipette refertothe gure pag...

Page 17: ...ette with a soft cloth or lint free tissueimpregnatedwithsoapsolution toremoveall dirty marks If the pipette is very dirty a brush with soft plastic bristles may be used Wipetheentirepipetteandthetip...

Page 18: ...r lint free tissue impregnated with the cleaning solution Rinse the components with distilled water Wipe the entire pipette with a soft cloth or lint free tissue impregnated with the cleaning solution...

Page 19: ...tor button depressed Turn the ejector clip counter clockwise and separate it from the handle Unscrew the con necting nut turning counter clockwise Press push button to extract the head To autoclave Cl...

Page 20: ...and the plastics used in the construction of the pipette PA Polyamide PBT Polybutylene Terephtalate PC Polycarbonate PC PBT Polycarbonate Polybutylene Terephtalate POM Polyoxymethylene or PVDF Poly vi...

Page 21: ...e the parts to dry by evaporation or wipe them with a clean soft cloth or lint free tissue Re tthetip ejectorasdescribedinpage16 Chang ing the tip ejector 13 Specifications Pipetman Neo is a high qual...

Page 22: ...04 F144561 0 5 0 025 0 012 0 08 0 04 D10 DL10 Max 2 0 030 0 014 0 08 0 04 P10N Min 1 0 025 0 012 0 12 0 08 F144562 5 0 075 0 030 0 12 0 08 D10 DL10 Max 10 0 100 0 040 0 12 0 08 P20N Min 2 0 10 0 03 0...

Page 23: ...s Service Kit 1st level includes 3 piston seals 3 O rings 1 tip holder Service Kit 2nd level includes 1 push button 1 connecting nut 1 tip ejector fortheP2NandP10Nmodels only 1 tip ejector and 1 adapt...

Page 24: ...24 Tip ejector 8 channels Tip ejector 12 channels Ejector lock Ejector spacer 8 channels Ejector spacer 12 channels Multichannel models F3 F4 G H1 H2...

Page 25: ...iption P20N P100N C D E Service Kit 1st level F144495 F144496 A B F Service Kit 2nd level F161972 F161973 C D Seal O ring 5 sets F144863 F144864 P200N F144565 and P1000N F144566 Description P200N P100...

Page 26: ...ply with the requirements of the following European Directives Villiers le Bel July 2nd 2012 A El Sayed H Ledorze General Manager Quality Manager GILSON S A S 19 avenue des Entrepreneurs BP 145 95400...

Page 27: ...shall also be void in theeventpipettesarealteredormodifiedbyanypartyotherthan Gilson or its designates Gilson s sole liability under this warranty shallbelimitedto atGilson ssoleoption repairorreplace...

Page 28: ...d Gilson Inc World Headquarters 3000 Parmenter StreetIP O Box 620027IMiddleton WI 53562 0027 USA Tel 1 800 445 7661 or 1 608 836 1551 I Fax 1 608 831 4451 Gilson S A S 19 avenue des Entrepreneurs I BP...

Reviews: