Gilson Company, Inc.
Micro-Deval Apparatus: MD-2000, MD-2000C & MD-2000F
Page 8
8.1 Routine Cleaning:
The optical path from the encoder to the sensor decal on
the jar lid should be periodically inspected for excessive
dirt, wear or obstruction. These conditions may decrease
cycle count accuracy. The encoder and decal surfaces
can be cleaned with standard household cleaners.
The clear polycarbonate doors can be cleaned with soft
cloths, window cleaners and warm soapy water. Cleaners
with abrasives should not be used anywhere on the case,
doors, encoder or jar decals.
8.2 Chain Replacement:
- Replacement chain is WGMD-CHAIN SUBASSY
1. Unplug Unit.
2. Open top door.
NOTE: If struck, the metal lip of the top door can
cause personal injury and damage to the unit.
Please keep the lid closed whenever possible.
3. Open bottom door.
4. Remove the 4 Phillips screws holding the front panel
and lift off.
5. Remove the 4 Phillips screws holding the right mid-
dustshield panel inside the bottom jar chamber. Tilt
and remove.
6. Remove the 3 Phillips screws holding the right top-
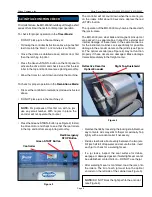
dustshield panel (see Figure 3). Tilt and remove. It
may be difficult to move past the lock fastener holding
the hinge. It may be necessary to remove the screw
in this fastener if it protrudes too far.
7. At this time, you should be able to see the chain from
the motor to the rear sprocket as well as the chain
from the rear sprocket to the top sprocket.
8. Find the master link in the chain. Remove the retaining
clip on the master link by spreading the legs apart and
sliding the clip off. The link may now be separated
and the chain can be removed.
8.3 Roller Replacement:
- Replacement idler roller is WGMD-ROLLER_IDLE
- Replacement sprocket roller is WGMD-ROLLER_GEAR
1. Follow steps 1 thru 7 above.
2. Repeat for the dust shield panels on the left side.
3. Open master link by spreading the legs apart and
pushing the retaining clip off. Remove chain from
sprockets.
4. Remove screws holding pillow blocks. To access the
top pillow blocks, you will need to remove the black
plastic hole plugs.
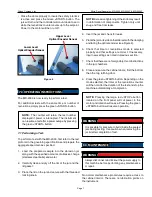
NOTE: One tab has been removed from these
plugs to accommodate the angled front.
5. Lift rollers out of unit.
6. Loosen setscrews on pillow blocks.
7. Note orientation of sprocket for replacement later.
8. Place hardware, pillow block, spacer, and sprocket/
sprocket on new roller. DO NOT tighten setscrews at
this time.
9. Position the rollers in the unit and tighten the
setscrews on the pillow blocks.
10. Reverse steps 1 thru 6 and test. You may notice some
rubber wearing off the edges of the new rollers as
they break in. This is normal and should stop as the
sharp edges are radiused.
9.0 ADDITIONAL INFORMATION:
Jar Revolution Speed: 100 ±5 rpm
Max Revolution Count: 32,762
Repeatability:
±0.5 revolution
Electrical:
MD-2000: 115V/60Hz, 15amp
MD-2000C: 115V/60Hz, 15amp
MD-2000F: 230V/50Hz, 8amp
Dimensions:
20x13x39.5in
(508x330x1,003mm), WxDxH
Net Weight:
144lb (65kg)
Est. Shipping Weight: 165lb (75kg)
Micro-Deval Apparatus, 115V/60Hz
MD-2000
115V/60Hz, Thermally Protected
MD-2000C
230V/50Hz
MD-2000F
Accessories
5L Jar with Locking Cover
HMA-920
Abrasive Charge
HMA-922
Description Model
MICRO-DEVAL APPARATUS

