9
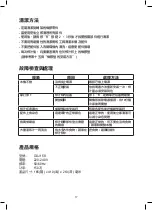
• Periodically clean the rubber parts of the spinning rack.
• Thoroughly clean all parts immediately after every use to maintain the performance of
the product.
• After operation, please press switch “R” for 2 - 3 seconds before disassembling and
cleaning.
• Do not use harsh chemicals or abrasives to clean the parts of the juicer.
• Never clean the parts in a dishwasher as
this will damage the parts.
• Rubber plug located in bottom of juicing jug need to clean properly after use. (Refer to
Page 7 “INSTALLATION OF RUBBER PLUG”)
CLEANING
PRODUCT SPECIFICATION
TROUbLESHOOTING GUIDE
Problem
Possible Cause
What To Do
No function of juicer.
Juicer is not plugged in. Check the j uicer is plugged in.
Incorrect assembly.
Re-assemble the j uicer as per
the instructions. Ensure the lid
is locked correctly.
The motor has stopped. There is a blockage in
the juicing jug.
Press the reverse button to
clear the blockage.
The motor has cut out
due to over-use.
Switch off, unplug and allow
to cool down for 10 minutes
before using again.
Leaking underneath
the j uicing j ug.
The rubber plug is not
correctly inserted.
Remove all parts and check
the position of the rubber plug.
Staining on parts.
This is the natural color
from j uice.
This is normal. To reduce
discolouration, ensure you
rinse and clean the appliance
immediately after use.
Squeaking noise when
j uicing.
Friction between the
squeezing screw and
juicing jug or food /
fruit.
The squeaking sound is
perfectly normal. Do not operate
the juicer without any ingredents.
Too much pulp coming
out with j uice.
There is excess
food / fruit in the juicing jug
clogging the strainer.
Cut food / fruit, especially
fibrous food into smaller
pieces.
Model No.:
GSJ15S
Voltage:
220-240V
Frequency:
50/60Hz
Power:
150W
Product dimension: 165(W) x 410(H) x 210(D) mm
Summary of Contents for gemini GSJ15S
Page 1: ...1 MODEL NO GSJ15S 150W SLOW JUICER A GILMAN GROUP BRAND...
Page 10: ...10 0 8 8 R 2 3...
Page 11: ...11 20 20...
Page 12: ...12 1a 1b 2 3 4 5 6 7 8 9 10 11 1b 1a 2 5 6 7 10 11 8 9 3 4...
Page 13: ...13 1 3 3 2 C...
Page 14: ...14 4 A B 5 A B...
Page 15: ...15 6 1 1 2 2 3 3 1 2 3...
Page 16: ...16 ON R R 2 3 2 2 ON O R ON 20 20...
Page 17: ...17 R 2 3 R 10 GSJ15S 220 240V 50 60Hz 150 165 x 410 x 210...
Page 18: ...18...
Page 19: ...19...
Page 20: ...20...


