background image

5

EN

EN

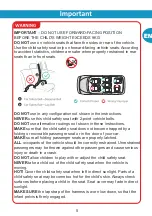
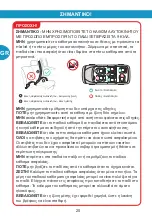
IMPORTANT 

– DO NOT USE FORWARD-FACING POSITION 

BEFORE THE CHILD'S WEIGHT EXCEEDS 9KG.

DO NOT

 use on vehicle seats that face the sides or rear of the vehicle. 

Use the child safety seat only on forward-facing vehicle seats. According
to accident statistics, children are safer when properly restrained in rear 
seats than in front seats.

DO NOT

 use in any configuration not shown in the instructions.

NEVER

 use this child safety seat with 2-point vehicle belts.

DO NOT

 use alternative routings not shown in these instructions.

MAKE

 sure that the child safety seat does not become trapped by a 

folding or moveable passenger seat or in the door of your car.

MAKE

 sure all folding passenger seats are properly latched.

ALL 

occupants of the vehicle should be correctly restrained. Unrestrained 

passengers may be thrown against other passengers and cause serious
injury or death in a crash.

DO NOT

 allow children to play with or adjust the child safety seat.

NEVER

 take a child out of the child safety seat when the vehicle is 

moving.

HOT!

 Cover the child safety seat when left in direct sunlight. Parts of a 

child safety seat may become too hot for the child's skin. Always check 
surfaces before placing a child in the seat. Seat cover may fade in direct
sunlight.

MAKE SURE

 the lap strap of the harness is worn low down, so that the 

infant pelvis is firmly engaged.

Summary of Contents for Bebe Stars LEVANTE 910

Page 1: ...LEVANTE 910 ISOFIX Group 0 123 Suitable for 0 36kg ...

Page 2: ...consult either the child restraint manufacturer or the retailer Only suitable if the approved vehicles are fitted with 3 point safety belts approved according to UN ECE Regulation n 16 or other equivalent standards CHILD SAFETY SEAT WITH ISOFIX Group 0 1 This is ISOFIX child safety seat It is approved according to the Regulation ECE44 04 series of amendments used for the car equipped with ISOFIX 2 ...

Page 3: ...3 EN EN ...

Page 4: ...d in this manual DO NOT use a child safety seat with damaged or missing parts DO NOT use damaged or frayed harness straps or vehicle belt NEVER use this child safety seat without the car seat cover DO NOT replace the child seat cover or harness with any other than the ones we recommend as these parts are integral to the child safety seat s performance NEVER use this child restraint with any other ...

Page 5: ...ome trapped by a folding or moveable passenger seat or in the door of your car MAKE sure all folding passenger seats are properly latched ALL occupants of the vehicle should be correctly restrained Unrestrained passengers may be thrown against other passengers and cause serious injury or death in a crash DO NOT allow children to play with or adjust the child safety seat NEVER take a child out of t...

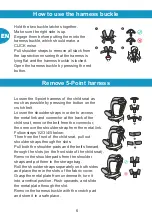
Page 6: ...and connector at the back of the child seat remove the belt from the connector then remove the shoulder strap from the metal link Follow steps 1 2 3 4 5 below Then from the front of the child seat pull out shoulder straps through the slots Pull both the shoulder pads and the belts forward through the slots on the front side of the child seat Remove the shoulder pads from the shoulder straps and pu...

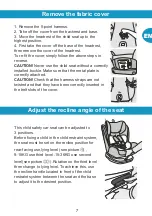
Page 7: ...hat the harness straps are not twisted and that they have been correctly inserted in the belt slots of the cover This child safety car seat can be adjusted to 3 positions Before fixing a child in the child restraint system the seat must be set on the recline position for rear facing use lying level see picture 9 18KG use third level 15 36KG use second level see picture Rotation on the third level t...

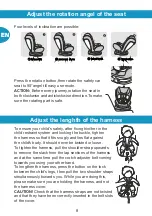
Page 8: ...he button on the lock between the child s legs then pull the two shoulder straps simultaneously towards you While you are doing this please make sure you are holding the harness and not the harness cover CAUTION Check that the harness straps are not twisted and that they have been correctly inserted in the belt slots of the cover Four levels of inclination are possible Press the rotation button th...

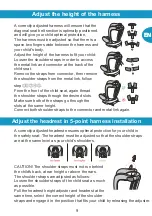
Page 9: ...traps through the desired slots Make sure both of the straps go through the slots at the same height Connect both shoulder straps to the connector and metal link again Adjust the headrest in 5 point harness installation A correctly adjusted headrest ensures optimal protection for your child in the safety seat The headrest must be adjusted so that the shoulder straps are at the same level as your c...

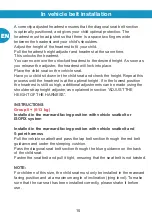
Page 10: ... position the headrest is still too high additional adjustments can be made using the shoulder strap height adjuster as explained in section ADJUST THE HEIGHT OF THE HARNESS INSTRUCTIONS Group 0 0 13 kg Installed in the rearward facing position with vehicle seatbelt or ISOFIX system Installed in the rearward facing position with vehicle seatbelt and 5 point harness Pull the vehicle seatbelt and pa...

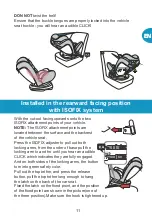
Page 11: ...t both locking arms from the under of base pull the locking arm to and fro until you hear an audible CLICK which indicates they are fully engaged And on both sides of the locking arms the button turn into green safety color Pull out the top tether and press the release button pull the top tether long enough to hang the latch on the back of the car seat Fixed the latch on the fixed point and the pos...

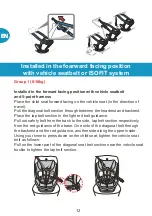
Page 12: ...ween the headrest and backrest Place the lap belt section in the light red belt guidance Pull out safety belt from the back to the side lap belt section respectively from the red guidance of the base One side of the diagonal belt through the backrest and the red guidance another side along the upper inside Using your knee to press down on the child seat tighten the vehicle seat belt as follows Pul...

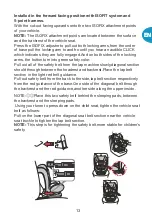
Page 13: ... belt from the lap machine slowly diagonal section should through between the headrest and backrest Place the lap belt section in the light red belt guidance Pull out safety belt from the back to the side lap belt section respectively from the red guidance of the base One side of the diagonal belt through the backrest and the red guidance another side along the upper inside NOTE Place this two saf...

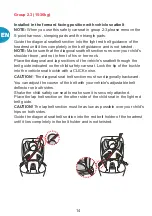
Page 14: ...of the vehicle s seatbelt through the belt guide indicated on the child safety car seat Lock the tip of the buckle into the vehicle seat buckle with a CLICK noise CAUTION The diagonal seat belt section must run diagonally backward You can adjust the course of the belt with your vehicle s adjustable belt deflector on both sides Shake the child safety car seat to make sure it is securely attached Pla...

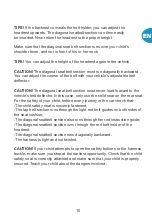
Page 15: ...hicle s belt deflector In this case only use the child seat on the rear seat For the safety of your child before every journey in the car check that The child safety seat is securely fastened The lap belt section runs through the light red belt guides on both sides of the seat cushion The diagonal seatbelt section also runs through the red instruction guide The diagonal seatbelt section runs throug...

Page 16: ...f the child seat Periodically inspect your child seat for worn or damaged parts If damaged parts are found replace the child seat Keep the child seat clean Do no lubricate any parts of the child seat The prolong the life of your nursery product keep it clean and do not leave it in direct sunlight for extended period of time Removable fabric covers and trims may be cleaned using warm water with a h...

Page 17: ...βουλευτείτε τον κατασκευαστή του καθίσματος αυτοκινήτου ή τον έμπορο λιανικής πώλησης Ενδείκνυται μόνο εάν τα εγκεκριμένα οχήματα είναι εφοδιασμένα με ζώνες ασφαλείας τριών σημείων που έχουν εγκριθεί σύμφωνα με τον κανονισμό UN ECE αριθ 16 ή άλλα ισοδύναμα πρότυπα Κάθισμα αυτοκινήτου με ISOFIX Group 0 1 Αυτό το κάθισμα ISOFIX για παιδιά εγκρίθηκε σύμφωνα με τον κανονισμό σειράς τροποποιήσεων ECE44...

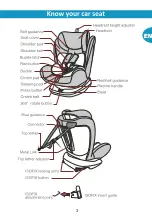
Page 18: ...καβάλου Εσωτερική επένδυση Κουμπί ρύθμισης Ιμάντας ρύθμισης ζώνης Κουμπί αναστροφής 360 Βάση Λαβή ανάκλισης Κόκκινος οδηγός ζώνης Μπλε οδηγός Σύνδεσμος Top Tether Μεταλλικός Σύνδεσμος Ρυθμιστής Top Tether Λαβές κλειδώματος ISOFIX Κουμπί ISOFIX Οδηγός εισαγωγής ISOFIX Σημείο σύνδεσης ISOFIX Προσκέφαλο Ρυθμιστής ύψους προσκέφαλου ...

Page 19: ...σιμοποιείτε ποτέ το κάθισμα αυτοκινήτου χωρίς το κάλυμμα ΜΗΝ αντικαθιστάτε το κάλυμμα του παιδικού καθίσματος ή τους ιμάντες με άλλα εκτός από τα εργοστασιακά καθώς αυτά τα εξαρτήματα αποτε λούν αναπόσπαστο κομμάτι της απόδοσης των παιδικών καθισμάτων ΠΟΤΕ μην χρησιμοποιείτε αυτό το σύστημα συγκράτησης για παιδιά με οποιαδήποτε άλλη βάση ΜΗΝ χρησιμοποιείτε παιδικό κάθισμα που υπέστη σύγκρουση Μια ...

Page 20: ...σόμενο ή κινητό κάθισμα συνοδηγού ή από την πόρτα του αυτοκινήτου σας ΒΕΒΑΙΩΘΕΙΤΕ ότι όλα τα πτυσσόμενα καθίσματα έχουν κλείσει σωστά ΌΛΟΙ οι επιβάτες του οχήματος θα πρέπει να είναι σωστά ασφαλισμένοι Οι επιβάτες που δεν έχουν ασφαλιστεί μπορούν να πέσουν εναντίον άλλων επιβατών και να προκαλέσουν σοβαρό τραυματισμό ή θάνατο σε περίπτωση σύγκρουσης ΜΗΝ επιτρέπετε στα παιδιά να παίζουν ή να ρυθμίζ...

Page 21: ...ς του καθίσματος αφαιρέστε την ζώνη από τον σύνδεσμο έπειτα αφαιρέστε τον ιμάντα από τον μεταλλικό σύνδεσμο Ακολουθήστε τα βήματα 1 2 3 4 5 παρακάτω Έπειτα από την μπροστά πλευρά του καθίσματος τραβήξτε τους ιμάντες ώμου και τα δύο μαξιλαράκια ώμου μέσα από τις εγκοπές Αφαιρέστε τα μαξιλαράκια ώμου από τις ζώνες ώμου και τοποθετήστε τα στην τσάντα αποθήκευσης Τυλίξτε τους ιμάντες ξεχωριστά και τοπ...

Page 22: ...έγξτε ότι οι ιμάντες δεν έχουν μπερδευτεί και είναι σωστά περασμένοι από τις εγκοπές του καλύμματος Αυτό το παιδικό κάθισμα μπορεί να ρυθμιστεί σε 3 θέσεις Πριν τοποθετήσετε το παιδί στο κάθισμα το κάθισμα πρέπει να είναι ρυθμισμένο στην ανάκλιση για χρήση από 0 13kg με πρόσωπο προς τα πίσω στην ξαπλωμένη θέση δείτε φωτο 4 9 18kg χρήση στο τρίτο επίπεδο 15 36kg χρήση στο δεύτερο επίπεδο εικόνες 2 ...

Page 23: ...ν πόρπη ανάμεσα στα πόδια του παιδιού και στη συνέχεια τραβήξτε τους δύο ιμάντες ώμου ταυτόχρονα προς το μέρος σας Ενώ το κάνετε αυτό βεβαιωθείτε ότι κρατάτε την ζώνη και όχι το κάλυμμα της ζώνης ΠΡΟΣΟΧΗ Βεβαιωθείτε ότι οι ιμάντες δεν είναι σφιχτοί και ότι έχουν εισαχθεί σωστά στις εγκοπές του καλύμματος 4 επίπεδα ανάκλισης είναι διαθέσιμα Πιέστε το κουμπί περιστροφής έπειτα περιστρέψτε το κάθισμα...

Page 24: ...τος περάστε πάλι τους ιμάντες ώμου στις επιθυμητές εγκοπές Βεβαιωθείτε ότι και οι δύο ιμάντες περνούν μέσα από τις εγκοπές στο ίδιο ύψος Συνδέστε ξανά τους ιμάντες ώμου στο σύνδεσμο και στη μεταλλική ζεύξη Ρύθμιση προσκέφαλου με ζώνη ασφαλείας 5 σημείων Ένα σωστά προσαρμοσμένο προσκέφαλο προσδίδει τη βέλτιστη προστασία του παιδιού σας στο κάθισμα ασφαλείας Το προσκέφαλο πρέπει να ρυθμι στεί έτσι ώ...

Page 25: ...ι το προσκέφαλο να βρίσκεται στο βέλτιστο ύψος Εάν στη χαμηλότερη θέση το προσκέφαλο είναι ακόμα πολύ ψηλό μπορείτε να κάνετε πρόσθετες ρυθμίσεις χρησιμοποιώντας το ρυθμιστή ύψους του ιμάντα ώμου όπως εξηγείται στην ενότητα ΡΥΘΜΙΣΤΕ ΤΟ ΥΨΟΣ ΤΩΝ ΖΩΝΩΝ Εγκατάστση με τη ζώνη αυτοκινήτου ΣΗΜΕΙΩΣΗ Για τα παιδιά αυτού του μεγέθους το παιδικό κάθισμα πρέπει να τοποθετείται μόνο σε θέση προς τα πίσω και σ...

Page 26: ...μένο Και στις δύο πλευρές των βραχιόνων ασφάλισης το κουμπί ασφάλισης γίνεται πράσινο Τραβήξτε έξω το επάνω ιμάντα και πατήστε το κουμπί απελευθέρωσης Τραβήξτε το επάνω μέρος για να κρεμάσετε το μάνταλο στο πίσω μέρος του καθίσματος αυτοκινήτου Στερεώστε το μάνδαλο στο σταθερό σημείο Η θέση του σταθερού σημείου εμφανίζεται στην εικόνα μία από τις τρεις θέσεις Βεβαιωθείτε ότι το άγκιστρο είναι σφιγ...

Page 27: ... τα εμπρός με την φορά οδήγησης Τραβήξτε την διαγώνια ζώνη ανάμεσα στο προσκέφαλο και την πλάτη και περάστε την ζώνη της μέσης μέσα στον κόκκινο οδηγό όπως δείχνουν οι εικόνες Χρησιμοποιήστε το γόνατό σας για να πιέσετε προς τα κάτω το παιδικό κάθισμα τραβώντας τις ζώνες για να σφίξουν όπως παρακάτω Τραβήξτε προς τα πάνω το χαμηλότερο σημείο της διαγώνιας ζώνης κοντά στην πόρπη για να σφίξετε την ...

Page 28: ... δύο πλευρές των βραχιόνων ασφάλισης το κουμπί ασφάλισης γίνεται πράσινο Τραβήξτε όλη την ζώνη της μέσης από τον μηχανισμό αργά η διαγώνια ζώνη θα πρέπει να περάσει ανάμεσα από το προσκέφαλο και την πλάτη Τοποθετήστε την ζώνη μέσης στον κόκκινο δρομέα ΠΡΟΣΟΧΗ 1 2 Τοποθετήστε αυτές τις δύο ζώνες ασφαλείας πίσω από το μαλακό μέρος ανάμεσα στην πλάτη καθίσματος και το μαλακό μέρος Χρησιμοποιήστε το γ...

Page 29: ...ην διαγώνια ζώνη και την ζώνη μέσης του καθίσματος μέσα στον οδηγό του παιδικού καθίσματος Ασφαλίστε την πόρπη μέχρι να ακουστεί ΚΛΙΚ ΠΡΟΣΟΧΗ Η διαγώνια ζώνη πρέπει να πηγαίνει διαγώνια προς τα πίσω Μπορείτε να ρυθμίσετε την πορεία του ιμάντα με τον ρυθμιζόμενο εκτροπέα ιμάντα του οχήματος και στις δύο πλευρές Κουνήστε το παιδικό κάθισμα για να σιγουρευτείτε ότι έχει δεθεί με ασφάλεια Τοποθετήστε ...

Page 30: ... τον εκτροπέα της ζώνης Σε αυτήν την περίπτωση χρησιμοποιήστε το παιδικό κάθισμα μόνο στο πίσω κάθισμα Για την ασφάλεια του παιδιού σας πριν από κάθε διαδρομή ελέγξτε Τις ζώνες ασφαλείας να είναι δεμένες Η διαγώνια ζώνη πρέπει να περνάει από τους κόκκινους δρομείς και από τις δύο πλευρές του καλύμματος Η διαγώνια ζώνη περνάει μέσα από τον κόκκινο δρομέα Η διαγώνια ζώνη περνάει μέσα από το κόκκινο ...

Page 31: ...ο παιδικό κάθισμα καθαρό Μην λιπαίνετε κανένα μέρος του παιδικού καθίσματος Να το διατηρείται καθαρό και μην αφήνετε σε άμεσο ηλιακό φως για μεγάλο χρονικό διάστημα Τα αφαιρούμενα καλύμματα και υφάσματα μπορούν να καθαριστούν με ζεστό νερό και ένα οικιακό σαπούνι ή ένα ήπιο απορρυπαντικό Αφήστε το να στεγνώσει πλήρως κατά προτίμηση μακριά από το άμεσο ηλιακό φως Καθαρισμός της πόρπης Τα τρόφιμα τα...

Page 32: ... our customer service department Αν αντιμετωπίζετε κάποιο πρόβλημα με το προϊόν ή χρειάζεστε βοήθεια παρακαλώ επικοινωνήστε με τον τοπικό αντιπρόσωπό μας ή με το τμήμα εξυπηρέτησης πελατών μας THANK YOU ΕΥΧΑΡΙΣΤΟΥΜΕ Customer service Εξυπηρέτηση πελατών Thank you for choosing Bebe Stars products Ευχαριστούμε για την προτίμηση σας στα παιδικά προϊόντα Bebe Stars ...

Reviews: