System Hardware Installation
- 30 -
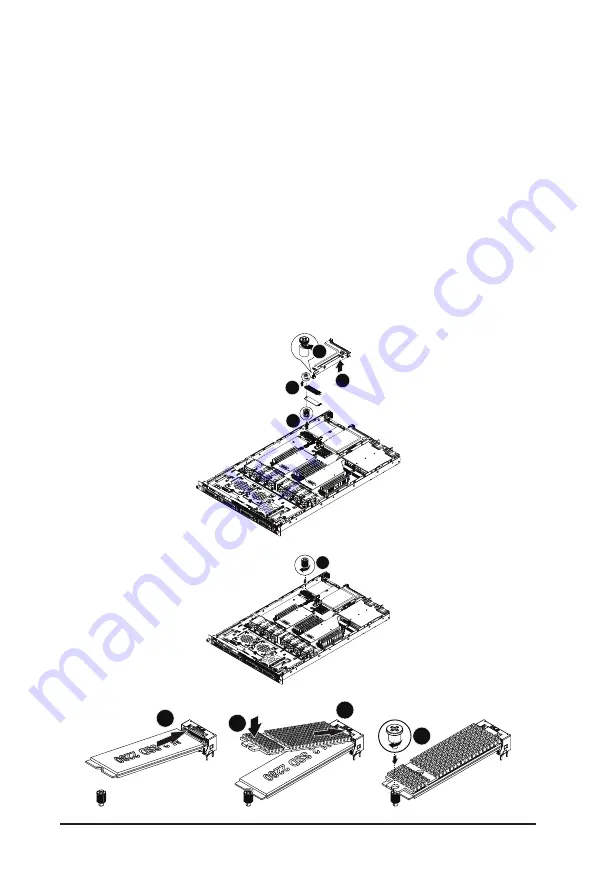
3-7 Installing and Removing an M.2 Solid State Drive
Follow these instructions to install an optional M.2 solid state drive (SSD):
1. Loosen and remove the thumbscrew on the riser bracket.
2. Lift up the screw securing the riser bracket.
3. Loosen and remove the thumbscrew on the M.2 heat sink.Remove the M.2 heat sink and warning
mylar.
4. Loosen and remove the stand-off.
5. Place the stnad off to the dedicated position.
NOTE:
The position of the screw will depend on the size of the SSD. Refer to the second image
below for proper placement.
6. Place the solid state drive into the M.2 connector.
7. Secure the solid state drive to the motherboard with a single screw.
NOTE:
The position of the screw will depend on the size of the SSD. Refer to the second image
below for proper placement.
8. Reverse steps 5-7 to remove the solid state drive.
1
2
3
4
5
6
8
7
9
Summary of Contents for LGA3647
Page 20: ...System Appearance 20 This page intentionally left blank ...
Page 25: ... 25 System Hardware Installation 1 4 3 2 5 6 ...
Page 34: ...System Hardware Installation 34 System Fan Cable On Board SATA to HDD Back Plane Board Cable ...
Page 58: ...BIOS Setup 58 5 2 11 Intel R I210 Gigabit Network Connection ...
Page 60: ...BIOS Setup 60 5 2 12 VLAN Configuration ...


