System Hardware Installation
- 24 -
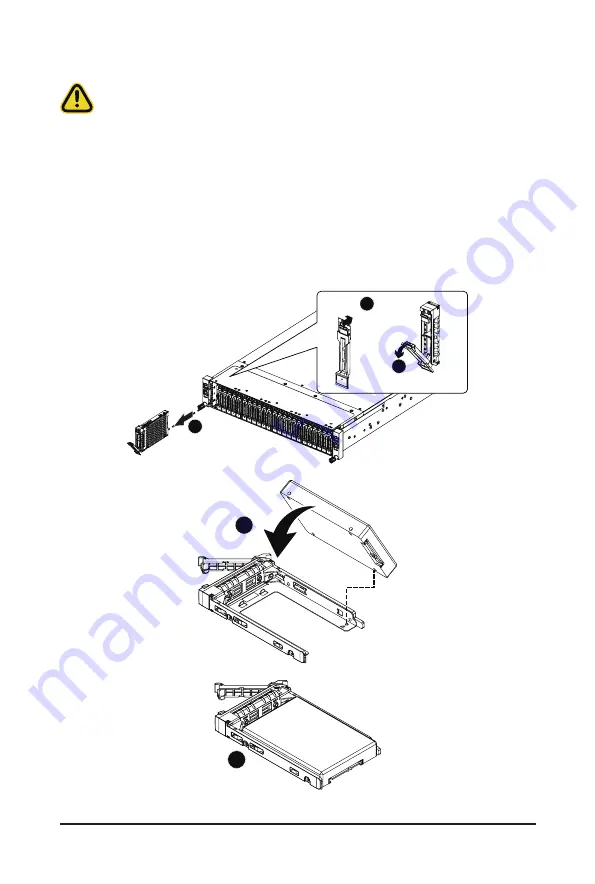
3-1 Installing the Hard Disk Drive
Read the following guidelines before you begin to install the Hard disk drive:
• Take note of the drive tray orientation before sliding it out.
• The tray will not fit back into the bay if inserted incorrectly.
• Make sure that the HDD is connected to the HDD connector on the backplane.
Follow these instructions to install the Hard disk drive:
1. Press down the colored release button.
2. Pull out the black locking lever.
3. Use the black locking lever to slide out the HDD tray.
4. Place one side of the HDD at a 45 degree angle into the tray, and align the guiding stand-offs in the
tray with the installation holes of the HDD.
5. Once aligned, push down the other side of the HDD and press it until it clicks.
1
Press
2
2
Pull
4
5
Summary of Contents for H262-Z6A
Page 1: ...H262 Z6A H262 Z6B HCI Server AMD DP 2U 4 Nodes Server Gen4 NVMe User Manual Rev 1 0 ...
Page 10: ... 10 This page intentionally left blank ...
Page 50: ...System Hardware Installation 48 LAN Bridge Cable On Board SATA to HDD Back Plane Board Cable ...
Page 55: ... 53 System Hardware Installation LAN Bridge Cable On Board SATA to HDD Back Plane Board Cable ...
Page 56: ...System Hardware Installation 54 This page intentionally left blank ...
Page 78: ...BIOS Setup 76 5 2 9 PCI Subsystem Settings ...
Page 89: ... 87 BIOS Setup 5 2 18 Intel R I350 Gigabit Network Connection ...
Page 91: ... 89 BIOS Setup 5 2 19 VLAN Configuration ...
Page 94: ...BIOS Setup 92 5 2 21 MAC IPv6 Network Configuration ...
Page 172: ... 170 BIOS Setup This page intentionally left blank ...


