Gigabyte 3D Cooler Pro Installation Manual Download Page 5

- 5 -

GH-PCU21-VG

English

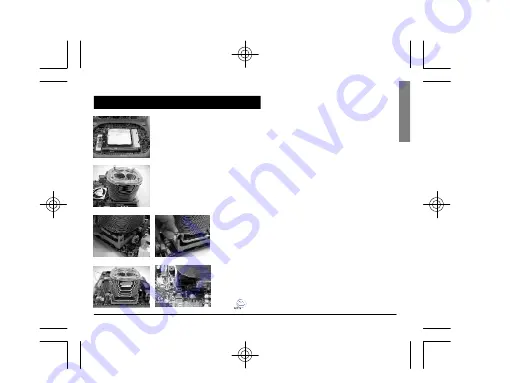
Installation Instructions for Intel Pentium 4 Clips

Figure  1
Please add an adequate layer of  heat sink paste on the surface
of the CPU.

Figure  2
Figure showing the correct installation of the cooler atop the
CPU.

Figure  3
Hook the clip on one end of the cooler with the insert space at
the CPU base (as seeing left Figure 3).Firmly push downwards
to clip the cooler end in place. Do the same for the other clip of
the cooler to secure cooler in place.

Figure  4
Connect the yellow 3-pin connector cable of the cooler to the
CPU fan connector located on the motherboard.
Clips Installation is now complete.

Figure  1

Figure  2

Figure  3

Figure  4

Note: Please refer to page 8 & 9  for power installation
and installation of  the fan speed controller.

Summary of Contents for 3D Cooler Pro

Page 1: ...Installation Guide for Intel Pentium 4 AMD Athlon XP Athlon 64 GH PCU21 VG ...

Page 2: ...llation InstructionsforIntel Pentium4Clips 5 Installation InstructionsforAMDAthlonXP Clip 6 InstallationInstructionsforAMDAthlon 64 Clip 7 Power Installation and 3 5 Fan Speed ControllerInstallation 8 Power Installation andPCI FanSpeed Controller Installation 9 ...

Page 3: ... manual 3 HeatSinkPaste 4 SpeedControl 3 5 frontpanel 5 PCIrear panel Before use please remove the bottom protective layer of the cooler Please makesure the computer is turned offand its power disconnected priorto installation 7 P4Clips 8 K7Clip 10 Screw 6 Powercable 9 K8Clip ...

Page 4: ...aring Type 2 BallBearing Unique patentforK8 K7 andP4 platform designs SmartIC controller fornoise and cooling Top and bottom doubleairflowinletcentral blower Attractive LED lights display Multi coolingofCPUandsurroundingcomponents Heatpipe design VRcontrolfunction suitable forboth 3 5 frontpaneland PCIrear panel Tool free and easyclip install ...

Page 5: ...fthe cooler with the insertspace at the CPU base as seeing leftFigure3 Firmlypushdownwards to clip the coolerend in place Do the same forthe otherclip of the coolertosecure coolerin place Figure 4 Connectthe yellow3 pin connectorcable ofthe coolerto the CPUfan connectorlocatedonthemotherboard Clips Installation is now complete Figure 1 Figure 2 Figure 3 Figure 4 Note Pleaserefer topage 8 9 for pow...

Page 6: ...PU Figure 3 Alignthe three spaces onthe coolerwith the three clipson the base ofthe CPUand thenpush firmlydownwards tolock the coolersecurely in place A flat headscrewdriver can also be used to securethe clips in place Figure 4 Connectthe yellow3 pin connectorwire ofthe coolerto the CPUfan connectorlocatedonthemotherboard Clip Installation is now complete Attention The indication arrow on thecoole...

Page 7: ...uts on the CPU socketand then push firmly downwardsto hold theclip in space Figure 4 Push the leveronthe side ofthecoolertowardsthe lever positionon thebase ofthe CPUtosecure thecooleratop the CPU Connectthe yellow3 pin connectorcable ofthe coolertothe CPUfan connectorlocatedon themotherboard Clip Installation is now complete Note Please refer to page 8 9 for power installationandinstallation of t...

Page 8: ...therend ofthe 4 pinconnectorcableto the PCB 4 pinconnectoron thecooler Figure 3 Securely holdthe 3 5 fan speed controllerbracketinplace with the screws provided Connectthe 3 pin connectorcable ofthe controllertothe PCB3 pinconnectoron thecooler Figure 4 Installation is complete Power Installation and 3 5 Fan Speed Controller Installation Figure 3 Figure 4 ...

Page 9: ...an speed controllerin the selected PCIslot Use screwsto secure the PCIrearpanelin place Figure 3 Connectthe powercable ofthe powersupply to the endofthe 4 pinconnectorcableprovided Thenconnectthe 3 pinpower connectoronthe fanspeedcontrollertothe 3 pinconnectoron thecooler Figure 4 Installation is complete Power Installation and PCI Fan Speed Controller Installation Figure 1 Figure 2 Figure 3 Figur...

Reviews: