background image

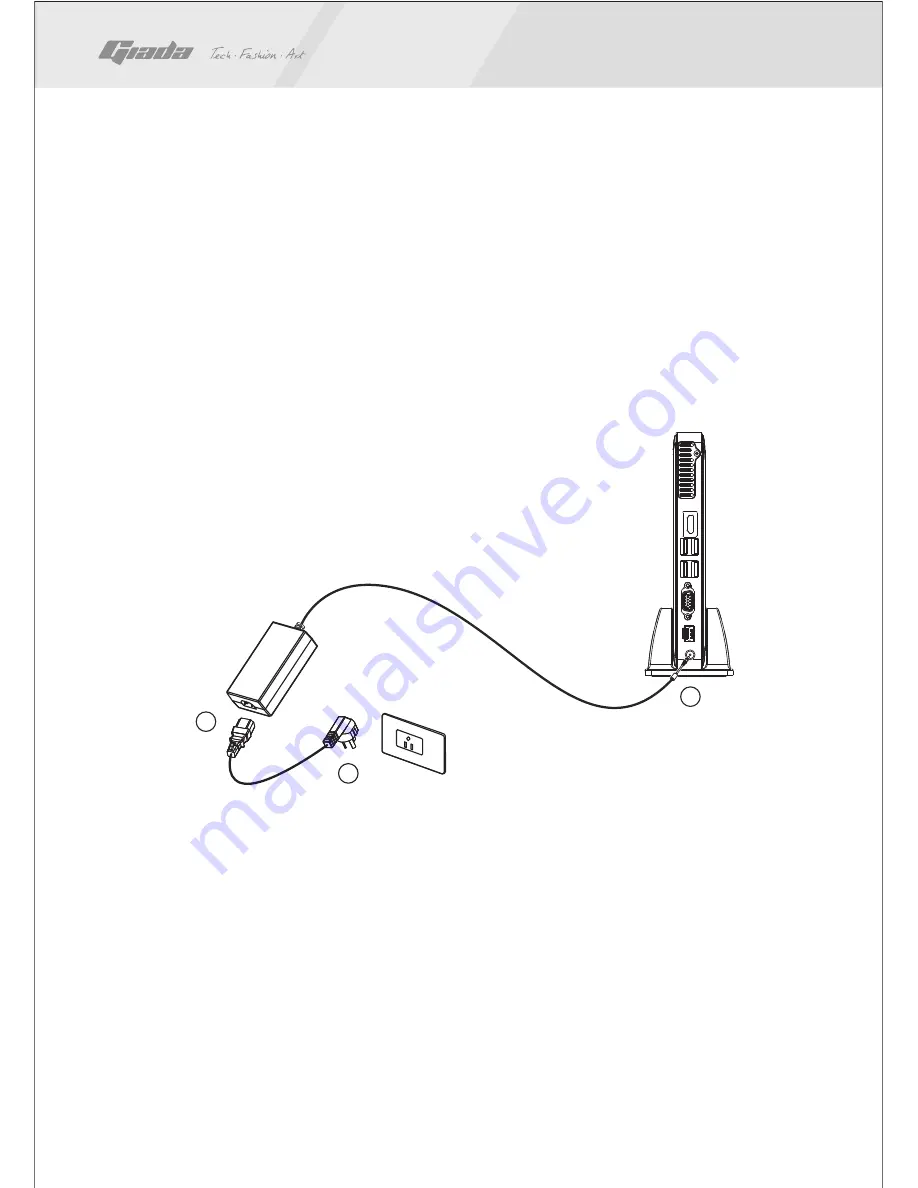
3. Connecting to the adapter

The power adapter of this product meets the related international standards, with 

input voltage 100V~240V. Please install it by following the steps:

Step 1: Take out the adapter and its power cord from the 

            package and connect them together properly.

Step 2: Connect the DC output terminal of the adapter 

            to power input port on the host.

Step 3: Insert the AC plug of the adapter into the 

            power receptacle.  

4. Startup 

The start-up button of your PC is mounted at the upper-middle part of the front 

side of the host. In the host’s running state, the indicator at the start-up button 

will illuminate in blue background light. 

As this product is light and small, you may fix the host with your forefinger or 

middle finger, and then use your thumb to press the start-up button. 

2

1

1

2

3

www.giadatech.com

11

Summary of Contents for N10U

Page 1: ...All rights reserved Giada N10U User s Manual Version 001...

Page 2: ...he adapter 4 Startup 5 Installing the operating system IV Equipment expansion 1 Card Reader 2 USB device 3 Audio device 4 Network device V Applications 1 Home Digital HD Theater 2 Office work entertai...

Page 3: ...office work and higher mobility when compared with traditional PCs Giada N10U will allow you to undergo new experience in the field This User s Manual would allow you better understand the device The...

Page 4: ...Corporation which were registered in the US other countries or other regions in the world NVIDIA ION Geforce Geforce CUDA PureVideo HD and PhysX are trademarks of USA s NVIDIA which were registered i...

Page 5: ...the anti sliding base is installed In lightning time do not plug or unplug the phone cable network cable power cord or other conductors connecting outside Unplug the power cord before you clean the d...

Page 6: ...ors occurred or the product s performance is obviously deteriorated please cut off power immediately and contact professional technicians 2 Accessories Your Giada N10 consists of the accessories in th...

Page 7: ...better understand the structure of the product 15 14 10 11 12 13 II About the product 9 8 7 6 5 4 3 1 2 Front view Top view Back view Side view 15 14 13 12 11 5 4 3 2 1 Side view Output for earphone U...

Page 8: ...ata interface VGA interface Lan interface Power interface Input for mic Output for earphone Card reader Left air inlet Right air inlet To start the PC To fix the PC for safety purposes To allow the he...

Page 9: ...iendly design lower power consumption which is only 1 3 of traditional PC less than that of ordinary power saving lamps improved laptop radiating technology and low noise Low power consumption and qui...

Page 10: ...eyboard and mouse to the USB interfaces at the back of the PC B Wireless keyboard mouse Before connection make sure your keyboard mouse is loaded with battery that can supply sufficient power Step 1 F...

Page 11: ...ace converter A Monitor with HDMI interface This product supports HD video and 7 1 channel audio signals by original HDMI digital interfaces You can connect the monitor and other devices compatible wi...

Page 12: ...al of the adapter to power input port on the host Step 3 Insert the AC plug of the adapter into the power receptacle 4 Startup The start up button of your PC is mounted at the upper middle part of the...

Page 13: ...n provide you the optimal performance of the system It is not recommended non advanced users modify the default setups If abnormity occurs due to the change of setup please restore the ex factory defa...

Page 14: ...ing the card Otherwise the memory card or the slot may be damaged Note SD MMC with the omitted angle facing the right MS MS PRO with the omitted angle facing the left Exit of memory card 1 Stop operat...

Page 15: ...the network To construct a LAN or other network please refer to following photo Note Before setting up the network please make sure you have properly installed the drive for the graphics card and wir...

Page 16: ...e product and a wireless router Start your wireless router and make proper configurations for it in accordance with the operating instructions or instructions from the carrier Start the WIFI wireless...

Page 17: ...g a home theater with which you can select speaker power amplifier audio decoding LCD display device projector and remote control equipment on the basis of your own needs With HDMI cable you can conne...

Page 18: ...se the PC for office work in your study you can select or buy from other sources the printer scanner digital camera digital vidicon USB game manipulator and so on This product only supports USB interf...

Page 19: ...large its memory capacity by adding external equipment Note Pay attention to the warranty clauses and do not open the host to change the hard disk 4 Mobile operation Because of the light weight you ca...

Page 20: ...tor and other external equipment It is recommended the attached adapter be used If the attached adapter can t be used under some special circumstances you must use a adapter with the same specificatio...

Page 21: ...n ultra light PC Never place the product at the edge of the table Otherwise it may fall on the ground and be damaged Always check the peripheral equipment and the connection cables to see whether they...

Page 22: ...make sure the new hardware was properly and reliably installed Check whether all signal cables are properly connected including cables between the keyboard and host and mouse and host 2 Host is automa...

Page 23: ...your system and the system has not been optimized for a long time it will also run slowly In this case you should run the optimization software programs for the disk or run the third party optimizatio...

Page 24: ...lled 13 PC can t recognize USB devices or USB devices can t run normally Check whether these devices are properly installed or the power is turned on or the latest version of the drive for the device...

Page 25: ...www giadatech com...

Reviews: