background image

10

9

www.giadatech.com

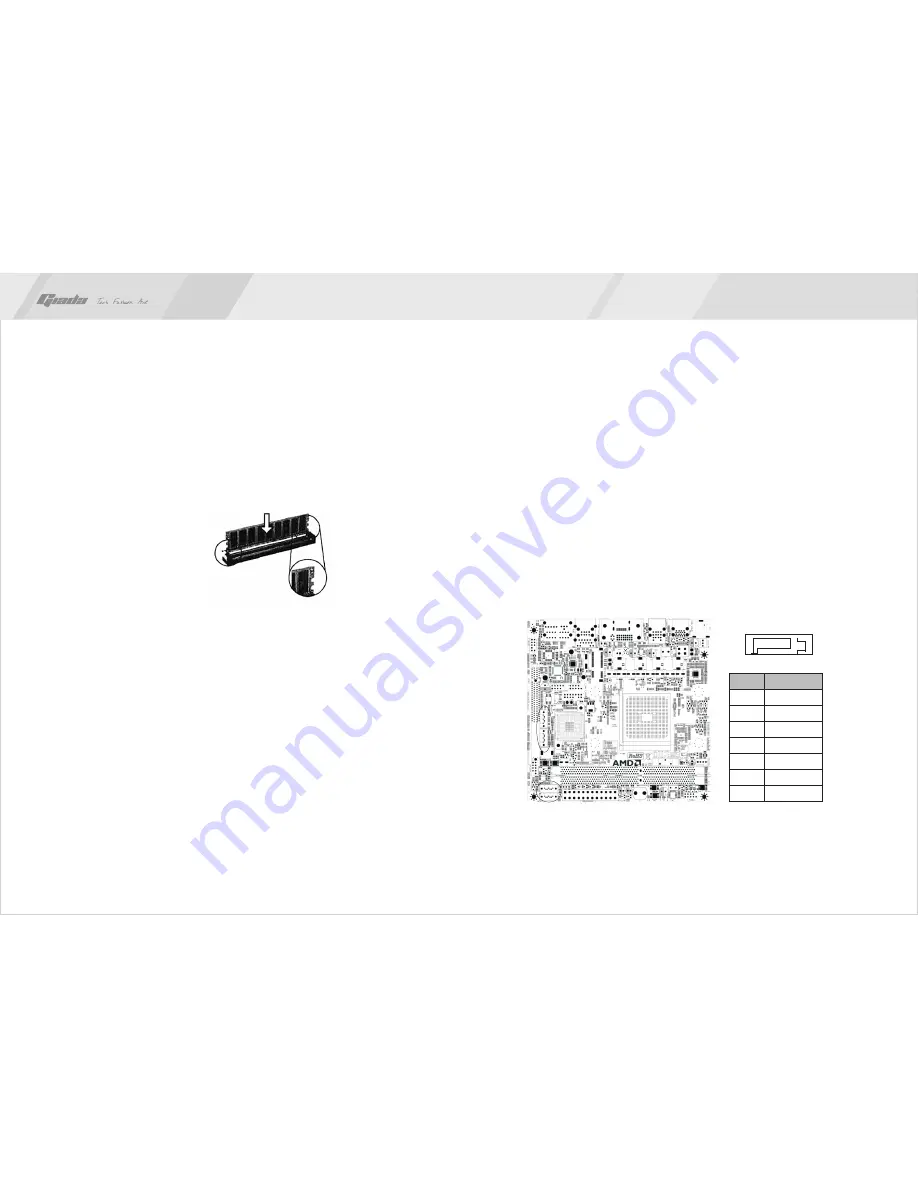
3. Installing memory

Please install the memory in accordance with the following procedures:

·

 Remove the buckle at the two ends of the interface slot for the memory;

·

 Align the golden finger of the memory to the groove of the interface slot and

    pay attention the concave hole of golden finger should be aligned to the 

    convex point of the slot. 

·

 Finally, insert the memory into the interface slot gently. If no error occurs at the 

    moment, insert the card forward in the slot till the white buckle is automatically 

    engaged in the concave hole at the two sides of the memory.

Note

In order to avoid damages to the motherboard or the components, the user must 

make sure the power supply to the computer is turned off before the memory or 

other component is installed or removed. As the groove is set at the golden finger 

of the DDR DIMM, the memory can only be inserted into the slot with one direction. 

During installation, the user only needs to align the golden finger and the 

dual-channel groove of the interface slot and insert it gently. To avoid damage, 

never apply excessive force in that process.

switch out the white buckle on 

both ends of the DIMM

4. Install expansion slot card

Installing Mini-PCIE extended devices

At the top side of motherboard there is a Mini-PCIE extended slots, which user 

can connected WIFI module and Bluetooth module etc.

5. Motherboard jumper setting

Note:

The user should notice that all sockets are marked with PIN1. The mark “#” 

indicates the default values.

5.1. SATA1/SATA2/ SATA3/ SATA4 (Serial ATA flat-cable sockets)

Serial ATA sockets can reach a transmission speed of 300MB/s, and you can 

connect your Serial ATA device to this socket.

7

1

PIN

Definition

1

2

3

4

5

6

7

GND

TXP

TXN

GND

RXN

RXP

GND

Summary of Contents for MI-A75

Page 1: ...this device must accept any interference received including interference that may cause undesired operation FCC ID YIKMIR880G This device complies with Part 15 of the FCC Rules Operation is subject t...

Page 2: ...Power receptacle 5 8 F_ PANEL Front end control panel 4 Rear panel interface 5 9 F_COM Front end COM port Contents III BIOS setting 1 Main menu 2 Main standard CMOS setup 3 Advanced Advanced BIOS setu...

Page 3: ...nel memory 4 SATA3 port 2 USB3 0 8 USB2 0 port on board 7 1 channels HD AUDIO sound card Supports S PDIF out ports on rear gigabit LAN and HDMI display output Any question about the product please sen...

Page 4: ...d consists of a great number of ICs and other components These ICs might be damaged by the static charge Therefore the user must make the following preparations before installation Turn off the power...

Page 5: ...otherwise may cause damage to the central processor After install the central processor please mount APU fan on the central processor and clip buckle in both sides of the socket When the APU fan has...

Page 6: ...installed or removed As the groove is set at the golden finger of the DDR DIMM the memory can only be inserted into the slot with one direction During installation the user only needs to align the gol...

Page 7: ...SIGNAL CTRL SYS PIN Definition 1 2 3 VSS VDD TAC 1 2 3 1 2 3 4 PIN Definition 1 2 2 3 Normal CLR_CMOS www giadatech com 1 2 3 5 3 CLR_CMOS CMOS pin The correct time system hardware and other informati...

Page 8: ...V USB D0 USB D0 GND NULL PIN 2 4 6 8 10 10 Definition 5V USB D1 USB D1 GND NULL 1 2 5 5 F_ AUDIO Pins for front end audio adapter These audio adapter ports allow you to connect to the wire harness of...

Page 9: ...ibed below when power supply with 20 pin outlet is used please make sure the numbers are matched correctly www giadatech com 1 PIN Definition 1 2 3 4 GND GND 12V 12V 5 6 ATX 20PIN Power receptacle Thi...

Page 10: ...n HDLED GND RST RST NULL DCD1 TXD1 GND RTS1 RI1 PIN PIN 1 3 5 7 9 1 3 5 7 9 5 8 F_ PANEL Front end control panel This socket is used to connect the flat cables on the front end panel NOTE HDLED HDLED...

Page 11: ...nchronous hardware Once all detections are completed BIOS will hand over the controlling to the operating system OS As BIOS serves as the only channel that connects the hardware and software whether y...

Page 12: ...he self detection process is completed you can press DEL to enter the BIOS interface if no error is found If the indicative information disappears before you can act you can shut off the computer and...

Page 13: ...as week month day year Fig 3 2 3 Advanced Advanced BIOS setup 3 1 CPU configuration K10 CPU overclocking configuration For K10 core frequency doubling adjustable CPU configuration Item Disable Enable...

Page 14: ...ild in serial port1 s COM 1 address Options are Disable 3F8 IRQ4 2F8 IRQ3 3E8 IRQ4 2E8 IRQ3 Auto Default 3F8 IRQ4 Serial Port2 Mode Normal mode for mouse and modem application If IrDA function is used...

Page 15: ...as been started It can be set on the basis of the needs of the user and doesn t affect the performance of the computer PS2 Mouse Support Set to support PS2 mouse The available options are Auto and Dis...

Page 16: ...u can set this item as Enabled The options are Disabled and Enabled Boot Device Priority To set the booting priority Hard Disk Drives To set the booting priority of hard disk devices Removable Drives...

Page 17: ...his item is used to enable or disable USB device support function When set to the default value Auto the system can be automatically detected whether USB devices exist when system is booting up and if...

Page 18: ...ress Enter all set values will be saved to CMOS SRAM and the system will exit from the BIOS setup program If you don t want to save you can press Cancel or Esc to return to the main menu Discard Chang...

Page 19: ...motherboard After you complete the installation of the operating system you should then install the driver for the motherboard To this end put the disk into the CD ROM The interface as shown in Fig 4...

Page 20: ...Install Sound card driver After you click Install behind the Realtek HD audio driver in the interface of 1 1 Installing driver for Chipset After you click Install behind the Chipset driver in the inte...

Page 21: ...in the Fig 4 5 Driver in the interface of Fig 4 2 complete the installation by following the indications in the popped up dialog boxes and then restart the computer 1 4 Installing driver for graphic...

Page 22: ...fault state of microphone is mute You need to turn it on manually as shown in Fig 4 7 and 4 8 After the driver for the audio adapter is stalled you can click the Audio Manager at the lower right corne...

Page 23: ...nput jacks as independent input devices Fig 4 10 Fig 4 11 www giadatech com Click OK and the controlling interface will turn to one shown in Fig 4 12 If a MIC is used please select the corresponding f...

Page 24: ...ght click the mouse at the corresponding output interface A dialog box will pop up as shown in Fig 4 13 Fig 4 13 www giadatech com Select Redistribution of Connectors Then an interface will pop up as...

Page 25: ...st this select the Disable mode turn off the motherboard integrated graphics output this model requires the use of external graphics output Select UMA mode Use only the motherboard integrated graphics...

Page 26: ...radio or television reception which can be determined by turning the equipment off and on the user is encouraged to try to correct the interference by one or more of the following measures Reorient o...

Reviews: